
It’s another week with a battery teardown! What do I have on my bench this week?
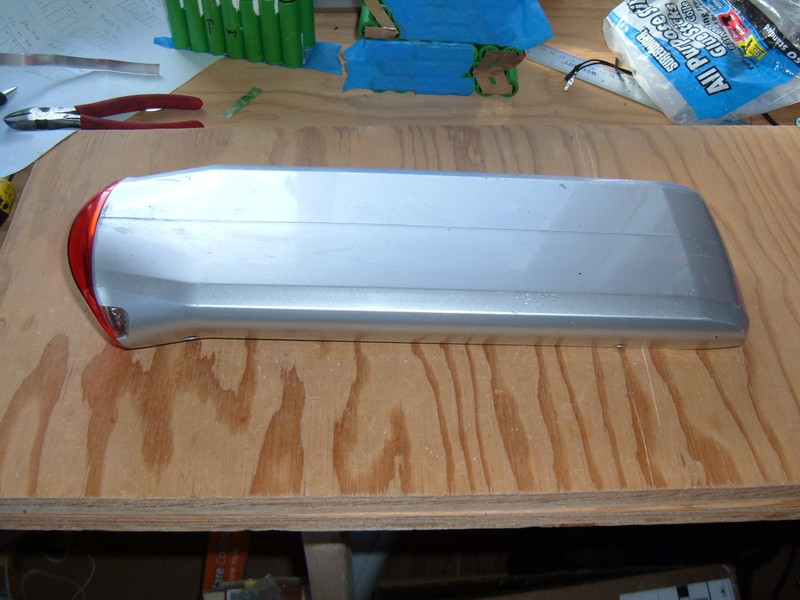
This is a Trek Transport+ battery (BionX powered). It’s reasonably similar to the Valencia Ride+ battery (torn down in two parts), but there’s no hump for the battery management board.
So what’s inside?

Well, in this one? A little house of horrors.
But you’ll want to read on, won’t you?
Exterior Features
Like the other Trek packs (and BionX rack packs), this has a nice rear light built in. It’s a LED/reflector combination that seems to work fine as a tail light - and runs from the main pack, so no separate battery to charge.
Sadly, this pack arrived stone dead, so I can’t get any pictures of the LED lit.

Bottom. The usual warning labels, the usual mounting points. Nothing exciting here. Time to open it up!

Opening the Pack
If you read my Trek Valencia Ride+ teardown, you’ll recall I offered some strong words about that damned black foam adhesive.
Guess what this pack is held together with!
I hate that stuff. It does not let go. It basically turns the pack into a monolithic unit, and is total nonsense. The Trek packs seem to be the only ones using it, fortunately.
If you do have one of these packs that’s glued together, one way to help get it apart is to carefully cut the black battery wrapper. Use a plastic tool, but the pack sides are glued to the wrapper, so if you can split the wrapper, you can get things apart.
I worked on this, I worked with prying tools, and after about 20 minutes of the application of totally absurd levels of force, the pack came apart.
Instead of the 4x 11-cell clusters the Ride+ pack has, the Transport+ pack has 3x 11-cell clusters.
And… that lower left cell. I know that discoloration. This is a dead, dead pack. Last time I saw that, I found some negative voltages on cells.

The Transport+ pack, per the battery label, is a 11S3P pack - so three cells in parallel for a group, 11 of those groups in series. It’s cute - 4.8Ah, not even 200Wh. Only 33 cells.

The Core Battery Pack
Well, that wasn’t any fun, but at least I have the battery out to play with and look into rebuilding.
This pack is built of the same cells all the old (pre-48V) BionX packs are built from - Sony US18650V cells. They’re 1600mAh LiMn cells, and have a nice self balancing behavior that means you can safely get away without per-cell-group balancing wires.

The pack is a folded pack, and is held together with some tape and some white hot glue.

Some of the cells are in bad shape, though. I couldn’t tell you why, but when the Sony cells go dead, they get this corrosion going. It’s under the plastic wrap, and I’ve seen it a few times now. No idea if they corrode through, or what exactly happens - and, no, I don’t have a strong desire to pull them apart to see. Maybe if I get really, really bored some day…

The other side of the pack has a bunch of tape covering what look to be the various interconnect wires.
Unlike the Ride+ pack, which has these along the side, the Transport+ battery has these along the flat surface. Why? No idea. Maybe it’s easier, maybe it’s a different battery builder.

With the tape off, the interconnects are visible. I’ve not actually seen this style of connector used on a BionX pack before. It’s very different. And there are more corroded cells in there. Yuck.

The ends are covered with the same black plastic used in most of their folded packs.

Pulling that plastic off, it feels like the same stuff used on the Ride+ pack - an utter pain to remove.
What’s really interesting, though, are the slits cut in the strip. I’ve never seen them all the way to the edge before on a BionX pack.

The connectors for the bridge wires have a diamond texture I’ve never seen before. My guess is that BionX used a different builder for this pack than their others.

The connecting strip thickness is 0.0065” - or right about 0.15mm. This is a standard thickness for their packs, and is a common thickness in general for nickel strip.

Eww…

Voltage Testing
The pack, as expected, is stone dead - around 2.3V across the whole pack.
Just out of curiosity, I tried to get the voltage across some of the regions - I expected to see something driven negative, but wasn’t sure how far negative it would be.
Well. Uh… -2.69V is a new record for me. That’s terrifyingly negative, and my first thought was that I’d measured wrong. So I checked again. No… pretty sure that’s correct.

If you fully discharge a cell and then keep pushing current through it, things will eventually go negative. It doesn’t hold a meaningful charge that way, and it’s certainly very damaging to the cell, but it does “work” for a limited value of work.
Well… now I’m curious about the others.
Unfolding the Pack
A bit of work later (mostly, desoldering the link wires and popping the glue joints) and the pack unfolds. This is why I referred to it as a “folded pack” - it’s a straight pack logically, but folded to fit the shape of the rear rack.

This is what it looks like lined up logically - the contacts next to each other get joined by the stretches of white wire. If the pack were built in a straight line like this, those would just be connected with nickel strip across the ends.

I hate this black plastic stuff - it’s basically impossible to remove cleanly. It makes a good insulator, though!
More corrosion. Yuck.
This is why you don’t screw around with a dead lithium pack and try to recharge it. You end up with stuff like this on the inside of the pack, and nothing good is going to come of charging it. Especially with those negative voltages.

Pack Layout
If, for some reason, you need the pack layout of this pack - here you go. I got most of the plastic removed, and you can squint and figure the layout under it.


Cell Group Voltages
What’s the full list of cell group voltages? Here you go!
7.5mV, 8.0mV, 6.8mV, -2.69V, 4.5mV, 3.49V, 5mV, 0V, 1.46V, 1.3mV, 0.2mV
This is what happens when you run current through a dead pack below the low voltage cutoff. It just gets messy.
Rebuild?
Well… I could rebuild it, but I’m not rebuilding this one. The BMS is quite dead, and I think the dead BMS killed the pack. It buzzes quietly with voltage applied, and doesn’t power on properly. So, sadly, until I develop my own replacement, there’s nothing I can do with this pack. Into storage it goes.
If I were to rebuild it, I’d go with the series-then-parallel layout that I used on the Ride+ rebuilds - it’s the same difference with these cells, and it’s easier to build.
Will I rebuild yours? Yes, if you split the pack yourself. I hate this black foam goop, and I’m not going to pull another one of these apart if I can help it.
Ride on!
Comments
Comments are handled on my Discourse forum - you'll need to create an account there to post comments.If you've found this post useful, insightful, or informative, why not support me on Ko-fi? And if you'd like to be notified of new posts (I post every two weeks), you can follow my blog via email! Of course, if you like RSS, I support that too.


)