
A rebrand of a knockoff Honda generator, obtained used, for cheap, has problems! I’m entirely unsurprised (unlike most of the rest of the country, right now). My fuel pump has started leaking, and my oil level switch sticks when cold. I’ve solved both issues, in two very different ways.
I have some thoughts on Trump winning that I’ll share at some point in the future once things have cooled down, but this week is something non-political, mechanical, and only slightly messy.

What exactly is my generator, why do I have it, and why did I go with this one?
I’ve covered this in some detail in a post on backup power for my solar powered office, but in short: This is backup power for my solar office - given sufficient clouds, my panels aren’t enough, and I do earn a living out there, so need reliable power.
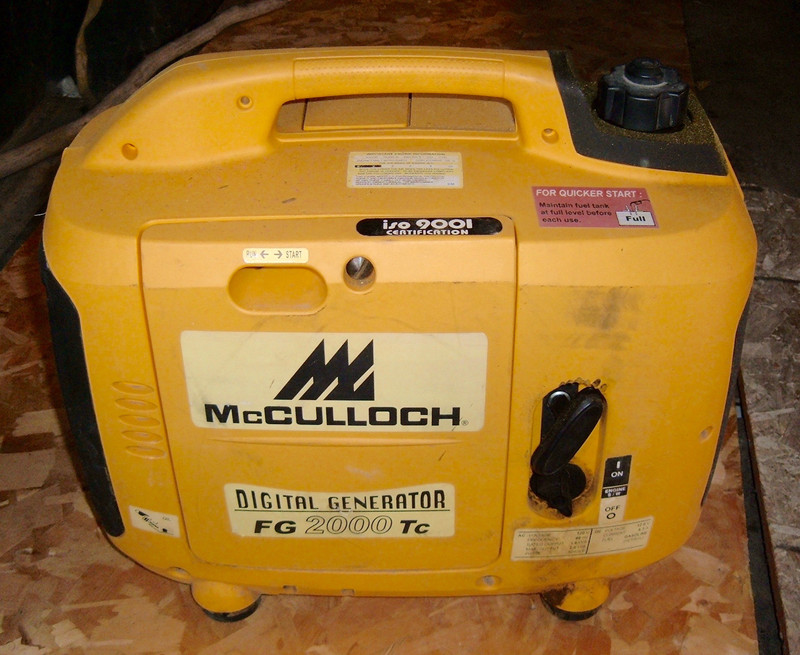
Of course, I don’t plan to use this much, so I got a cheap generator. This is a rebadged Kipor IG2000. A Kipor is a licensed clone of the Honda inverter generator (or a reverse engineered knock off, depending on who you listen to), sold for much less money, and generally regarded as somewhat crappier and less reliable. Given that I just bought a Ural, you can conclude that I’m probably OK with less reliable devices.
If you’re interested in pulling one of these apart to replace a leaking fuel filter, or you’ve got a problem with your oil level sensor, read on!
The Problems
The first problem I had involved the generator shutting down after starting - it would run for 10-15 seconds, then stop. I initially thought this was a problem with my battery charger drawing too much current, but eventually figured out that the “oil level” light was coming on when things shut down.
The second problem involved several weird behaviors all stemming from a single problem. The first issue I noticed is that if I filled the fuel tank, it would be emptier in a few days if I left the fuel shutoff on. The second issue was that if I was moving the generator, I’d see either wet spots under it, or sometimes a thin dribble of liquid. So, something clearly wasn’t right. My options were either oil or gas, and the oil level shutoff made me initially think it had an oil leak - but the oil was always full. So it took some head scratching to figure out, which I’ll describe later!
Bypassing the Low Oil Alarm
If your generator starts, runs for a few seconds, then shuts down, see if the the “Low Oil Alarm” light is glowing. If it is, the obvious first step is to check the oil level. If the oil level is good, you may have a faulty or sticky sensor. The alarm light may also glow dimly when pulling the starter cord.
The oil level sensor, sadly, is pretty well buried in the engine. I may pull it out for cleaning at some point, but for now, bypassing the sensor when the engine is cold works well enough.
There’s a wiring harness zip tied just inside the maintenance door. Remove the zip ties, then look for the two pin connector that’s an orange wire and a yellow/green wire. Check the oil level, then disconnect this connector. The engine won’t shut down from the oil level sensor now!
The sensor is open circuit normally, and closed circuit when the level is low - so just disconnecting the sensor solves the problem, at least if the problem you’re trying to solve is, “My generator is full of oil and won’t start because this sensor is acting up.”

There’s obviously a risk now that the engine will run out of oil and not shut down before destroying the insides (I’d normally say “the hard, expensive bits,” but the whole generator isn’t worth very much). I solve this by checking the oil before I start the engine, and the sensor, at least for me, behaves properly after the oil warms up - so I reconnect it after 10-15 minutes of running. Putting the side back on also quiets the generator down a remarkable amount for a simple hunk of plastic.
I’ll probably fix this properly at some point, but if you can’t get your generator to start, the low oil alarm light is lit, and you’ve checked the oil level - this should help you get things running.
Leaking Fuel Pump
The next problem took a bit longer to understand and hunt down.
I was losing fuel with the tank full and the engine switch on (it’s a combined fuel switch and ignition cut switch), but only some - the tank never fully emptied. The generator was leaking some sort of liquid, some of the time, that didn’t correspond with low oil levels. These both pointed to gas, so I went about figuring out what was going on.
Gravity makes leak troubleshooting tricky. I could see fuel dripping from the fuel valve, but that wasn’t the source. Eventually, I traced it down to the fuel pump. If the fuel level in the tank is above the fuel pump, it will leak down slowly.
I finally tracked the problem, with a full tank, to drips coming off the fuel pump. The fuel pump is mounted to the outside case of the generator, to the right through the maintenance door. It’s the white thing in the gap, and I could eventually see fuel dripping down from the bottom corner of it. Well, I’m no mechanical engineer, but I had this faint idea that, perhaps, fuel pumps should keep the fuel contained inside, and not drip it - especially when the engine isn’t running.
Solution? Replace the fuel pump.

Opening the Generator
To get at the fuel pump for replacement, one needs to open the generator.
The IG2000 Service Manual is great help here, though you could figure things out without it.
It’s pretty simple. Remove all the screws. There are three screws along the handle, two long ones along the bottom - and a bunch on the ends, plus a bonus hidden circlip.
As you go along, it’s a really good idea to keep the screws with the part they secure. The end screws aren’t quite the same, and it’s better to keep them sorted out.

The exhaust side of the generator has a plate held in with 4 screws - remove them and the plate. They’re just standard Phillips head screws.

The plate pulls off to expose the muffler.
I didn’t mention it before, but you shouldn’t be doing this with a hot generator. Obviously.

The fuel fill surround took a little bit to boggle out. On the handle side, there’s a rubber plug that doesn’t pull out easily.

However, the other side has a hidden secret! There’s a little circlip hidden in there! That needs to go - a small flathead screwdriver will pop it off easily.
Don’t worry about the rubber surround - it’s part of the fuel tank, and comes out when the sides separate.

The power side is held on with 6 screws - 4 on the end, and 2 in the sides. Remove them all. Yes, my generator is dirty. It lives outside.

The panel just flips down with plenty of wire to spare.

Splitting the Case
A term normally reserved for crankcases on horizontally opposed engines does apply here as well.
With all the screws and the circlip removed, the only thing holding the case together is friction with the rubber bushings - or at least, that should be the case. If it doesn’t pull apart reasonably smoothly, look for more screws.
You do not have to remove the feet to split the case - they’re just bolted into the plastic.
Start at whichever end seems easier and work across. It should be pretty simple.
When it starts to come apart, pay attention to where the assorted rubber bushings and mounts go - there are a lot of them, and it takes time to puzzle out where they came from if all you know is that one just went bouncing across the floor. The inverter is rubber mounted, the fuel tank is rubber mounted, and the engine is rubber mounted (though that, at least, has metal rods through the bushings, so they should stay in place).
You’ll still probably have to chase a rubber bushing across the floor and figure out where it came from, though.

The solid case side (right side in this picture) comes off easily, with nothing attached. The left side, with the maintenance opening? Don’t just yank it free. The starter rope connects, the fuel lines connect, there are some wires that connect… be careful with that side.
Fortunately, all the connections are at the fuel tank/inverter side, so you can swing it away from the engine easily enough. There’s plenty of slack to work with.

It’s a decent idea to run the generator fuel tank dry, or nearly so, before pulling things apart. Much neater. If the tank is nearly dry, you can close the fuel cap vent, flip the tank on its side, and pull the fuel line off the bottom without much fuel leaking.
You’ll notice that my generator does have a fuel filter in the bottom of the tank. Neat! You should still keep the strainer at the top in place.

Replacing the Leaking Fuel Pump
Here’s my problem: The fuel pump. This silly thing is leaking. Note that the lines under it are wet, and the line out to the right is dry.
Also, note the two vent holes on the back. The two wet vent holes on the back. It’s not shiny plastic - it’s wet plastic.
Two screws, three clips, three hoses, and the unit comes out entirely. At least it’s an easy fix!
The fuel routing is visible in the above picture and this one. The fuel from the tank goes out the bottom of the tank and into the fuel selector switch (at the bottom of the below picture). This switch controls fuel flow into the pump (the round white thing). Coming out of the pump, the fuel flows into the carburetor. Also feeding the pump (the right hand of the lower hoses) is a crankcase vacuum line to provide the pulses needed for the pump to work.

Here’s the old unit compared to the new one. The vacuum nozzle is at a different angle, but otherwise they’re the same thing. This is a Honda 16700-ZT3-013, easily found as an OEM unit or an aftermarket unit on eBay. I got the OEM unit, as clearly the cheaper alternatives fail eventually.

Presto! One replaced fuel pump. You don’t have to disconnect the wiring, and you don’t have to remove the pull start rope. There’s enough slack that you can get a screwdriver in easily.

Reassembling the Case
Now comes the hardest part: Putting the whole thing back together.
Several things to keep in mind as you go:
- Figure out where all the parts line up, and where all the rubber bushings go. Some of them are tricky unless you saw where they came from.
- Keep an eye on the fuel line routing - there are ways to put things back together that crimp the fuel line, which sort of defeats the purpose of the fix.
- The nut plates on the ends are prone to falling off - keep an eye on them and make sure they’re where they need to be.
- You’re unlikely to get an absolutely perfect fit on the case if the generator is a few years old.
I found it easiest to work with the generator on its side. The trickiest thing to get lined up is the engine - the two metal rods on the bottom need to line up into the corresponding parts of the case, and there’s a similar rod at the top that lines up in the handle.
The inverter and fuel tank also have to line up into the proper slots - they’re both rubber mounted.

Make sure you keep the fuel line unkinked, and don’t stress any wires in the process. They’re cheap.
Once everything is lined up, start putting the screws back in! ”Assembly is the reverse of disassembly.”
There’s no need for insane torque on the screws. Remember, it’s a knockoff Honda.
Vacuum Fuel Pump?
Here’s the pump, ready to be tossed. I was going to open it up and see what failed, but it’s glued together, and I had other things to do.

What is this thing, how does it work, and why was it leaking?
A vacuum fuel pump is a pretty simple gizmo. There’s a diaphram that moves with the pulses from the crankcase (as the piston moves, the crankcase volume changes, so the pressure changes), and a pair of check valves (also usually soft plastic flappers or something). This pumps fuel.
Mine was leaking. One of the diaphrams had a hole in it. And it made a mess. Simple, effective, and common enough.
It only leaked until the fuel tank level was below the vent holes, though. The reason this generator needs a fuel pump is that the fuel tank extends below the level of the carburetor - so the fuel has to be pumped up towards the bottom of the tank. However, when the tank is full, gravity suffices. This probably explains the label saying “The generator will be easier to start if the tank is full.”
Tools Used & Time Consumed
I’m pretty impressed here. I did this whole project with a mid-sized Phillips screwdriver, and a decent sized standard screwdriver. That’s it!

All told, it took me about an hour and a half, but I was in no hurry, there was someone else in the shop I was talking with, and I was taking plenty of pictures. This is a pretty straightforward repair.
And, so far, it’s working! The generator runs long past what the float bowl holds. The fuel tank is full and staying full, with no obvious dripping. I’m hoping the new pump might help with the fact that the generator is running very rich as well (if it’s putting more pressure into the carb than needed, the fuel level could be higher than desired).
My current plan is to see how long I can keep this cheap little generator running before I have to replace it. If we get an inversion layer this winter, it’ll be providing ~50% of my power needs for a month or so (hopefully only running about 2 hours in the afternoon every day).
Anyway. Cheap generator, cheap repair. If you find this useful, let me know below!
Comments
Comments are handled on my Discourse forum - you'll need to create an account there to post comments.If you've found this post useful, insightful, or informative, why not support me on Ko-fi? And if you'd like to be notified of new posts (I post every two weeks), you can follow my blog via email! Of course, if you like RSS, I support that too.


