
You know what you need? Cheap target stands for range days! You can build a pair of these stands for just over $50 in parts from your local Home Depot or Lowes.
I built this pair in just over an hour. Most importantly, they fit on my Ural!

If you find yourself needing some cheap target stands on short notice, read on!
Parts List (for 2)
- 3x 10’ 1.5” PVC pipe ($20)
- 8x 90 degree PVC bends ($12)
- 8x PVC “T”s ($18)
- 1x Pack of lath/furring strips/whatever they’re called (I had this laying around from other projects)
- 1x bottle of PVC cement (optional, and I also had this laying around)
- Saw, of some sort (also laying around)
The pile should look something like this when you’ve obtained everything.

Dimensional Overview
I picked dimensions based on what I was confident would be stable, fit on my Ural, and let me use some medium U-Haul boxes I had laying around for target backing.
This works out to a bit over 2’ wide, and a bit over 3’ long. It’s large enough to be stable, plenty wide enough for normal 24” wide target silhouettes, and fits over the back of my Ural - which, for me, is a pretty important feature. I like my range days on weird Russian bikes - it feels somehow more appropriate as a range vehicle.
I chose the pipe diameter based on some cheap wooden strips I have laying around. I used these, originally, for holding up ceiling insulation in my office, and I used them for marking my basalt path course as well. I have plenty laying around, they’re cheap, they take staples, and if they get shot up? Oh well! They’re deliberately easy to replace. Ideally, you can get the targets up high enough that people aren’t too likely to shoot up your actual stand. Any sort of thin wood will work fine - just make sure it fits in your pipes.
Cutting the Components
With the three 10’ PVC pipes, mark each one at the following distances: 2’, 4’, 5.5’, 7’, 8.5’
If you do this properly, you get two 2’ sections and four 1.5’ sections out of each pipe, with no waste.
I cut mine with a random reciprocating saw I had laying around from other projects, but even a hacksaw or PVC cutter works fine - and “close” is good enough here. If a cut is a bit slanted, or off by a quarter inch, it doesn’t matter in the end. I found a pallet I had laying around from a delivery worked really nicely for a cutting base.

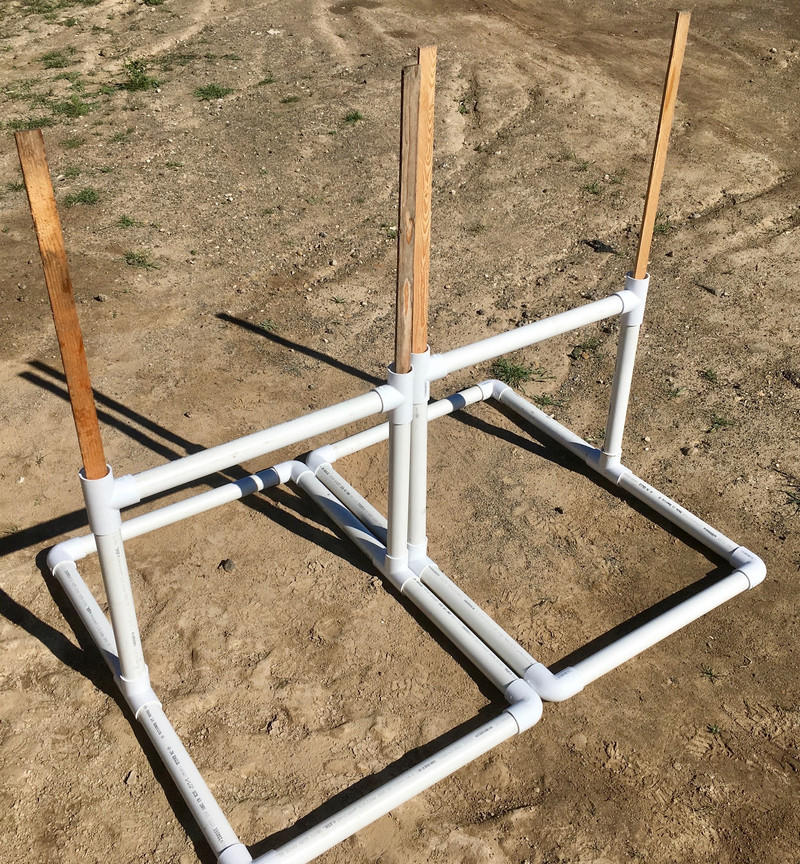
After you’ve finished cutting, you should end up with this - six 2’ lengths, and twelve 1.5’ lengths.

To Glue or Not to Glue
There’s a bit of debate about gluing or not gluing parts together when it comes to PVC target stands. Those who support gluing tend to operate under the (usually mistaken) belief that they can avoid hitting the stand - which is usually true, at least for a while (depending on your friends). Those who suggest not gluing tend to believe that they will be replacing parts fairly often - which, also, can be true. A lot of it comes down to how it’s being used - if you’re doing a lot of active moving while shooting, it’s much more likely to get shot up than if you’re using it to hold targets at 150 yards for precision rifle work.
I split the difference and glued the base together, but left the uprights and cross member unglued. Just hammer them together hard, and if they come loose, hammer them back together on whatever is handy. However, I don’t expect to take many rounds to the base - the point of those wooden uprights is to elevate the targets enough that misses will avoid the stand. If you mount your targets so that a 45 degree angle down and to the left from the center clears the PVC, you’ll hopefully avoid most flinched rounds out of a handgun.
There’s absolutely no reason to spend the time and money on PVC primer for this project, though - and, based on some tests a few people did, primer doesn’t make for stronger joints.

Assembly
It’s time to start slamming pieces together to make the target stands!
The first part to build are the base sides - two 1.5’ sections and a T. You can glue these or not, but I did. Regardless of glue or not, make sure they’re jammed together tightly. Slamming the assembled side down on a bit of concrete helps ram the pieces together and makes some pretty entertaining sounds in the process - you’ve basically created a Blue Man Group percussion instrument.

The uprights are next. I opted not to glue these together, since they’re more likely to get shot than the base is.

Finally, put the base together (with the 90 degree slip fittings and some more of the 1.5’ pipe segments), then pound the uprights and crossmember in! I chose not to glue these pieces together.

Finally, insert your uprights! If you want them up higher, you can toss a short piece of 1” PVC pipe in the bottom of the uprights, but this is fine for my needs.
To use them, just staple some scrap cardboard across (you can use another wooden slat to support it if winds require), then staple your targets on and have fun!
Ural Compatibility
I built these with the dimensions I used after taking a tape measure to my Ural - and, yes, they fit! I can tuck them over the spare tire and they stay more or less out of the way of the main cargo area. I can put plenty in the trunk under them, and the usual “metric ton and a half of stuff” in the sidecar.

Fully loaded for a range trip (handgun, shotgun, rifle, targets, plenty of ammo, target stands, target slats, cardboard), there’s still plenty of space left! I have everything one needs for a nice extended range day in here - and you can bet I’m the only Ural at the target range!

Have you built cheap target stands? How’d you do it? Or, if you have suggestions for these, feel free to let me know below!
Comments
Comments are handled on my Discourse forum - you'll need to create an account there to post comments.If you've found this post useful, insightful, or informative, why not support me on Ko-fi? And if you'd like to be notified of new posts (I post every two weeks), you can follow my blog via email! Of course, if you like RSS, I support that too.


