
Last week, I covered how to build a little MIDI to DMX converter to use with the Proclaim software for church multimedia. This week, I’m documenting how to actually use it in production by adding scenes to Proclaim, adding them to slides, and using the system.

There are two levels of “use” for this gizmo - programming new lighting scenes in Proclaim, and reprogramming the device to add new scenes/fixtures/etc. I’ll cover the first at the beginning, because this is the most common use case, but I’ll touch on the device programming as well at the end (since someone will have to set it up for your church).
Proclaim’s Lighting Interface: Setting Slide Signals
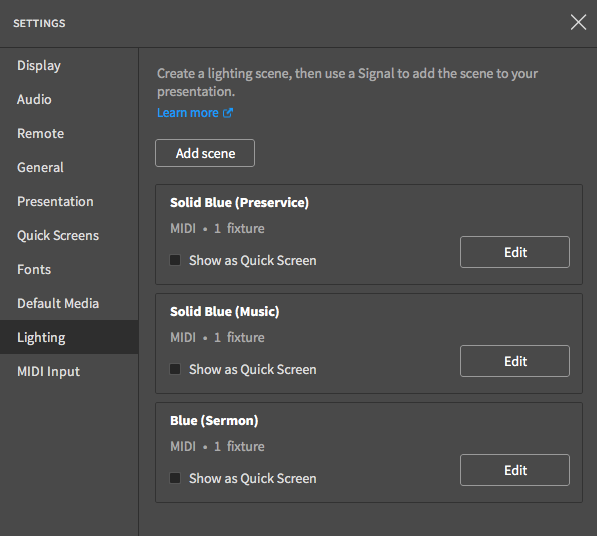
Proclaim’s lighting interface isn’t great, but it’s what they offer. And it does work - it’s just a bit cumbersome with large numbers of lighting scenes. There are a few different places one interacts with lighting in the software - the settings menu for configuring lighting scenes, and than the signals tab of each slide, for applying the scenes.
The most common interface one might use is setting the lighting scenes for each slide (or, rather, each slide you want to change lights for). This is likely to be things like the start of the sermon, the start of a song (to match lighting to the backgrounds), or on a movie slide (bring the lights down at the start of the film, bring them back up at the end).
All of this is done with the “Signals” tab at the top of the slide editor. Add a signal, select the lighting tab, and you’ll have a long (scrollable) list of the scenes. Pick the scene you want, and the controller will fade to that scene (with the configured settings) when the slide comes up. Slick!
It’s a good idea not to toss tons of lighting changes in the presentation, though. Have one for each time you need to change lights, and then check for them when you create a new presentation. Random lighting changes midway through a pre-service announcement loop is no good. We typically have someone scroll through the deck and sanity check lighting before the service starts, and since we’ve got a pre-service (for people doing childcare during the main service), weird lighting things usually show up there.
If slides get reused for announcements, you may not want a separate “preservice” lighting. It’s up to you and how you use the software.

Assuming the lighting is properly set up for your computer, this should just work!
Lighting Setup Basics
The previous step requires having lighting scenes set up, though. That’s the trickier part, because creating new scenes requires knowledge about what’s programmed in the device. This part can be done by the person who programs the device for your church, or it can be done by someone with access to the source code for whatever was set up for your church.
For the purposes of this explanation, we’re going to be using my source code, which is specific to our church (obviously). I’ve got it on Github: https://github.com/Syonyk/MIDI_to_DMX, and I’ll be referencing that throughout the rest of the examples.
One particularly annoying part about this process is that Proclaim doesn’t have cross-platform MIDI device matching. If you set the lighting scenes up on one machine, it’s unlikely to match on a different machine - even with the same adapter. This is true at least between OS X and Windows, so you’ll have to edit each scene on the actual presentation computer and select the proper device. For each scene. Proclaim could use a feature to “Set all lighting scenes to this MIDI device,” or do some better matching. Even though the device is named “Arduino Micro” on both machines (and is literally the same physical device), it can’t figure out that it’s the same lighting controller. I suppose this is useful to prevent using the wrong controller, but it is annoying that it has to be set per-scene.

In any case, to add a new scene, you’ll click the “Add scene” button, click “Add Control,” select “MIDI,” and then select the device - normally Arduino Micro, though you could change the name if you dug around deep enough. On Windows, you have to plug the MIDI device in before starting Proclaim, or it won’t detect it. On OS X, it shows up fine if you plug it in after starting Proclaim.

With that done, you can start adding MIDI notes to specify your scenes!
Modes of Operation: Scene, Fixture, Raw DMX
My device supports three different modes of operation, covering the spectrum from “Ease of use” to “Extreme Flexibility.”
The most straightforward mode is “Scene Mode.” These scenes are fully specified in scenes.h, so all you have to do is select the scene number you want to use and specify the fade time. Easy to use, but a bit limited - updating them requires reprogramming the device, which isn’t something that people likely want to do on a Sunday morning when you realize you have some new lighting configuration you want to create.
The next mode is “Fixture Mode.” This is specified in (surprisingly) fixtures.h. In this mode, the programmer specifies each fixture that is being used - both the type (white or RGB) and the DMX channels associated with it. By assembling commands for each fixture, you can create new scenes with nothing but the Proclaim interface on Sunday morning. I’ve used this a few times to create special scenes for movies or new color patterns that weren’t programmed as a scene. This is probably the most useful mode, because you can create new scenes, on the fly, without having to reflash the device.
Finally, for flexibility reasons, there’s “Raw DMX Mode” (which has no header file). It’s what it sounds like. Within some limits, you can set any DMX channel to any value. Helpful for troubleshooting, perhaps? I don’t think this is a particularly useful mode, and I’ve never used it in production, but it exists. If you have some sort of speciality lighting, this mode might be helpful (though you probably have a good light board already, if you have expensive lighting).
Example Lighting Setup
I’m going to refer to a few different lights below, and it might be helpful to understand exactly what I’m talking about. Our church has a fairly simple lighting setup, but it’s typical for what you might find at any small church.
We’ve got some RGB wash lights on the sides (blue in this picture) that shine up a backdrop. Then, we’ve got stage lights (green here) that shine across the stage. Not pictured, we have some light bars that occasionally go in the center of the stage and are a separate set of channels, but usually match the stage lights (unless they don’t).
For white fixtures, we’ve got two spots that shine on the stage in the back, and then the congregation lights - overhead lights that provide light for reading and note taking (the lights hanging on the string on the right).

I have a few different lighting concepts we use throughout the services. For the preservice (before anything has started), stage lights are dim, congregation lights are at 100%, and all the RGB lights are doing whatever they’ve been set to. It’s easy to find a seat, and the stage is de-emphasized.
For the worship (music) segment, the congregation lights are dimmed, the spots are up, and all the RGBs are up.
For the sermon, the wash lights (on the side) are still on, but the stage RGBs are off. The spots are up, and the congregation lights are also at 100%. We never run the spots at 100% - they max out at 75%, because otherwise they’re just too bright for the room. Also, their bulbs are expensive.
So, with that explained, here’s how you set up the various modes!
Scene Mode
Using Scene Mode is the easiest way to create scenes, because everything is already programmed into the device.
Simply add a new lighting scene in Proclaim, name it, add the Arduino as the MIDI device, and tap “Add note” to add the note that will select the scene.
- MIDI command is “note on” - this selects a scene.
- The “Note” field is the scene ID to select. You’ll get this data out of the scenes.h header file that’s programmed into your particular board.
- The “Velocity” field sets the fade time, in seconds. Zero will snap to the new scene, and three to five seconds is a good default to work with for fades. It’s smooth enough to look good, but doesn’t take all eternity to fade. You can pick over 2 minutes for fades, if you have some reason to do it.
- Channel is ignored here.
If you have lighting hooked up, you can use the “Preview” button at the bottom to send the current note and verify that the scene you want comes up. The “Preview” button is also a good way to select something sane if the lighting is in a weird state from last time you used the controller, since it recalls the last state and restores it.
Easy!

Fixture Mode
Setting up a scene with Fixture Mode is a bit more complicated, but it’s worth understanding, because this is, by far, the most flexible mode.
What you’ll need to know (from fixtures.h) is the number of the fixture for each fixture you’re setting, the color (or brightness) you want to set, and your desired fade time.
For our church setup, the following fixture numbers are in use:
- #1 are the side wash RGBs.
- #2 are the stage square RGBs.
- #3 are the center stage light bar RGBs.
- #4 controls the spots (single channel).
- #5 controls the overhead congregation lights (also single channel).
The channel selects the fixture (this implies a maximum fixture count of 16 - that’s unique DMX targets, not total physical fixtures), the note sets the color or the brightness, and velocity sets the fade time. The command type is “note off” - that specifies fixture mode.
For color, check the top of fixtures.h to get the color map.
For brightness (white lights), the brightness is scaled by a factor of two. Since MIDI only lets you send data bytes of 0-127, this is scaled internally to the DMX 0-255 range.
So, as a concrete example, I want to have red wash lights (color #1), blue stage lighting (for both sets of lights, color #8), the spots at 75% (96/127), and the overhead lights at 100%. Cross referencing against the data in fixtures.h, I end up with something that looks like this:

Set velocity to the target fade time on all the targets. You could set it only on the last one, and the device tries to read all the commands before executing, but it’s safer to set it on all of them in case there’s some glitch during the transmission.
Raw DMX Mode
Finally, the super flexible option: Raw DMX mode.
This mode uses the “control change” command code. The “Number” field specifies the DMX channel to use (1-127), “Value” is scaled to the DMX range (it’s doubled, except that 127 maps to DMX value 255), and channel is ignored.
However, unlike the other scenes, the fade time has to be explicitly specified at the end in order to set the scene and begin the transition. To end this command sequence and start the fade, send a control change to Number 0. This is not a valid DMX channel, so this is used as a flag to indicate that the fade should start (in this case, a 20 second fade). If you don’t send a control change to Number 0, the changes don’t apply.
Simple? Hopefully!

Programmer Considerations
The code is heavily commented - hopefully that should be sufficient to get a programmer started with configuring the device for your particular environment. If that doesn’t work, please get in touch with me - the contact form is over on the right, and I’m happy to help out. I’ve been buried in this code enough that it’s all obvious to me, and I expect it’s not as obvious to other people.
You’ll set your IDE up to interface with an Arduino Micro, and the code should compile and build. I’d suggest starting with a working build, and then modifying things. There are two extra libraries needed (the TinkerKit DmxMaster library, and the MIDIUSB library), but they’re easy enough to find and download (the code has the links).
Be aware of the “fixed channels” definitions. These set channels that shouldn’t change (some of our lights require a mode and grand master channel to be set properly), so you should clear these out if you don’t have the same lights I do.
It’s good to sit down with a list of scenes you’d like as regular configurations, and then you can use fixture mode to create new things on the fly.
Final Thoughts
As I said last week, we’ve been running our church lighting with this setup for a few months now. It works really well. Having someone sweep through the slides before the service and remove any weird lighting control signals is a good idea, since Proclaim is heavily based around copying slides from one week to another.
If someone at Faithlife would like to respond to an email or two I’ve sent, I do have a few suggestions to make this interface easier to use. The biggest one is having some way for me to set up a MIDI device on a Mac that can then be used, directly, on a PC (or with one small change). Adding new scenes is a bit annoying, because I have to then go select the proper device for every scene on Sunday morning. I also wouldn’t complain if the were willing to support this particular gizmo directly…
But, if you find yourself in need of a church lighting solution and you use Proclaim, give this a shot! I’m happy to help out as well with any issues found, though don’t expect a response on Sunday morning.
Let me know if you’re using this, and how I can improve things for you!
Comments
Comments are handled on my Discourse forum - you'll need to create an account there to post comments.If you've found this post useful, insightful, or informative, why not support me on Ko-fi? And if you'd like to be notified of new posts (I post every two weeks), you can follow my blog via email! Of course, if you like RSS, I support that too.


