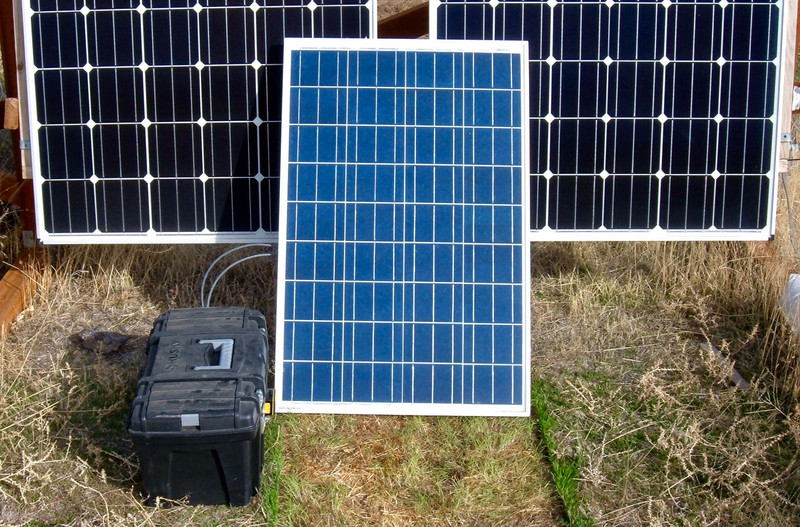

If you were living under a rock, you may have missed that there was an eclipse in 2017. And, predictions for traffic were that it would be awful. So, for a long duration camping trip, I decided to build myself a “Power Toolbox” out of some scrap batteries I had laying around, a few components, a solar panel, and an afternoon.
My goals: Charge phones & tablets, charge a Mavic Pro, provide limited 120V on demand, and charge off a solar panel. Did I succeed? Of course! And it didn’t even cost me that much! Now, that’s mostly because the battery packs I used are free scrap I had laying around… but, still. The point stands, this was not a particularly expensive build for what it offers me. For $300, I’ve made something that has a good amount of the capabilities of a much, much more expensive unit.

In addition to being useful for camping, this serves as a convenient way to carry power from my office to the house in the event of a longer term power outage. It probably won’t run my freezers (my little generator will), but it will certainly run some other hotel loads around the house, charge phones, and it can even run a my little under desk heater.
Anyway, interested in what went into this build? Read on!
Design Requirements
As stated above, my goals for this battery pack were as follows:
- Charge USB devices at a good rate (so not the default 0.5A).
- Charge Mavic Pro drones (ideally with the car charger).
- Provide at least a few hundred watts of 120V for charging laptops and the like.
- Charge from solar, with a reasonably portable solar panel.
- Have enough battery to be useful for long duration trips.
And, the goal that tied everything together: Use the pile of 10S lithium ion packs I have laying around as a power source. They’re a 37V nominal pack (42V fully charged, about 34V drained), and I have a lot of them laying around. These are old, worn out BionX battery packs, and this is what’s left after this toolbox build. I have a lot of battery capacity laying around. The capacity is down from new, but they’re still safe to use, and, well, they’re free to me.

Design Process
There’s a way to do a system like this that’s fairly cheap and fairly easy. Goal Zero makes a ton of money selling prebuilt systems like this. You start with a 12V lead acid battery, and go from there. Big 12V inverters are cheap, everything likes 12V directly off the battery, and you go from there with a heavy lead acid battery as the base. Or, if you’re buying one of the newer Goal Zero systems, they’re lithium - but those are very expensive.
Does that sound like how I go about things? Certainly not!
Heavy 12V lead acid batteries are, well, heavy. And I wanted a lot of useful power. I’ve got about 1kWh of lithium in here, which would require a very large lead acid battery. I originally designed this to run a peltier based cooler, which explains the rather comically large capacity, but it turns out that there’s a very good reason why people don’t do peltier based coolers much (I may post some research along those paths in the future), and I ran headfirst into the reality of thermoelectric cooling (which is that it’s a great way to burn a ton of power to slightly chill a small space). I learned a lot playing around, and I’m still stubborn enough to keep beating my head against it, though…
For my build, the whole system is designed around that 37V nominal pack voltage. This requires some weird parts, because almost nothing is designed to run on a 36V system. Off grid systems are typically either 12V, 24V, or 48V. The 36V systems are the oddity, and there’s just not much available for them.
However, for the Mavic Pro charger and USB devices, I made a very, very useful discovery: Lots of “car charger” systems work on a 24V system as well as a 12V system! Motor coaches (big busses) typically have a 24V electrical system, and a lot of stuff is built to work with them. The cheaper chargers won’t handle the higher voltage, but the Mavic Pro charger certainly does, and Anker makes a very nice little USB charger that does. This lets me push more power with fewer amps, which is useful. And, since it’s still below the pack voltage, a cheap buck converter can drop the voltage for me.
After doing some research, I settled on a few components that seemed like they’d work well together.
USB Power
For the USB power side of things, I selected an Anker iQ 3 port car charger. This works on a 24V system, and does the right thing for both iOS and Android devices in terms of fast charging (they detect the device and feed it lots of power, which is useful).

It’s important, with a device like this, to make sure that it can actually provide power to all the ports at once. For camping with a bunch of people, having everything slow down if a lot of devices are plugged in is no good. This device can provide power for all three ports at once - and a lot of it! Peak power per port is 12W, with a total device power of 36W (or 1.5A at 24V on the input side).

Drone Charging
The drone charging is easy - I’ve got a Mavic Pro car charger, as part of the Fly More Combo. This works on 24V systems as well, though it’s important to realize that it will not work on exactly 24V - it needs closer to 28V to function properly. This is to avoid draining the batteries in a car or coach - the charger only works with the engine running and the alternator putting out about 14V (or 28V). So, if you can’t get your Mavic Pro charger to work on 24V (or 12V), that’s why. Kick the voltage up a few volts to a running voltage, and you should be good to go. I’m not sure what the peak it tolerates is, but 28V is fine.
120V AC
I found a great little inverter on closeout sale for my 120V AC output. It’s a 400W unit that works on 36V, and is a pure sine wave unit, at that. Awesome. The cheaper inverters are all modified sine wave, which basically means, “Square wave with some time at zero volts in between.” The fancy ones are pure sine wave, and that works much better with a wider range of devices.
Fortunately for my wallet, I found one of the last of the old units (at a sweet discount). You can find a newer model for $200 - it’s a Bix Power unit, and it’s 500W instead of 400W, but that didn’t matter for me (so I paid half as much).
The 24V Outlets
Finally, the build! I started out with a Husky toolbox from my local Home Depot. The size seemed about right, and it had plenty of room to work with - plus, those fancy little compartments on top that are perfect for putting cigarette lighter plugs in (yes, I’m old enough that I call a 12V car accessory plug a “cigarette lighter,” and, yes, I know how they work, not that I’ve ever smoked a cigarette).
The primary goal here is that the core of the system (batteries, buck converters, inverter, etc) be easy(ish) to carry. It’s not the lightest thing I’ve ever built, but it’s portable without the solar panel by one person (it’s awkward, but you can carry the panel as well), and that matters to me.

After poking around with where I wanted things, the first step was to bore some holes in the top compartment for the 24V outlets. These are matched, rather nicely, to the outlet size, and the outlets just push right in. It’s a tight fit, which is perfect. Use a hole saw that matches your plugs.

Press the outlets in, and I’ve got a pair of badly mislabeled power outlets. These are not 12V (they’re about 28V), and they’re not 120W (the buck converters are rated at 15A Chinese, or about 7.5A in reliable reality, so about 210W per outlet). That’s more than enough to run my hardware.

A quick test fit shows that, yes, my cell phone charger fits, and that the lid closes over it (useful for keeping things tidy).

I can’t just hook these outlets up straight to the battery, though. The battery voltage, peaking out around 42V, well exceeds the limits for a 28V system. But, fortunately, buck converters (that drop voltage and raise amperage) are cheap, and I have a pair of 15A units laying around on a shelf! I wouldn’t trust them at 15A for long, but at the amperages I’m pulling (a few amps), they should be fine. A pair of my ever-trusty 3M trim tape holds each of them in place. I really, really do love this trim tape!

The two buck converters are mounted side by side under the lid, and feed the plugs directly. I’ve adjusted both of these to around 28V - the voltage stability isn’t perfect, but it’s more than good enough for my needs. In operation, I haven’t had any issues with them even getting warm - they’re not heavily loaded at all. They can run fairly warm with a good load on them, but you really shouldn’t get them anywhere near 15A if you want them to last.

The 120V Outlets
I’ve got an inverter for the box, but having to run power cords into the box for 120V is annoying - so I took a spare power strip I had laying around, filed a hole in the side, and I run the power outside if I need 120V charging. I sized the hole for my power strip cord, and the lid closes firmly on top without crushing the cord.

The inverter is a 400W unit, and it’s zip tied along the back of the toolbox. Remember, zip ties are classy duct tape!

The power strip plugs into the outlet on the top of the inverter (there’s a universal outlet on the side I ignore), and I’m good to go.
Normally, this is shut off - the idle draw is a few watts from the electronics, so I just flick it on if I need 120V. If I really felt like it, I could run a power switch extension outside, but it’s not a big deal to flip the box open and turn it on.
Despite being labeled as a 400W inverter, it will tolerate a good bit more wattage for a while. I can run a 650W heater on it, without complaint (though it trips off if I set the heater to a 1500W setting). Their newer 500W inverter is rated for a peak power of 1000W, so I’d guess peak power on this inverter is around 800W. Whatever it is, it’s plenty for my needs (though it’s not going to run a circular saw). The voltage is on the lower side of what I prefer (110V under load), but it’s acceptable. Ignore the frequency readout on my little gizmo - it’s wrong.

The Main Switch
The various bits and pieces do have some idle power draw, so I wanted a big switch to turn power entirely off. I’m a huge fan of mechanical power disconnects, because they get rid of all the idle draw and you’re left with battery self discharge. So, I’ve got a nice circuit breaker on the negative side (not that positive side or negative side really matters for a floating system like this - there’s no ground reference). This is hung outside, on the front of the box, so I can easily turn the system on and off. It would be a good idea to insulate the connectors with hot glue or something…
I’m not really using this as a circuit breaker. My box would be glowing (or on fire) with 2500W flowing through things, though I don’t doubt the packs could source that for a while. It’s just a breaker/disconnect I had laying around.

Finishing Up Inside: Batteries and Solar Charger
A good chunk of the remaining space inside is taken up with the batteries (three old scrap banks for around 800-1000Wh, depending on how you measure), and an annoying little boost charge controller I need to get around to reviewing (the MPT-7210A). Plus some wiring. It’s not the neatest wiring job, but this was an “afternoon” build for camping - and it spends most of the time closed anyway. The charge cables (that connect to the solar panel) sneak out a hole in the side, and the 120V power strip curls up nicely inside the box when not in use.

The various wires all join together on the inverter ring terminals, because this is convenient. Everything is switched before it hits the batteries (the circuit breaker is between the negative terminal here and the battery bank). This leads to an interesting mode of operation in which I can actually run directly from solar, if the power draw is low enough. The charge controller is touchy about this, but it’ll do it if I have a fairly constant draw (or a small enough draw). I could, say, charge a phone at 12W or so directly from a 100W solar panel with this setup, though any disruption to solar (like a bird flying over and sliding a shadow over the panel) will reset the charger.

So, that’s my power toolbox! I can hook up the solar panel to charge, or just carry the toolbox around for power without solar (nearly a kWh of power will last me a long while when camping).

I intend to do a longer review of the MingHe MPT-7210A charge controller at some point, but I’m fairly unimpressed with it. It is a little boost converter for charging high voltage battery banks off lower voltage solar panels. However, it’s not a MPPT (it does not track maximum power), and the behavior of the unit leads to very poor panel utilization. Any drop in power from the panel resets the charging, and the current slowly creeps up from 0A again. It’s not a good behavior for a charge controller, and it’s one MingHe unit I don’t particularly like. On top of that, the user interface is beyond obtuse to use.
Parts List
If you want to build something like this (I can’t imagine why you’d want to build a 37V based system, unless you had the spare packs), here’s what I ended up using and the rough cost. You could certainly go cheaper with a 12V system, but 900+Wh of lead acid is kind of heavy - and doesn’t like being deeply discharged. As always, I pick my stuff up on eBay if I can find it.
MPT 7210A Solar Charge Controller: $30
400W 36V Bix Power Pure Sine Wave Inverter: $110 (no longer for sale - the 500W unit is $200)
15A Buck Converters: $8/ea
Car Accessory 120W Outlets: $5/ea
Anker 36W 3 Outlet Charger: $20
100 Watt Solar Panel: $100
Toolbox: $25
I don’t count the wire or assorted connectors, but consider them another $10 or so - I just buy that stuff in bulk and have it laying around.
Total cost for a nearly 1kWh unit? A hair over $300. I had a lot of the stuff laying around for other reasons anyway (blog review and analysis), so my actual cost was a good bit lower as I didn’t actually have to buy most of the parts.
How it Works
Perfectly! I can carry an awful lot (900+Wh) of portable power around with me. The total toolbox weight is almost exactly 30lb (14kg), and it’s easily carried with one hand. I’ve got a 100W camping solar panel I charge with if I need, but for most trips, I don’t bother taking that with - there’s a lot of energy stored. And it’s a great use for some worn out batteries that I wouldn’t otherwise have a use for. I don’t see a reason to recycle them yet, but they’re worn enough to be annoying for tractive power storage.
Should You Build One Like This?
Well… no. You shouldn’t. Not around a 37V pack layout.
The overall concept is great, and doing this with a 12V or 24V system would be a great idea. But 37V? No. Not unless you happen to have enough free packs in that configuration that it’s worth the cost and hassle to make it work. I’ve kind of standardized on 37V packs for auxiliary power storage, simply because I have a lot of them (and a few very large 37V packs I need to get wired up in my office). For me, 10S is worth the hassle, but it’s probably not for you.
But, the point is, building something like this, for your own portable energy needs, is really quite easy. If you care about longevity and deep cycling, build it out of LiFePO4 cells (4S for 12V, 8S for 24V), and you’ve got something close enough to lead acid voltages to make things easy. For an infrequently used system, nothing wrong with lead acid, though if you’re using the standard UPS batteries and such, it’s pretty unwise to cycle them deeply. They don’t tolerate it well. Putting the electronics in a small toolbox and using a deep cycle marine battery is probably the better option.
I like my unit, though!
Book Review #2
I’m not doing a review of every single book I read, but this one was interesting enough (and relevant enough to our circumstances) that I think it’s worth reading. On the surface, it talks about survival. But, at the core, it talks, extensively, about human nature.
Deep Survival: Who Lives, Who Dies, and Why by Laurence Gonzales
On the surface, this book is about survival in wilderness situations - why some people live, some people die, and some people do insanely stupid things and then die (or get lucky and live). But, applying the lessons learned more broadly, there are some interesting parallels one can draw with the arc of nations and, specifically, the end of the US Empire.
One of the points made early in the book is that people have “emotional bookmarks” - “I do this, I feel some sensation I like, therefore I’ll do it again when circumstances allow.” Even if circumstances have changed, and that activity is a really bad idea. Say, riding snowmobiles up the side of an unstable hill in conditions you’ve been told are an avalanche risk. It felt good before, a few people did it again, and people died.
Many of the things that work on a nation’s rise through history stop working well on the way down - especially when those things were what created the problem in the first place. It’s hard to “grow your way out” of problems caused by growth. And it’s a far bet that we’ll see more and more politicians saying things along the lines of, “Well, sure, it didn’t work the last 15 times someone tried this thing, but it’s different now. It has to work!”
Another topic in the book is the state of being “lost.” What is it, how do we get in it, and why do people, when lost, do all sorts of crazy things? The author proposes that “lost” is the state in which we recognize that our mental map of reality no longer matches what we see - and we can no longer pretend that, maybe, the lake dried up, or the giant rock went missing, or the sun really did rise in the south today. As map making beings, we then generally proceed to panic and try to do something - anything - that will get us a useful mental map of the area again. We also tend to try and start with our model and assume the world behaves the same, which is rarely true.
And I expect we’ll see an awful lot of that sort of thing in the next decade as people try, and mostly fail, to apply existing mental maps to the new things happening. When they suddenly realize that their map no longer reflects reality, all sorts of interesting things happen, none of them particularly well thought out or useful. It requires a conscious effort to recognize that you’re lost, calm down, and take concrete steps to regain a useful mental map.
Finally, in the context of natural systems, the author talks about how adding energy to systems often is functionally invisible - until the whole system breaks apart in chaos. This is true of mountains (not only of snowpack, but also of rocks - a hunk of granite that has been climbed thousands of times is still part of a mountain that’s slowly coming apart, and they occasionally do collapse down on people), of systems of climbers roped together, and of human interactions and stress. We’re adding a lot of energy to a lot of natural systems, hoping they’ll not care - and, likely, they’ll continue looking like they don’t care until something massively breaks loose.
So, a good book on wilderness survival - but also a very useful way to think about times ahead.
Comments
Comments are handled on my Discourse forum - you'll need to create an account there to post comments.If you've found this post useful, insightful, or informative, why not support me on Ko-fi? And if you'd like to be notified of new posts (I post every two weeks), you can follow my blog via email! Of course, if you like RSS, I support that too.


