
Earlier this year, I posted about something I called “Pi3Desk” - making a Raspberry Pi 3 into a better desktop than it was. Lots of tweaks, kernel upgrades, a USB SSD… the works. And, shortly before I posted it, the Raspberry Pi 3B+ came out, and the Raspberry Pi foundation upgraded their reference kernel.
Over the past six months, I’ve continued pushing, crashing, fixing, and generally thrashing my Raspberry Pis into the ground as desktops - and I’ve made things even better!

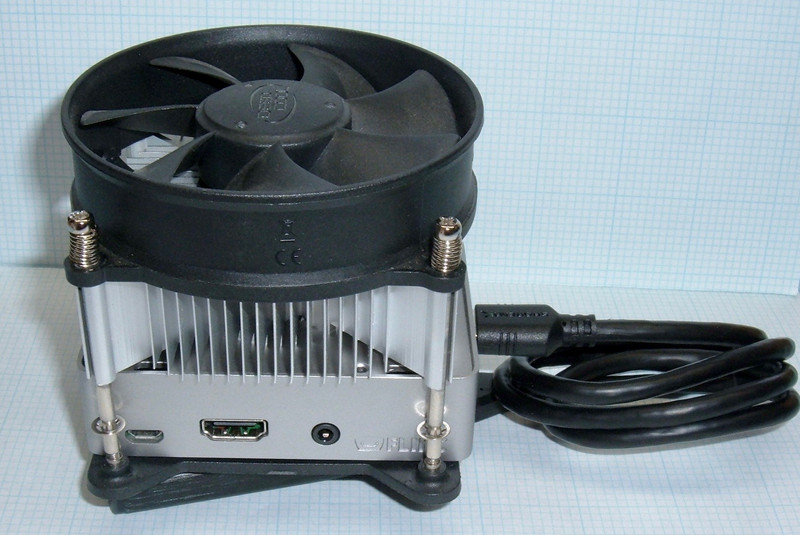
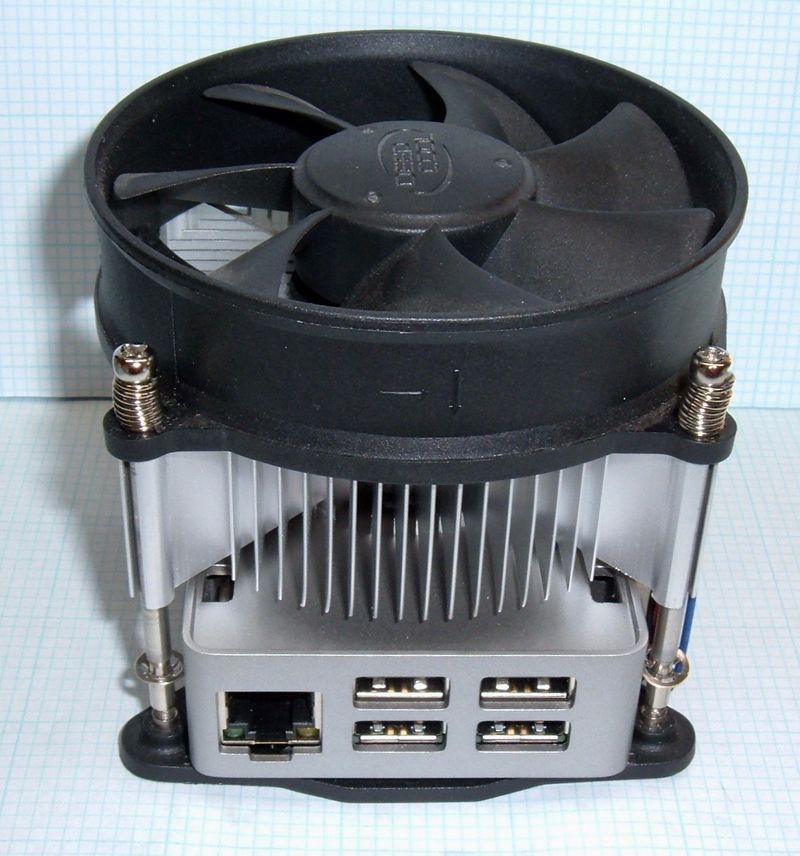
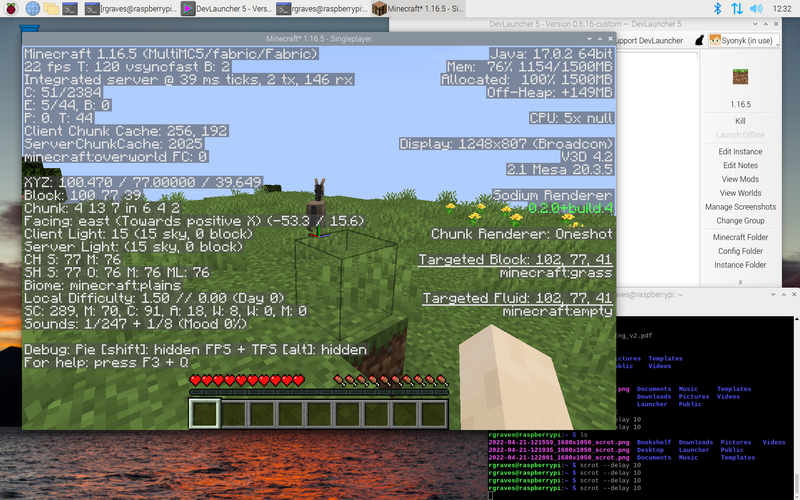
Yes, it looks a bit Kerbal - but it works. I can hold 1.4GHz sustained on my 3B+ with this setup - it doesn’t even hit 50C unless ambient is really high! That cable looping to a device under? That’s a USB SSD - which blows a MicroSD card absolutely out of the water in disk performance. I’ve got a custom kernel build with some compressed swap, some memory parameter tuning, and the thing just flies (relative to the base configuration, of course).
And, this time, I’ve documented the setup process much more completely - so you should even be able to reproduce it for yourself!
Keep reading for all the juicy details.
What… Why? A Raspberry Pi desktop? Are you insane?
Probably. I really, really like the Raspberry Pi platform for what I consider an “honest desktop.” It’s still a simple, in-order processor, that mostly behaves. It’s not going to have Meltdown or Spectre or Foreshadow or whatever else something Intel screwed up gets named before I publish this post, and the boards are cheap.
I spent many, many years of my computing life on machines that were rather significantly less powerful than a Raspberry Pi 3, and I got things done just fine - including an awful lot of heavy multitasking. The 3B+ has a quad core 1.4GHz processor and a gig of RAM - this should be useful for far, far more than the Raspberry Pi is commonly considered suitable for. Even better, I’ve been using various Pi3s as desktops for the past year or so, and they’re remarkably capable, once you fix the limiting factors!
Here, I’ve got a few browser tabs open, Deluge managing a remotely seeded copy of Raspbian, a few terminals, and, to top it all off, Netbeans running and building C code! Yeah! On a Raspberry Pi! It runs just fine - not the fastest thing on the planet, but for simple projects it’ll hold up. I’m not even pushing the memory limits that hard here.

On a different system (I have multiple of these now), I’ve got my normal few terminals open, Hexchat open (connected to half a dozen IRC networks - I still spend lots of time on IRC), and a browser open. Said browser has a few lighter weight tabs open, my full inbox open, Google Docs up, the front page of Reddit (which is quite large) rendered, and for good measure, I’ve got a Plex tab open in the background playing Alestorm. Plus, the Hangouts extension is running. All of this is open, responsive, and all works.

Looking at relevant parameters for this situation, I’ve got nearly 500MB swapped out - but I’m not using nearly 500MB of disk, because I have a bunch of compressed swap in use! For the cost of 100MB of RAM, I’ve got 244MB of compressed swap in use, and then I’ve spilled 230MB over to SSD. That’s RAM that isn’t going to be used any time soon. Plus, if you look at the top output below, I’m not exactly starved for available RAM either. The system is behaving perfectly fine.

Another non-trivial part of this projet is that I just enjoy the challenge. “You can’t do XYZ on that platform!” type comments, to me? Yes, I can, and watch me. The art of optimizing a system is increasingly a lost art, and if you look at my GitHub, you’ll see an awful lot of Arduino libraries that are significantly tighter than the stock libraries (usually in terms of memory, because that’s the limiting factor on a normal Arduino - 2kb of RAM is a huge amount, but not if you’re stupid). I’ve heard so many times that “You can’t use a Raspberry Pi as a desktop!” - and at this point in time, I have to entirely disagree, because I’m nearly a year into using them exactly as that.
For me, winter power use is another concern (I have a solar powered office), so being able to use something extremely low power is helpful in the dark months of winter.
Why not the (Kickstarter/Indiegogo/etc) ARM board instead?
The next question, from a lot of people, is why I don’t use some ARM board with more RAM, or faster storage, or a faster processor, or… etc. You can get ARM boards with 4GB of RAM, or faster storage, or faster processors, and they’re really not that expensive.
Simple: software support. Most of those boards have limited or very poor software support, and you’ll see reviews talking about how it’s great, but the GPU drivers only work on one particular kernel version, so you can’t watch videos on a new OS, and most of them are more or less prototype boards. They work with one specific software version, relevant when they were released, and they never get updates. Support is generally non-existent beyond the initial sale as well.
The Raspberry Pi doesn’t suffer from any of that. It’s a common enough platform that it’s well supported, and is increasingly well supported even in the main Linux kernel. I know the hardware will get proper software support, and that the software support will be pushed forward so I can play with bleeding edge kernels without having to port what are probably opaque binary blobs forward. I’m lazy, you see, and while there are some people who would be excited about pushing some fork of the 2.6 kernel forward to the 4.x line, I’m not that person. Give me a kernel that builds - which the Raspberry Pi Foundation does!
Ok. What are the limiting factors?
Storage, RAM, and, to a lesser extent, thermals (which impact clock speed). So, basically, everything. But they’re easy and quite cheap to fix!
First and foremost, storage. A Micro SD card is a very, very useful thing to have around - for a camera. Or maybe a drone. It’s designed for bulk file storage, and it works very, very well for that. It is absolutely miserable for general purpose OS use, and I’ll touch on this, in far greater detail, later in the post. At this point in my life, I’m convinced that nothing of any consequences should run an OS from an SD card. Or a USB stick (they’re just as bad).
RAM is the next limiting factor. The Raspberry Pi 3 has a whopping 1 GB of RAM - which, in 2018, is actually quite tiny. Smart watches have more RAM (though they also tend to have an extra zero on the price - the value for your money is probably better with the Pi). The thing is, 1 GB of RAM is a lot, if you use it wisely. Raspbian, stock? It doesn’t use it wisely. We can largely fix this by getting fancy with how we use swap.
Finally, the Raspberry Pi 3 and 3B+ have some thermal issues. The original Pi and, to a limited extent, the Pi2, are OK without a heatsink. The 3? Woah Nelly. Thar be underclocking. The 3B+ is a huge, huge improvement on the 3, but it still has some thermal problems and will overheat under sustained heavy load. The good news? It’s really easy to fix, and there’s a case that solves almost all your problems.
Cost-wise, fixing storage properly is the most expensive. You’ll need to spend about $30 to get storage that’s worth a damn. The RAM fixes? Free, except for the time required to build a kernel. Thermals vary, but $18 or so will get you a very, very long way, and if you insist on doing better, a good heatsink and fan isn’t very expensive.
Storage: SD cards SUCK for OS use!
There’s no way to sugar coat this: SD cards and USB sticks are completely terrible for actual operating system use. Really, dreadfully, awfully awful. You think they’re bad, but they’re worse than you know, by far.
To understand why, we’ll have to delve into disk storage and filesystems a bit.
A modern operating system, running on a modern computer (and the Raspberry Pi is absolutely a modern computer) is really complicated. There’s a lot going on. The Pi3 has 4 processor cores that can all be executing code, and most desktop code executing wants to use the disk (directly or indirectly). A browser is the common desktop application, and it’s hard on the disk - at any given time, it might be reading from disk, writing to disk (the local caches), and doing plenty of compute (or GPU) bound rendering. The operating system has to handle all this, and it also has to handle, in many cases, swapping unused RAM to disk. Other applications all like disk as well - a mail client will be writing new mail to disk and reading old mail from disk, compilers are just IO monsters, your shell is writing history files, etc.
“Removable storage” (SD cards, USB sticks, etc) are designed for their common use case, which is storing media files for transfer. They work very, very well in their designed environment, which is a single thread writing one file at a time to them. The transfer can use large block sizes (the “chunk size” of each write), and the writing is heavily linear (as long as there’s enough free space). This is how they’re used, and this is what they’re optimized for.
An operating system, on the other hand, is typically doing a mix of random reads and writes, almost entirely with small block sizes. It’s a totally different workload from what removable storage is designed to deal with, and they’re really, really bad at it. Performance falls off a cliff when you ask them to do this sort of thing, and it chokes out the whole computer.
“Operating system storage” designed for this type of use handles it far, far better. It’s 2018, so the right answer for operating system storage is a solid state drive of some form or another. We can still get away with an older, cheap one because everything is choked through the USB 2.0 bus speeds (40MB/s theoretical, 30-35MB/s actual), but the performance of a SSD in filesystem use radically exceeds SD cards and even USB sticks. There’s a reason an OS-suitable SSD costs far more than the equivalent USB thumb drive.
Storage Benchmark: USB SSD vs Removable Storage
It’s all well and good for me to say this - but I’ve gone further and have collected data to make my point! And I’ve made charts!
First, let’s look at single threaded linear read/write performance of a few different drives (just reading/write a large file, in order). This is what the USB drives are designed to do, and what they do well. I’ve put in a pair of USB thumb drives (both decent quality), and a pair of SSDs in USB enclosures. I will say that I think the Pi 3B+ USB is slightly faster than the Pi 3 USB - I consistently see slightly better speeds on the 3B+ for large transfers.
You can see that the 1MB block size reads (first column, blue) are all pretty good - north of 25MB/s, for all the drives. This is sitting on the USB bus bandwidth - it’s super easy for the drives, and I know all the drives involved will run far faster on a USB3 bus. Large block write performance (the second, orange column) is better on the SSDs than the USB drives.
Then we get into the small, linear 4KB reads/writes. Amazingly enough, everything performs fairly well on reading with the small block size. This is easily predictable behavior, and I’d wager that the USB drives have a prefetcher that’s suited to handling this sort of access pattern. But the writes. Oh, the writes. Even in a very easy linear write pattern, both USB drives fall flat compared to the SSDs. OSes tend to do a lot of smaller writes in actual use…

But, where we really see the difference is in the multi-threaded random read/write performance. For this test, I’m randomly reading/writing in files, with 4 threads running in parallel. This is a far better simulation of operating system behavior, if you want a synthetic benchmark.
With the large block sizes, reads (blue/#1) are acceptable across the board - including on the MicroSD card. Random writes (orange/#2) suffer badly - on the USB drives and SD card. The proper SSD? This is easy for the, and they’re sitting up near the USB bandwidth. When we go to the 4kb reads (grey/#3) and writes (yellow/#4), the difference is stark. The bulk storage devices on the left just can’t compare with the proper SSDs. One of the USB sticks has truly awful 4k random write - 7kb/s. That’s not useful on anything newer than about an Apple II. Both OS SSDs handle the stream of random writes very, very well. I don’t know for sure, but I’m guessing the limit is how fast the USB2 bus and chipset can send the requests. This is why we need the USB SSDs, though. They behave acceptably for random traffic that reflects real-world behavior.

One recent development is the USB Attached SCSI Protocol (UASP). This is designed for USB3 connections, and improves performance nicely. It also is backwards compatible with USB2 - so, does it matter for the Raspberry Pi?
Well… no. It’s not built into the kernel, but that doesn’t matter, because the USB driver doesn’t support something it needs.
[  297.430999] usb 1-1.1.2: The driver for the USB controller dwc_otg_hcd does not support scatter-gather which is
[  297.431011] usb 1-1.1.2: required by the UAS driver. Please try an other USB controller if you wish to use UAS.
Sad. If someone wanted to get on the development, there’s an open bug…
Filesystems
Last time I talked about this project, I went on about btrfs and how awesome it is. It supports compression, which over a choked link like USB2 is free bandwidth - which it is. Except, there’s the rest of the filesystem performance to consider, and I didn’t really check it out. I just figured, “Hey, new filesystem, this should rock!” It may, for certain use cases, but for a USB SSD on a Raspberry Pi? No, it doesn’t rock. More of makes a dead thud.
This is all on the same Pi, the same SSD. I’ve tested btrfs, ext4, and f2fs, with both 4kb and 1MB block sizes. All these tests are with 4 threads, as that’s the sort of performance I’m most interested in.
What we can see is that for small block sizes, btrfs just doesn’t hold up in the random write department - or the mixed workload department, which is a combination of reads and writes (so the sort of thing you see from a heavily used filesystem). I care a lot about random write performance, so… sorry, btrfs. You’re out for now.
That leaves ext4 and f2fs. In theory, f2fs should be better at random performance on a SSD, but… in reality? There’s just not much difference in performance, in my configuration. Given that ext4 is mature, stable, and insanely well tested, and f2fs is still new and under development (comparatively), I’ll stick with ext4 for this project. The data doesn’t lie, and I’ve abused ext3/4 horribly over the years, with no catastrophic data loss. That’s worth something!

Storage: USB SSDs
What all this means is that to get good desktop performance on a Raspberry Pi, you need a proper SSD in a USB enclosure. There’s just no way around it.
Fortunately, they’re cheap in Raspberry Pi sizes! Even though the Pi doesn’t support UASP yet, I’d find a case that supports it. If you use it on something else, it will help, and there’s always the (slim) chance that the Pi kernel will start supporting scatter-gather at some point.
You want a USB to mSATA adapter (with UASP support). This should run you $10 or so on eBay, with shipping.
For the SSD? Just get whatever’s cheap. A used 32GB SSD is perfectly fine for a Raspberry Pi project. If you’re paying more than $20 on eBay for one, keep shopping. You don’t need industry leading performance on something that’s going to be choked over USB2. The worst SSD is so far beyond the best SD card…

Memory: Swap is not evil!
With storage performance resolved, the next limiting factor is memory. There’s only a gigabyte of it, and that’s not very much. Fortunately, with fast storage, swapping doesn’t have the penalty that it does on the SD card (it’s almost entirely 4kb block writes), but we can still do better by compressing memory temporarily in RAM before it gets spilled to disk.
When people of a certain minimum age think of a computer “swapping,” they think of an old Windows system, barely responding, with the hard drive light on solid, every time you switch applications. That’s certainly swapping, but it doesn’t need to be nearly that bad. Swap space allows the operating system to take a page of memory that hasn’t been used in a while, put it on disk, and free up the physical RAM for other uses.
If the page of RAM isn’t going to be used for a long time, there’s no problem with putting it in swap - and, on a RAM limited device like this one, it’s far better to have that page out of RAM so the limited RAM space can be used for more useful things. Active applications, filesystem cache… there are a lot of things we’d rather have in RAM than stale data that isn’t going to be used again.
Recent Linux kernels include support for a variety of compressed swap systems as well. “Swapping to RAM,” on the surface, sounds silly - what would the advantage of swapping memory into memory be? But, the reality is that most pages of memory in a computer are very compressible. By compressing them, we can swap several pages into a single page, which makes the process worth it.
The most commonly used compressed swap system is zram - it’s commonly used on low memory Android devices, and some tutorials for the Raspberry Pi mention it. But zram has limits that make it poorly suited to desktop use on a Raspberry Pi. It can never “spill out,” so if you pair it with other swap, it suffers from “LRU inversion” - least recently used inversion. This means that the earliest stuff swapped out, which is likely to be the least useful, gets stored in the compressed swap (taking up memory forever), while more recent data (which is likely to be more useful) spills to disk.
Conveniently enough, there’s a better system that we can use - zswap. Unlike zram, zswap isn’t a standalone swap system. It requires a backing file or partition, and it serves as a front end filter to the swap on disk. This means that it is far more flexible than zram, and when the cache fills up, it can spill out old pages to disk. It can also make the decision to reject pages that don’t compress well - these would be wasteful to store in RAM. All of this means that, for desktop use, zswap is far, far more useful.
Plus, in recent kernel versions (which we’ll be building later), it supports “same filled page compression” - this means that if a page is all 0s (typically), it doesn’t even bother feeding it to the compression algorithm. It just makes a note - “Page 1234 is all zeros - got it!” - and saves even more space. You’d think there weren’t that many pages like this in a typical operating system, but the swap stats indicate it’s oddly common in use.
In my previous build, I was using z3fold, but I’ve had a lot of problems with it under heavy memory pressure, and despite attempts to bring in newer patches, it’s still unstable. I’ve gone back to zbud, which should be worse on paper. In reality? With the same filled page compression, I don’t see a substantial difference between zbud and z3fold after running for a while (both settle in around 2.5x compression). And one doesn’t crash.
Thermals and Overclocking (and Power)
I talked about this extensively last week, but what it boils down to is that even with the awesome FLIRC case, the Raspberry Pi 3B+ puts out enough heat that it will throttle back under sustained load. It drops from 1.4GHz down to 1.2Ghz - which isn’t any better than the Raspberry Pi 3 (although the faster core clock and RAM clocks still help a bit).
But, with a bit of extra cooling, you can build something that’s rock solid at 1.4GHz all day long. The extra performance is nice, but what’s more important is the consistency. The last thing you want when a system is loaded up heavily is the processor overheating and things slowing down - and that’s exactly what you get with a Raspberry Pi that isn’t properly cooled.
At this point, the case to buy is the FLIRC case ($18 on eBay). It’s an aluminum case with a bit that drops down to contact the processor. This means that the whole case is a heatsink, which means that the CPU will run cooler, and therefore faster (because the processor throttles back at 80C). For the 3B+, the processor runs at 1.4GHz up to 60C, then drops back to 1.2GHz until 80C. But, in any reasonable ambient conditions, the FLIRC case won’t let the CPU get to 80C, so you have sustained 1.2GHz.


If you want to sustain 1.4GHz, you’ll need an extra heatsink. Pop the plastic top off, add a large heatsink/fan of your choice, and you should have enough cooling to hold 1.4GHz in most normal conditions. Or just accept that you’ll drop to 1.2GHz under sustained high load, and enjoy the slick looking FLIRC case.
You’ll also need a properly good power supply. The 3B+ is power hungry. The official Raspberry Pi power supply is good, otherwise, make sure you can source an awful lot of amps (at least 2A, without sagging at the connector).
Build the Improved Pi3Desk - Step by Step
Last time I did this project, I had more than a few people grumble that I didn’t give step by step instructions. Honestly, I still wasn’t sure how well it would work, and I made some guesses on things like btrfs that turned out to be wrong. At this point, I’ve played with enough that I can offer some advice on how to build something pretty darn solid. I won’t claim it’s perfect, and if you have problems, well… this is the bleeding edge. Sometimes you get cut. If you don’t know enough to troubleshoot weird issues, pushing the envelope with a custom Raspberry Pi install probably isn’t the best idea. But, at least as of when I’m posting, these steps should get you a properly quick Raspberry Pi desktop!
Commands in Courier are to be typed in the terminal. If you have no idea how to use a terminal, you might want to work out the details on that before diving into this - I assume you’re generally moderately competent with the Linux command line.
Requirements and Assumptions
I’m also going to assume you have a USB SSD of some variety. The storage performance of the SSD, even choked over USB2, is so massively better than the SD card that if you’re not going to get one, you won’t find many of the gains I talk about. However, you also need an SD card for the install, and, depending on your USB enclosure, you may need it to boot. I boot from the SD card, just because I’ve yet to find a USB SSD enclosure that reliably initializes fast enough for USB booting. Booting from the SD card, then keeping the root filesystem on the SSD, works in pretty much all cases, and at least in this set of instructions, I’m aiming for maximum success! Modify if desired.
If you don’t want to build a new kernel for zswap support, you can stick to the stock kernel, but I really do suggest building one. I’m working to get zswap included in the stock kernel, but until that point, you have to do a kernel build. It’s not that scary - I promise!
This process takes a few hours end to end, but there’s a lot of “set it and walk away” time - it’s not a few hours of hands on work.
Starting Out
Start by following the Raspberry Pi install instructions. Install the latest Raspbian image - whatever happens to be latest when you try it. Use their directions to flash the image on to the SD card, then boot your Pi from the SD card. It should resize the filesystem and generally go through the welcome process - set a password! Updates might take a while, especially on a cheap SD card. Once you’ve finished the initial configuration wizard and updates, we’ll move the freshly updated install over to the SSD!
Moving the Install to USB SSD
If you wanted to use an exotic filesystem like btrfs (not part of the stock kernel), you’d have to build a new kernel first. But, here, we’re just going to use ext4 on the SSD. This lets us keep the stock swap file setup (you can’t put swap on btrfs without a few patches), and since we’re keeping the SD card around, we can just make a single large partition on the SSD. If you want to get more exotic, try USB booting, or use a separate swap partition, go for it. But, if you’re doing it my way, there’s no need to, and leaving /boot on the SD card means this setup will (should?) reliably boot with a wider variety of hardware. Why ext4? It’s stable, it works, and performance is good across a wide range of use cases. I just can’t justify f2fs based on the actual performance numbers I see for this sort of setup.
Plug in the USB SSD enclosure. If you run ‘dmesg’ you should see some output at the bottom about a new device as sda. Everything here assumes the USB target is /dev/sda, which should be the case if it’s the only storage device plugged into USB.
Let’s zero out the partition table, then create a partition on it. Zeroing the first megabyte (1x 1MB block) will blow out the partition table (and then some), leaving a clean slate as far as the partitioner is concerned.
sudo dd if=/dev/zero of=/dev/sda bs=1M count=1
sudo cfdisk /dev/sda
If the drive has weird stuff on it (LVM volumes or the like), you might want to just zero the whole thing out. Instead of wiping the first MB, wipe the whole thing. But you should be OK with wiping the first megabyte (at worst, you’ll get warnings later on).
sudo dd if=/dev/zero of=/dev/sda bs=1M
sudo cfdisk /dev/sda
Once you launch cfdisk, you’ll want to create a new GPT partition table. Then, create a single partition (hit enter on the “new” button, the default partition size is the full volume size, so hit enter again to create a single partition). Once you’ve done that, select “write,” type “yes” to agree to the changes, then “quit.”
Great! You’ve got a new partition! Let’s format it, mount it, and copy the host OS over to it. I’m using rsync for the copy. In theory, we should mount the SD card partition read only before doing this, but in reality, it works fine. The “-x” command keeps this to one filesystem, so it doesn’t go copying out /dev and /sys, or copying /mnt/root into the new drive. Just in case the kernel didn’t catch the new partitioning changes, we run “partprobe” first (partition probe) to update things. If you’re curious about the rsync flags, “man rsync” will let you poke through the reference for it. Proc is a special case here that we deal with separately.
sudo partprobe
sudo mkfs.ext4 /dev/sda1
sudo mkdir /mnt/root
sudo mount /dev/sda1 /mnt/root
sudo rsync -axHAWX --numeric-ids --info=progress2 --exclude=/proc / /mnt/root
sudo mkdir /mnt/root/proc
Now, before rebooting, we need to inform the OS it’s to be using the new filesystem as root - not the SD card.
blkid /dev/sda1
Copy the PARTUUID value - select it with the mouse and use Ctrl-Shift-C to copy.
First, we need to edit the fstab on the new partition. Delete the UUID value on the third line (with / and ext4), then paste in the new UUID - Ctrl-Shift-V should paste things. Then, Ctrl-X, y, enter and you should be back at the terminal.
sudo nano /mnt/root/etc/fstab
We need to do the same thing for the initial kernel command line. Delete the value after the existing PARTUUID, and paste the new value in.
sudo nano /boot/cmdline.txt
Alternately, for some installs (perhaps through NOOBS?), you won’t see the partition UUIDs. You’ll see /dev/mmcblk0p2 - which you can replace with /dev/sda1 to point to the new partition. The full desktop Raspbian installer certainly uses PARTUUIDs, though.
With that done, reboot the system and see what happens! If you’ve done it right, you’ll boot, cleanly, from the USB SSD!
To verify this, look at the first line in the output of “mount” - you should see something very close to, “/dev/sda1 on / type ext4 (rw, noatime, data=ordered)” as the output. The key here is that /dev/sda1 is mounted as the root filesystem instead of /dev/mmcblk0p2. Perfect!
Your existing root filesystem is still present on the SD card, but we can safely ignore that now. Things should be pretty quick now - but we’ll make them better still!
Building the Kernel
I promise, it’s not as bad as it sounds. It just takes a while on a Raspberry Pi. Even a 3B+.
First, we need to install some prerequisites for the latest kernels that aren’t there stock. If you’ve been used to installing packages on the SD card, you’re in for a treat with how fast the install goes!
sudo apt-get -y install git bc bison flex libssl-dev
Now, we’re going to get the Linux kernel sources for the Raspberry Pi. You can find them at https://github.com/raspberrypi/linux - but we don’t want to mirror the entire repository. That’s too large, and takes too long to download for no benefit at all (if all you’re doing is building a kernel). This build is for the 4.18 branch, but the same steps apply to any other branch you want to build. The “–depth 1” parameter says, “Only get the current version of the files.” And the “-b 4.18.y” parameter selects the branch to check out (if we’re not using the default one). We’ll check out into the “linux-4.18” directory, in case we want to check out a different version later (4.19 might be building by now, if you feel especially experimental).
git clone --depth=1 https://github.com/raspberrypi/linux -b rpi-4.18.y linux-4.18
Once that’s done (it will take a little while), we’ll create the default configuration, then change it to add the zswap support. I’ve created a handy little patch file to do this, though it will likely eventually stop working as the config changes around. Ideally, by that point, the kernel will have all this included!
You need to enable CONFIG_ZSWAP, CONFIG_ZPOOL, CONFIG_ZBUD, and, optionally, CONFIG_Z3FOLD. Or you can skip z3fold - I can crash it under heavy memory pressure, but other people haven’t been able to reproduce the crashes as easily. Try it at your own risk.
cd linux-4.18
make bcm2709_defconfig
wget https://raw.githubusercontent.com/Syonyk/raspberry_pi_scripts/master/zswap.patch
patch < zswap.patch
Did you look at the file I had you download before you ran the patch? You should have… (it’s not evil, but who knows what sort of stuff I could have wedged in there!). If that doesn’t apply, just make the changes yourself.
Now, build the kernel! This step does take a long time, and it might be longer if you don’t have a good heatsink on your Pi. It should complete in an hour or so, maybe longer without proper heatsinks.
make -j4 zImage modules dtbs
You might be curious about how hot your CPU is running, and at what frequency. Open another terminal window if you are, and run this:
watch "vcgencmd measure_clock arm; vcgencmd measure_temp"
With that goofy case and heatsink/fan combo, I don’t exceed 50C, and I don’t drop below 1.4GHz. If you feel you can express yourself at lower clock speeds, that’s fine, but some people chose more, and we encourage that.
If that completes without errors, you’re ready to install the kernel. If that has errors… well, good luck. Try disabling the module that’s throwing errors, if it’s some esoteric hardware support module you don’t need. The install will overwrite your existing kernel - but there’s a handy backup. If everything goes wrong, put the SD card in another computer and copy kernel7.img.orig back to kernel7.img and you should boot! If not, good luck!
sudo cp /boot/kernel7.img /boot/kernel7.img.orig
sudo make modules_install
sudo cp arch/arm/boot/dts/\*.dtb /boot/
sudo cp arch/arm/boot/dts/overlays/\*.dtb\* /boot/overlays/
sudo cp arch/arm/boot/dts/overlays/README /boot/overlays/
sudo cp arch/arm/boot/zImage /boot/kernel7.img
sync
If all has gone well, you can now reboot. The system should come back up cleanly, and you should have a new kernel version reported if you run ‘uname -a’ (some variant of 4.18 is expected). If this has gone poorly, you can mount your SD card in another machine and copy the original kernel back over. If that doesn’t work, it’s time to reflash the stock Raspbian image on the card and try again. Sorry! Bleeding edge and all that…
If you’re back up successfully, configure the system so the kernel won’t get automatically updated. It’s not a big deal, but you want your custom kernel, not the stock one - the stock one doesn’t support zswap yet.
sudo apt-mark hold raspberrypi-kernel
Configure zswap and some tuning
Now, we need to configure the zswap we built the fancy new kernel for!
First, let’s order dphys-swapfile (the stock swap management package) to put a competent size swap file in. The stock 100MB just isn’t enough for desktop use. I would suggest setting CONF_SWAPSIZE to 1024 - a nice even gigabyte. You might consider 2048 as well, but in my experience, if you’re past about a gig of swap with a gig of RAM, you’re likely heading into weeds you should reconsider.
sudo nano /etc/dphys-swapfile
Now, we need to enable zswap. We’re going to add a few parameters to the end of /boot/cmdline.txt to enable zswap on boot. The sed command here replaces the “end of line” with the new parameters, doing an in place modification.
sudo sed -i 's/$/ zswap.enabled=1 zswap.max_pool_percent=15 zswap.zpool=zbud/' /boot/cmdline.txt
And, while we’re here, let’s change a few memory system parameters that will help on this IO choked system. These try to let the OS build up a lot of dirty pages in RAM (stuff that needs to be written to disk), while trying to start writing out as early as possible. This should help prevent IO related hangs.
sudo sh -c 'echo "vm.dirty_ratio=50" >> /etc/sysctl.conf'
sudo sh -c 'echo "vm.dirty_background_ratio=1" >> /etc/sysctl.conf'
Reboot, and let’s see if it’s all working!
Sanity Checking
Now, make sure everything is behaving as expected.
Run ‘free’ and make sure the total swap line reads 1048572 - that’s a gig, which is what we set.
Now, make sure zswap is enabled:
cd /sys/module/zswap/parameters/
grep -r .
You should see output like this (don’t type this into the terminal - it’s just the output of the above):
_enabled:Y_
_max_pool_percent:15_
_zpool:zbud_
_same_filled_pages_enabled:Y_
_compressor:lzo_
Yay!
If you want to monitor zswap use at runtime (with some math done), I’ve written a little shell script that you can use. Yes, you get a divide by zero error until stuff is in swap - patches welcome. Load up a browser or something. It needs to run as root because the debug fields are root only in sysfs. You did read this script you downloaded before running it as root, right?
cd
wget https://raw.githubusercontent.com/Syonyk/raspberry_pi_scripts/master/zswap.sh
sudo ./zswap.sh
You are good to go! Enjoy your radically improved Raspberry Pi 3B+!
But I want my multiple desktops!
Now, we’re just messing around. I suggest adding a RAM use indicator and CPU temperature gauge to your menubar. Right click on the top panel, by the CPU monitor. Select “Add/Remove Panel Items.” Add, Resource monitors, and click “Up” until it’s by the CPU monitor. Then click “preferences,” and change it to only display RAM use.
Do the same thing, and add a CPU temperature monitor. I’d suggest setting the “Warning 1” temperature as 58, and the “Warning 2” temperature as 78. The 3B+ throttles back from 1.4GHz to 1.2GHz at 60C, and then drops further at 80C.
Now, we’ll set up multiple desktops. Run ‘obconf’ from a terminal. On the left, click “Desktops.” Add a few desktops and name them what you want. But you can’t switch between them them easily anymore…
Add another panel to the top bar - this one is the “Desktop Pager.” Put it where you want it, and if you want to click around between desktops, you can now.
However, if you miss your Ctrl-Alt-Left and Ctrl-Alt-Right desktop paging, we can fix that too.
leafpad .config/openbox/lxde-pi-rc.xml
Find the section with “C-A-Left” - you’ll see it in a “keybind” XML parameter. The comment still says it’s key bindings for desktop switching - but it isn’t.
Replace this:
    <keybind key="C-A-Left">
      <action name="UnmaximizeFull"/>
      <action name="MaximizeVert"/>
      <action name="MoveResizeTo">
        <width>50%</width>
      </action>
      <action name="MoveToEdge">
        <direction>west</direction>
      </action>
    </keybind>
With this:
    <keybind key="C-A-Left">
      <action name="DesktopLeft">
        <wrap>no</wrap>
      </action>
    </keybind>
Do something similar for C-A-Right - just replace the action name with DesktopRight.
Reboot, and you should have desktop switching back!
Chrome Extensions You May Enjoy
Some advice?
No Coin - blocks cryptocurrency miners on your Pi.
The Great Suspender - suspends tabs that haven’t been active in a while.
These will help your browser experience greatly.
Enjoy your Pi3B+Desk!
Follow these steps, get a good case, get a tolerable USB/SSD adapter, and you should have something that functions as a properly useful desktop!
I won’t claim it’s perfect. I still lock mine up on occasion - some sites are just too much for even a Raspberry Pi 3B+. But unlike the MicroSD card version, this variant will often chew through and come out functioning as it swaps stuff out and catches up on the other end.
The charts above should demonstrate just how bad SD cards and USB thumb drives are. They’re really, really bad compared to a proper storage solution.
So, go forth, and Pi3B+Desk!
Comments
Comments are handled on my Discourse forum - you'll need to create an account there to post comments.If you've found this post useful, insightful, or informative, why not support me on Ko-fi? And if you'd like to be notified of new posts (I post every two weeks), you can follow my blog via email! Of course, if you like RSS, I support that too.

