
For a while now, I’ve had an Intel NUC (NUC7I5BNK) running our home TV. It’s actually more fair to call the TV a monitor for the NUC, as that’s the only signal, of any variety, feeding into the TV (by design). But, in any case, the NUC runs the TV, runs Plex, runs streaming content (yes, you can stream stuff in rural Idaho) - and also runs a cooling fan. Quite a bit, actually, and a NUC fan, if you’re not familiar, is loud enough to be annoying in the evening when you’re watching a movie that gets quiet.
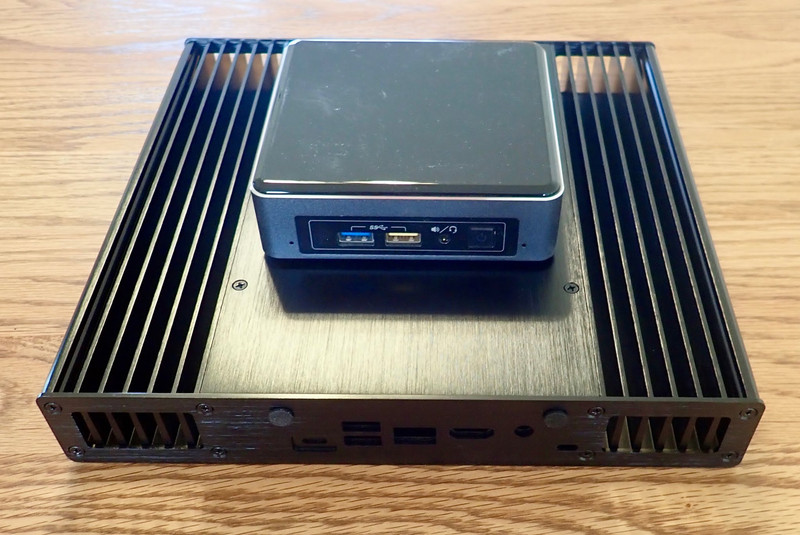
How to solve this for a system that by design doesn’t use much power? A passive case! This is a case with no fans to cool it - just sheer metal mass and fins. Conveniently, Akasa makes a number of such cases. One of which, I now own! It’s rather substantially larger than the stock NUC case, but how does it work? Is it any good?

Very well, and, other than being a bit expensive, I’m incredibly happy with it! Dive on in and see what’s involved in making a NUC dead silent!
What’s a NUC?
The Intel Next Unit of Computing is a small form factor computer that Intel builds. If you imagine laptop guts in a very small desktop case, you’re pretty close. However, unlike modern laptops, the board has actual sockets for RAM and storage - plus usually a SATA port. You can build it out however you need, within reason. Some people might need 8GB of RAM and a fairly small SSD for a TV box. Others might need 32GB of RAM and a large SSD for a little virtualization lab in a box. Both are equally valid.
Also conveniently, the NUCs don’t use much power - and they’re quite tolerant of a wide range of input voltages. Mine is rated for anything from 12V-19V on the DC jack, which means you could use a 4S lithium bank (16.8V fully charged, 12.0V usefully empty) to power one for portable use. Also, they’ll work with typical car voltages (12V drained, around 14-15V operating) without needing special adapters (if you’re feeling lucky about voltage spikes). They’re quite flexible.
If you want one to mess with, look on eBay before you buy a new one. It’s easy to find some lightly used ones, with RAM and SSD, for less than the bare cost of a new one!
The Akasa Plato X7 NUC case
If you want basic specs on the Plato X7, the Asaka website has details. But, in a nutshell, it’s just a very large hunk of aluminum, some screws, and some adapters. The NUC board fits against it, transfers heat into it, and then the heat flows throughout the case, eventually ending up in the air. Because there’s so much radiating area, the case requires no fans to cool a processor - even one that’s running quite hard. Finding them can be hard - I got mine shipped from Europe.
My NUC is a 7th generation i5 unit - so a dual core (four thread) Kaby Lake chip, based at 2.2GHz, with a peak turbo frequency of 3.4GHz. Design power is 15W on the processor, plus the rest of the die, so we’re not talking about a huge amount of heat in the first place (the power supply is only 65W). Using laptop parts keeps the power down, and they’re not that hot running to start with.
The top plate comes off with four screws, and inside, there are a number of connections to stretch from the edge of the case to the NUC board. You have to transplant the board into the new case - but, conveniently, the NUC form factor is pretty standard, which means that cases like this are fairly easy to design! We’ve got (on the left) an IR guide (so remotes work with the onboard IR sensor), a pair of USB3 connectors, a headphone jack extension, and a power/status cable header (that goes to the standard NUC header).

You can sort of see how things line up here - except, the NUC will be facing the other way. The USB extensions extend the USB, and the rest plugs in (or not) as you choose. This case dwarfs the stock NUC case, though.

Removing the NUC Board
If you’ve not seen the insides of a NUC before, they’re awesome little machines. In any case, if you want to pull the mainboard out, you have to remove various parts to get at the screws. You might not have to pull the RAM, but… I did. Instructions on removing NUC boards are rather missing in action.

There are screws in the corners securing the mainboard in place. Remove them.
Then pry the board out, starting with the back of the board (power, HDMI, and network jacks). You can spend time flipping the case over and removing a bunch of other things that don’t actually need to be removed, but they don’t help. With the obvious screws in the corners out, the board should come free. It’s just in there tightly.
Before you actually remove it, though, remove the various connectors hooked up to things. You’ve got the wireless cables hooked up to the wireless card, and there’s a microphone cable coming from the front panel area. Pop these free gently (the wireless connections are seriously fragile - be careful with them), and the board should come out.

I only say I live in a dusty environment so often because I do. This isn’t even a year of dust buildup, on the intake side of the fan. It’s probably not helping my noise issues. You can see the microphone cable leading to the front of the case, and the wireless cables routed all around to antennas on the top.

On the other side of the board, you’ll find the fan and heatsink. This little noisemaker is what’s causing all the trouble - so it has to go. See the two screws in the corners of the fan? You should be able to guess what one does with them.

With the fan out of the way, you can access the three screws for the main heatsink. Two of them are visible once the fan is out of the way, and the third is accessible through the hole in the heatsink shroud.

Looking at the bottom of the heatsink, you can see a pair of heatpipes spreading off - nifty! Heatsink design has come a long way from the 90s, when they were just a hunk of metal with some fins cast or milled in it (but, to be fair, processors use an awful lot more power). You can see the processor in the center of the board. This is more than just the CPU - it’s the CPU, GPU, and platform controller hub, all in a tiny bit of silicon!

Before installing the board in the new case, clean off the processor die (carefully). It’s soldered onto the board, so you’re not likely to go about replacing this any time soon. I really, really like the metal lip around the edge of the processor. Back in the old days, processors didn’t have that. Intel chips from the early 2000s were usually robust enough to put a heatsink on without damaging, but AMD chips? They were fragile. None of that nice epoxy around the edges - just a square hunk of silicon sitting proud, and it was up to you to get the heatsink on without damaging anything. Not everyone succeeded, and chipped edges on AMD chips were incredibly common. This metal ridge? You’ll have to try to hurt the chip. It helps spread the load and more or less prevents a heatsink from crushing the dies.

Installing the NUC in the X7
If you look closely at the X7 case, there’s a hunk of milled aluminum sticking up that the processor sits on to transfer heat into the rest of the case. For reasons slightly beyond my understanding, but that are probably related to older NUC boards, the surface isn’t entirely flat. There’s a step down at one edge.

It’s not mentioned in the instructions, but a bit of test fitting of my board indicated that the CMOS battery was not going to fit where it was. Remove this from your board before installing it, or things may not sit properly. When you pull that little metal RF shield off trying to remove the CMOS battery, it clips right back in place.

I get the impression this same case has been through a lot of NUC revisions. The main instruction sheet is different on both sides, for different generations of NUC, and there are a few change notices also crammed in the package. At some point they’re going to have to redesign the case - but, for now, they can just keep hacking things forward. Here, they suggest using the new thermal pad on one end of the chip area. Looking at how things line up, the height difference step is right between the two mounting holes for the stock heatsink, so it makes sense.

I’ve installed the thermal pad on the right side, with two globs of thermal compound on the other chips. The included compound is fairly thin, so it should spread fine. One can find holy wars about how to best apply thermal compound, which means that someone has probably done an incredible amount of testing. The results were astounding - a whopping 2C difference under load and 0.5C difference in idle temperatures (between the absolute best and absolute worst)! Translation? It just doesn’t matter. Get some thermal compound in there, and you’re fine unless you’re doing some sort of extreme overclocking, which, I assure you, I’m not. It’s fine.

Set the board in place (ideally coming straight down to not scrape the thermal compound off). Once you’ve pushed down the center of the board, you can try to lift an edge - you’ll feel the stiction of the compound holding the board in place. Great! Use the four provided screws and paper washers to secure the board in place, and we’re on to final assembly. Also, onto better learning the camera I’m using for this project - variable f-stop small digital cameras are new to me. Sorry about the poor depth of field on this post. You can see the full SATA port here. The board has gigabit ethernet, USB3… it’s a properly modern board.

One really nice thing this case includes (that I’m not using) is a set of rails to mount a 2.5” hard drive - along with a short SATA cable and the goofy little power adapter required to run one from a NUC. If you were doing something that required bulk storage, you could put a big 2.5” spinning drive (or SSD) in this case. I might consider a large SSD for silence reasons in my use case - but, it doesn’t matter, because I’m streaming content off a server in the utility room. These rails are safely tucked aside in case I decide I need more local storage for some reason.

If you want to install the microphones from the stock NUC case into the new X7 case, you can. They just peal off the front of the NUC case, and there’s an extension cable included to let you hook them up to the board. I opted not to move them over, because the only use I have for a microphone on this computer is the occasional video call with family, and my webcam has a microphone. Where the NUC will eventually be mounted won’t be great for room audio either. And, really, I’m sick and tired of absolutely everything listening to me (or having the capability). One less device in the house with a microphone attached is a win.

The final hookups to the board are pretty simple - run the provided front panel cable to the header it matches, put the RAM and SSD back in, and hook up the USB cables. The clear guide should get IR signals into the receiver, and the header takes care of the power connection. You can spot my highly technical “tape it to the side” solution for the CMOS battery as well.
Actually, unless you’re using ethernet, don’t put the SSD in yet. It blocks the wireless card, and you need to hook up antennas.

Wireless: U.FL vs MHF4 Connections
I was all prepared - I had a nice set of wireless antennas ready to install, with what I thought were the proper U.FL connectors. It turns out, the connections aren’t well documented for the NUC (at least the 7th gen), and they are most certainly not U.FL. They’re MHF4.

What’s the difference? U.FL is tiny. MHF4 is tinier. They are very nearly microscopic little connections, and they’re not at all compatible. You need MHF4 ends on the cables to work.
But I’ve already got the board over, and a quick experiment indicates that wireless and Bluetooth flat out don’t work without antennas. This is a problem for a TV computer that uses Bluetooth for control and WiFi for connectivity. Why, yes, I do live in an area I can stream high resolution content across my wireless without compressing it to death!
I spent a while pondering solutions, then realized that I have a perfectly good pair of antennas in the old case! And the old case isn’t doing anything - so, I unclipped the cables, routed them into the new case, and hooked them up.

Does it work? Quite well! Interestingly, this configuration has gotten rid of some trackpad stuttering that’s been driving us nuts for a while now. I assumed the trackpad just didn’t like dry fingers, but it turns out that using “external” Bluetooth antennas make things work an awful lot better! The NUC case apparently has enough interference in this version that Bluetooth just doesn’t work well.

The Proper Antennas
After a week or two of waiting, the MHF4 pigtails and antennas showed up. Many of my projects span a month or more, just waiting on parts (or waiting on me to have time to assemble parts). This project is no exception. It took 2-3 weeks for the antennas to arrive, and I ran on the old case just fine for that period of time.
With the proper antenna connectors installed, I routed the cables to the card. My advice? Avoid the USB3 ports like the plague! Why? We’ll get there in a bit!

Final Assembly
One of the weirdest pieces in the kit is a large hunk of metal - and some matching thermal pads. It’s not immediately obvious what it does until you consult with the instruction sheet.

It goes on the SSD! The modern M.2 SSDs run fairly hot, and this serves to couple, through a few layers, the SSD to the top case. I can’t say it would be my first choice of a cooling solution for the SSD, but it works well enough (and is silent). The (fairly thick) aluminum top runs warm in operation, and it’s got a good thermal connection to the main case. It works well enough, and given that I’ve got a lightly loaded system, I’m not highly motivated to change things out.
I do wish they’d moved the hole for the bottom antenna a bit further out. It interferes, ever so slightly, with the SSD heatsink.

Interference: USB3 is a 2.4GHz Jammer!
Before I swapped out the case, I’d been fighting issues with the Apple Magic Trackpad. Endlessly. My wife’s fingers run dry enough that she struggled with it on a Mac, and after we switched to the NUC (because Apple steadfastly refuses to update the Mac Mini, and an old Core 2 Duo just wasn’t cutting it anymore), it was a challenge to get anything done.
I blamed the Apple Bluetooth vs the NUC Bluetooth - you know, that usual Mac vs PC thing. But, after a year, it turns out I was wrong. And I’m entirely willing to admit that.
USB3 is, among other things, a 2.4GHz jammer. Intel put out a whitepaper on this in 2012. There’s even a full site on the issues: https://www.bluetoothandusb3.com/
Basically, USB3 will absolutely smash any 2.4GHz signal, given the opportunity. Bluetooth is 2.4Ghz. And the NUC case doesn’t seem to offer good enough isolation. Bad Intel! Actually, given their issues recently… this is minor. I’ll take jamming 2.4GHz over, well, everything they’ve apparently screwed up over the last decade. If you’ve no idea what I’m talking about, consider yourself lucky.
Performance
In retrospect, I should have grabbed some performance numbers before I upgraded the case. But, I didn’t. All I can report is on how the X7 case handles the NUC’s thermal loads.
Perfectly, under reasonable loads (like Folding@Home in the browser)!

The CPU just parks at 3.4GHz and stays there. I can’t ask for more!
With the more power-hungry load of Prime95, things sit closer to 3.0Ghz - the package power limits sit at 25W, and the temperature sits around 80C. Hot, but not unreasonable for a passive case. I could probably up the power limit, but I see no real point, and 80C is plenty hot for this system.

Actually, not true. I could ask that the Intel Power Gadget doesn’t bluescreen Windows 10. I was quite concerned for a day or so because right after moving the NUC to the new case, it would bluescreen every few hours. Turns out, not running the power gizmo solves that problem. I’ve been an Intel fan for a long while, but this project? Come on. Intel? What are you doing?
Final Thoughts
Goal: Silent TV computer.
Result: Silent TV computer.
I have my small gripes with the case, but, overall? It does what it advertises, very well! It’s dead silent, cools the system well enough, and I’m very happy with it!

If you need a passive case for a NUC, check eBay, because you can find some there, but you may have to get more creative in your hunting. These cases aren’t common - but they’re worth hunting down.
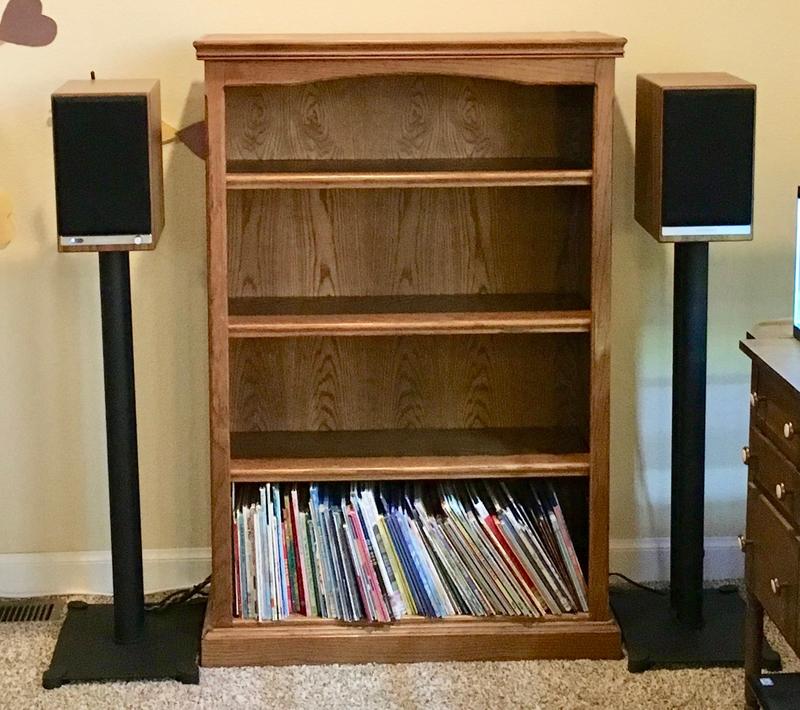
Now, why did I go to all this effort to put the NUC in a passive case? Obviously, for the TV - but I’ve done more. Next week, though, I’m going to take an odd detour into speaker stands.
Comments
Comments are handled on my Discourse forum - you'll need to create an account there to post comments.If you've found this post useful, insightful, or informative, why not support me on Ko-fi? And if you'd like to be notified of new posts (I post every two weeks), you can follow my blog via email! Of course, if you like RSS, I support that too.


