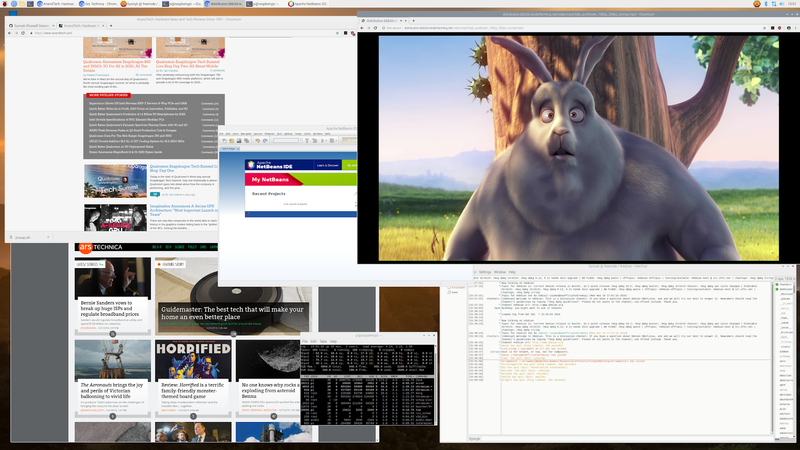
The Raspberry Pi 4 has been out for about 6 months, and early reviews made it clear that the best option was just to sit back and wait for it to get a bit more stable. That’s happened, so now I’m going to dig into one and see what it looks like as yet another light desktop system!
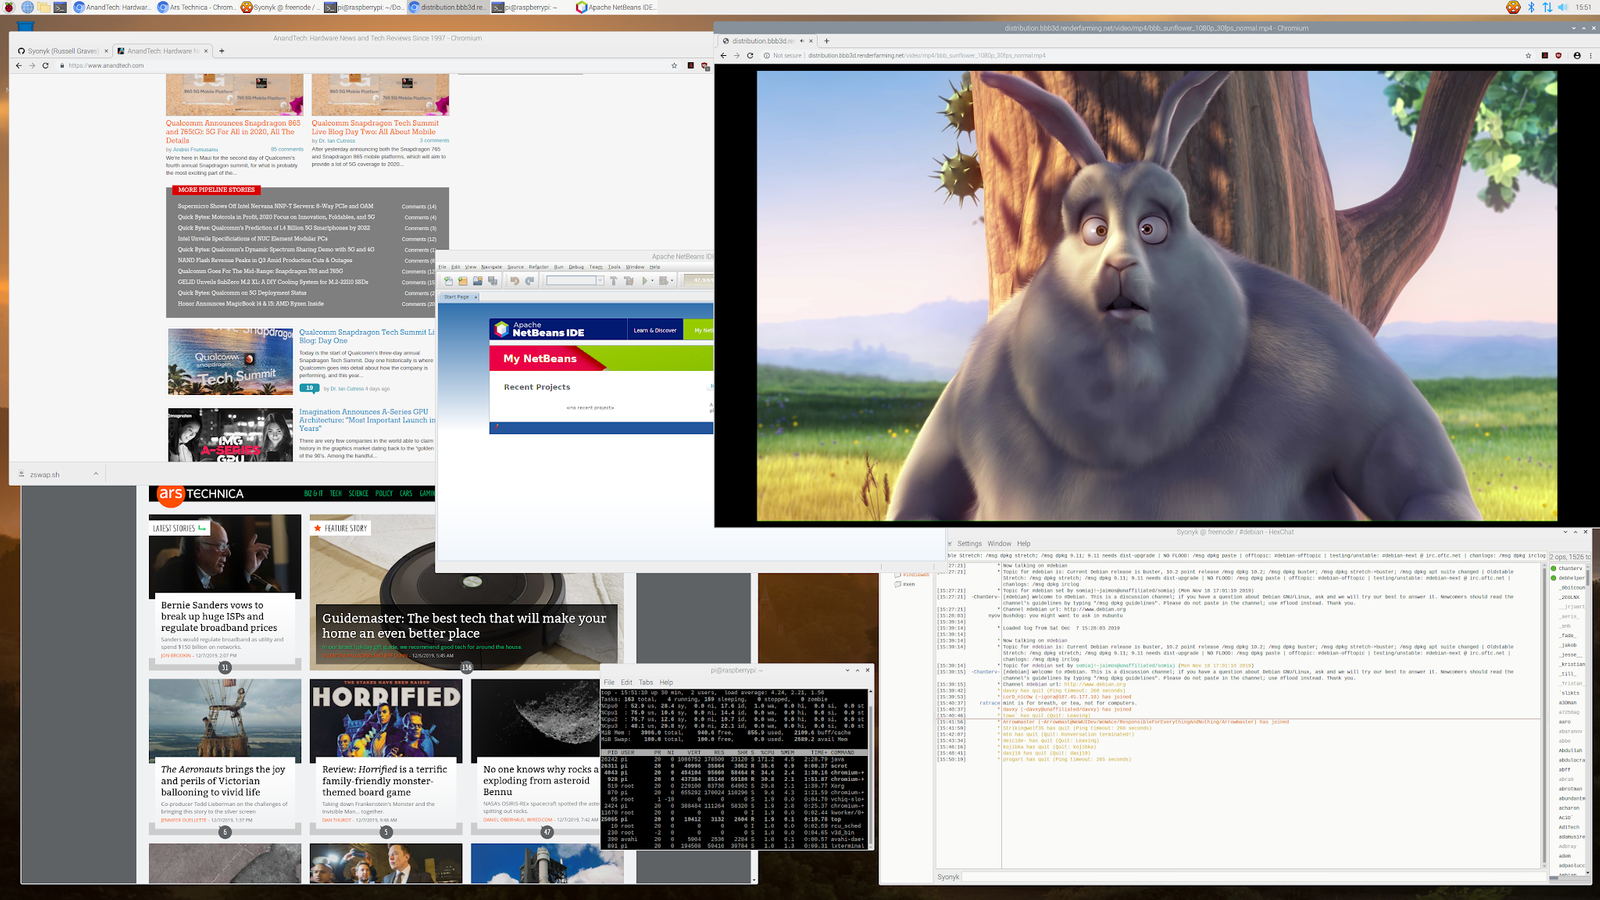
My benchmarks showed that the Pi4 is a rather massive step up in performance from the Pi3 - and on paper, should outrun the Jetson Nano I’ve been using for a while. Of course, I’ve got some of my tweaks… so jump in and let’s make a yet-more-capable desktop!
What is it with you and ARM desktops?
My blog probably makes it clear I’ve got a thing for these little ARM boards I can turn into desktop grade systems. I started using them a few years back when I moved into my solar powered office. While I have plenty of power most of the year, winter is a rough time - so very low power systems are useful. Plus, after I started working through the choke points, it turns out that even something like a Raspberry Pi 3 can make a very useful little desktop! Sure, it’s RAM limited, and the SD card is slow… but zswap and a USB SSD adapter really made it into something useful.
Besides - what’s the world come to when a quad core 1.2GHz system with 1GB of RAM can’t be used for much? I’m old enough to remember when the first 1GHz chips came out - and that was an amazing amount of power in just a single core!
At this point, it’s halfway because they’re useful to me, and halfway because they’re just a fun challenge. Why bother with an expensive, high power system that probably has a ton of security problems in the hardware when you can, for a fraction the cost, have something that does the same job at perfectly usable performance?
The Raspberry Pi 4
That the Raspberry Pi 4 happened surprised roughly nobody - the Raspberry Pi foundation has been iterating on their design for years, and following the 3 with the 4 is the sort of thing a 4 year old can predict.
What surprised an awful lot of people, myself included, is that they released several versions of the Pi 4 - with differing amounts of RAM! Their perpetual $35 price point comes with the usual 1GB of RAM, but you can buy the Pi4 with up to 4GB of RAM (for $55 - I expect that the higher cost units are a good bit more profitable than the base model and make up the bulk of the actual profits).
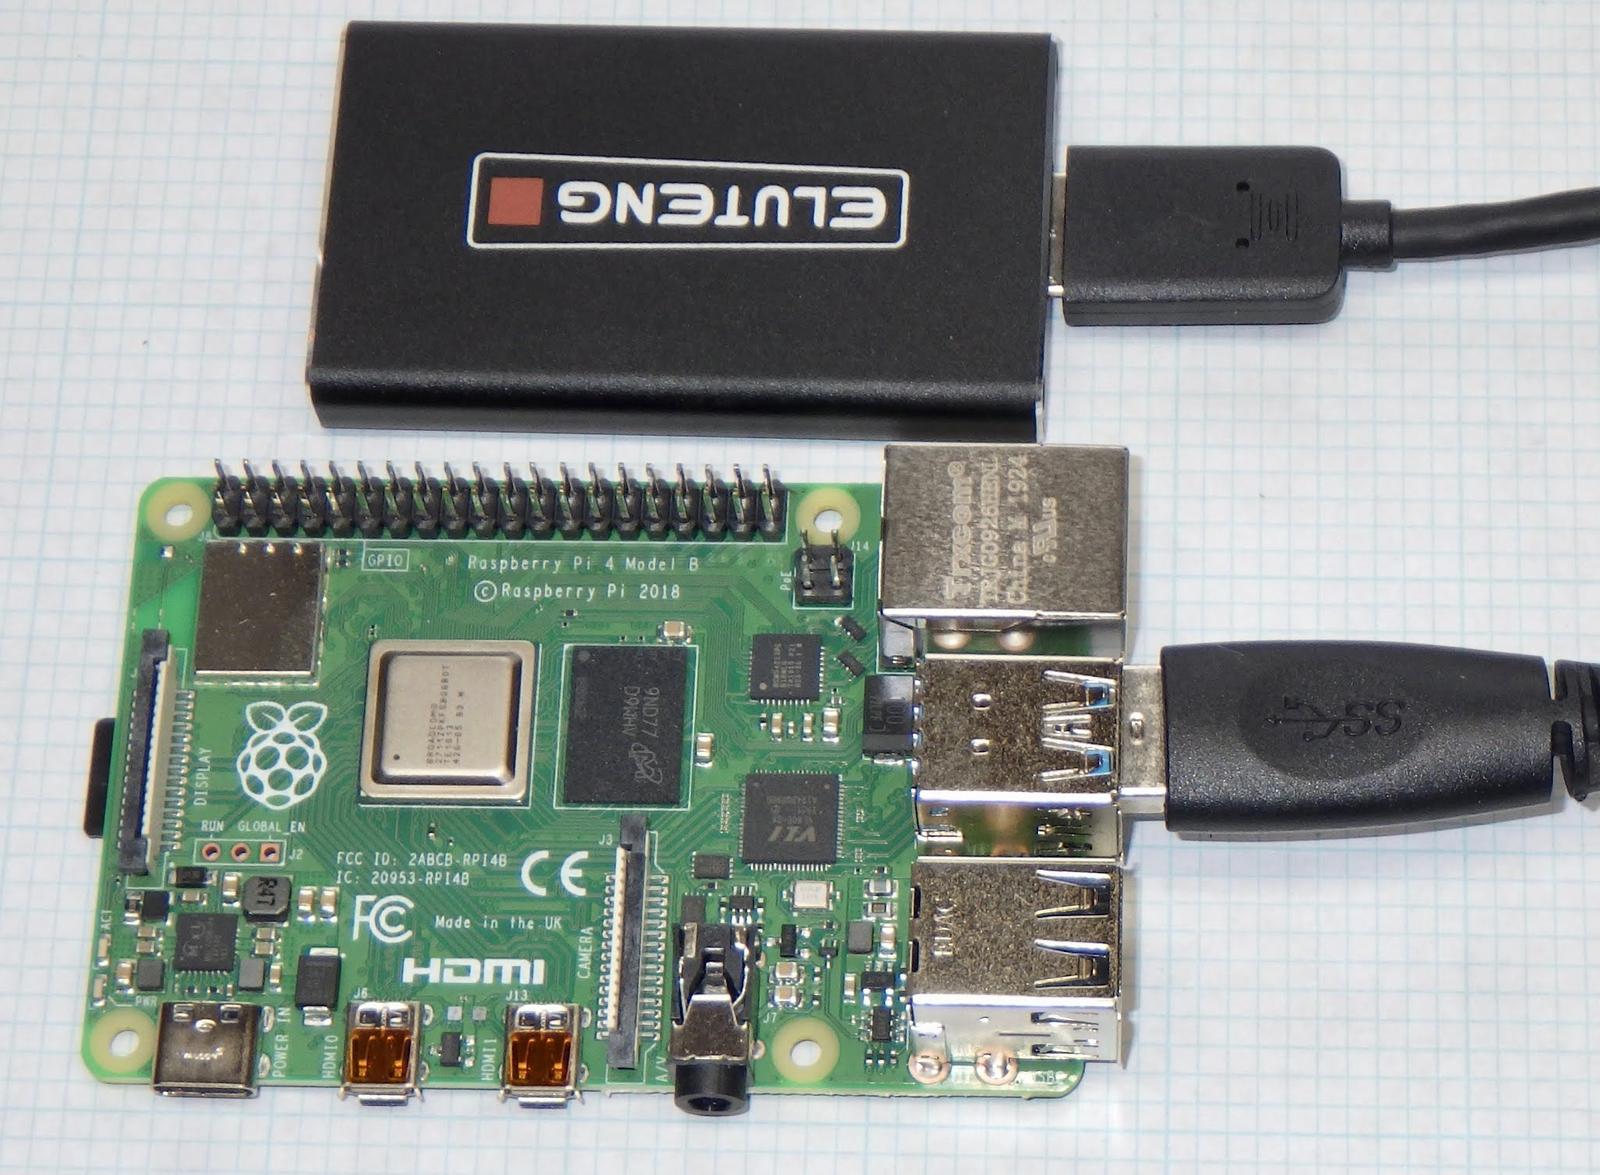
RAM has always been a weak point on the Raspberry Pis. Since the original, they’ve always shipped with “barely enough RAM.” You can make it work, but having an option with a whopping 4GB of RAM out of the box? Yes, please!
The rest of the Pi4 is a significant upgrade from the 3 as well. The quad cores are A72 cores running at 1.5GHz, up from the A53 cores running at 1.4GHz in the Pi3B+. While the frequency jump isn’t significant, the A72 cores are a lot more powerful than A53 cores. There’s support for dual 4k displays (!), USB3 (!), and a proper gigabit NIC. It’s an awful lot crammed into a very small package - and that’s before you overclock it!
What You’ll Need
If you’re going to set up a Raspberry Pi 4 desktop, you’ll need a few things. First and foremost, you’ll need a Raspberry Pi 4 - and I’ll suggest a starter kit that comes with the proper power supply. The Pi4 uses a USB-C power supply that’s not quite right, so expecting a random USB-C power supply to work is probably not wise. When the USB foundation gives you a reference circuit, follow that circuit exactly, don’t get cute unless you really understand what you’re doing.
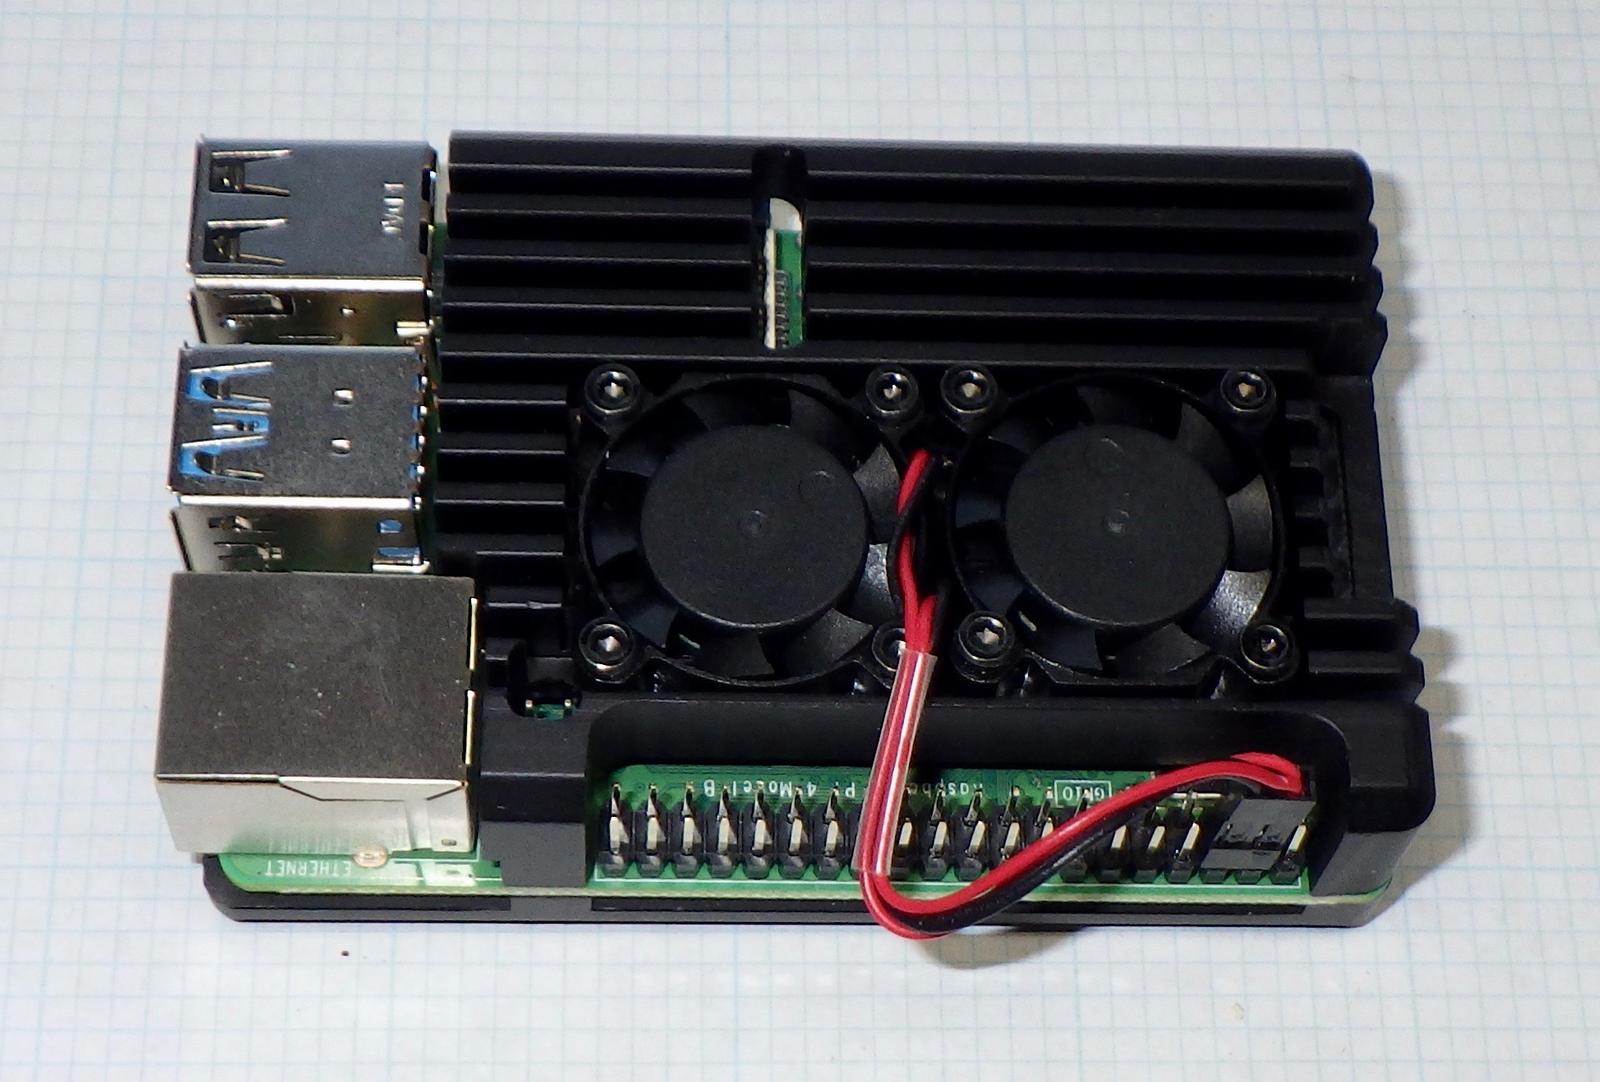
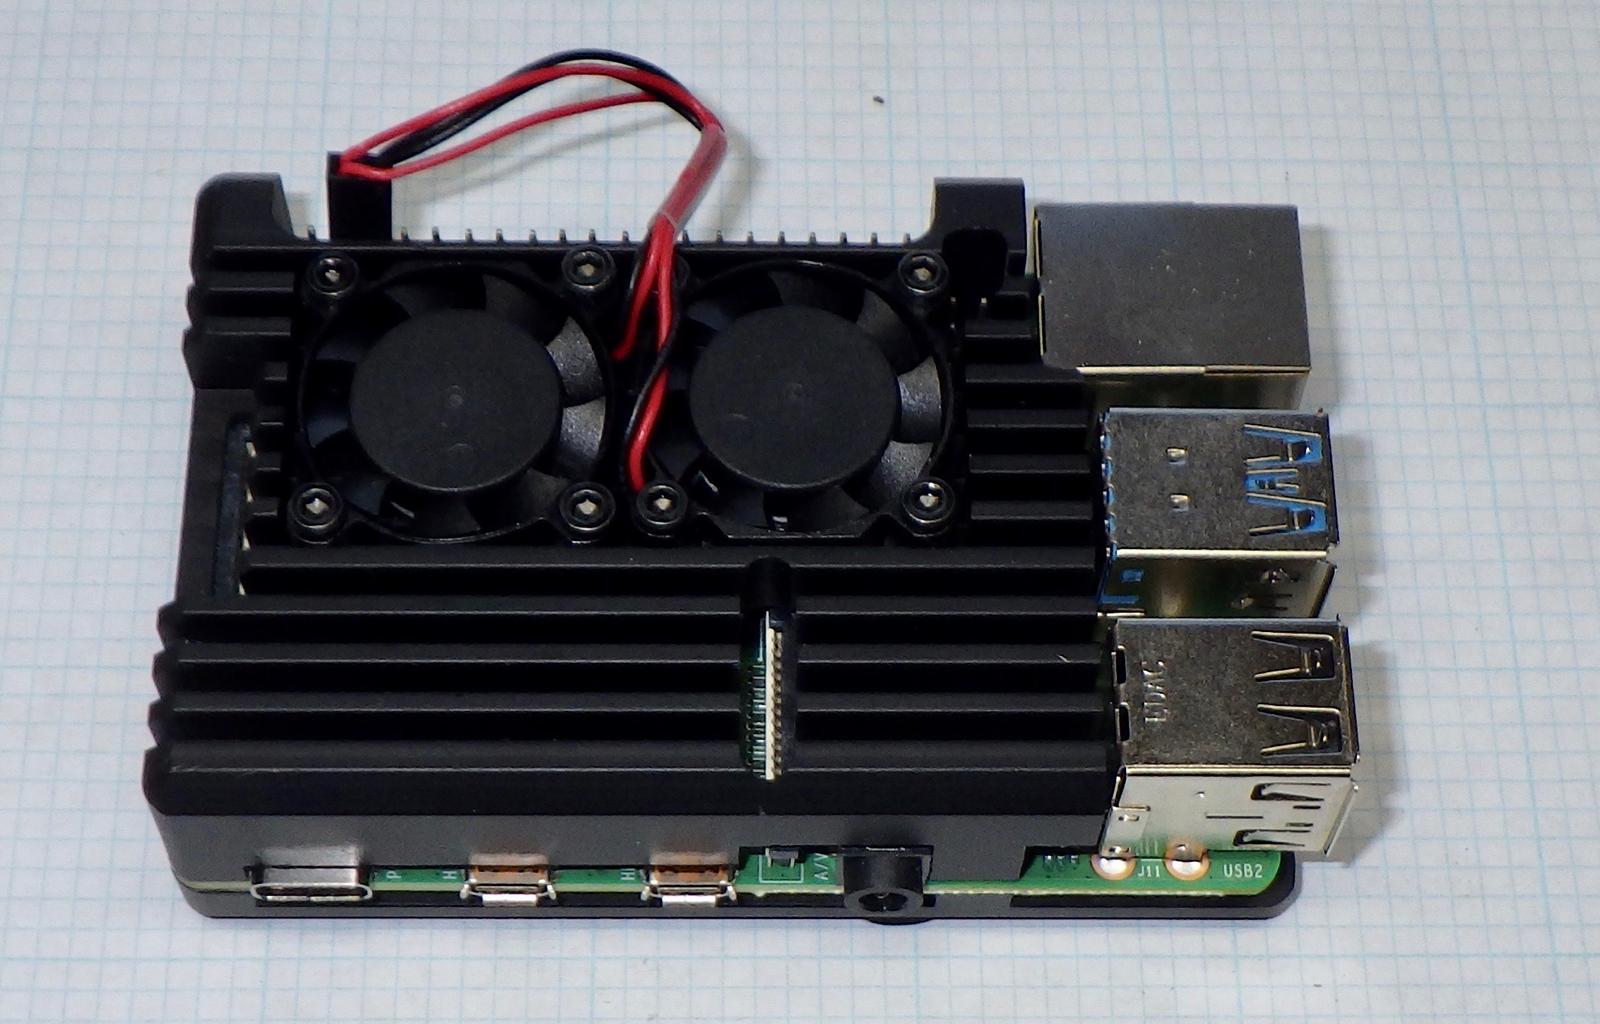
I’ll suggest getting one with a good heatsink - given some heatsink, you can push the Pi4 up to 2GHz and gain an awful lot of real-world performance. For light use, a passive heatsink is fine, but to really thrash it hard, you’ll want something with fans.
You’ll also need some sort of microHDMI cable - you can either get an adapter or just a straight up cable. Get a 2.0 capable cable if you’re going to play with 4k at all - the older cables are refresh limited up there.
For storage, you need a 16GB microSD card of some variety (8GB might be OK, but if you have one laying around use that - it’s just going to host the boot partition after setup), and then a USB3 to SSD adapter and some sort of SSD. I’m a fan of the mSATA adapters and some cheapo 32GB SSD. They’re good enough for this sort of use.
If you buy on eBay, you might find the following useful (and I’d certainly appreciate the affiliate income from you using my links):
USB 3.0 to mSATA Adapter
mSATA SSD
Raspberry Pi 4 Heatsink
The whole setup shouldn’t run you much more than $100.
Initial Setup: Follow the Steps, install to uSD
To get the image installed, follow the Raspberry Pi Foundation’s directions - they’re quite good. The Raspberry Pi 4 doesn’t support USB booting yet, so you’ll need the microSD card anyway. We’ll put the image on the SD card, get the OS set up and running, then pivot over to the SSD. I’m working with one of the recent Buster images, though it shouldn’t change with newer versions terribly much.
The microHDMI cable goes to the display output nearest the USB-C port. Power it on, you should see something about a resized filesystem, then the board will reboot into Raspbian. Hopefully. If you don’t see anything on the display after the initial setup, don’t panic - the Pi4 is a weird beastie and I’ll cover it later. If you’ve got a good monitor it should behave. If you have a cheap Chinese special… well, scroll down towards the bottom.
Go through the initial setup. I don’t know why they don’t just list timezones as, you know, actual timezones. It does bug me, because I know I’m in Mountain time, and I have to think about what other cities are in the same timezone. The updates will take a bit if you’re connected to a network, so go grab a cup of coffee while it does that. Reboot, and, ideally, you’ve got a fresh Raspbian desktop!
Now is a good time to work out the monitor issues, if you have any. Solve all this stuff on the SD card before you pivot over to the SSD.
A Quick Note on UAS: Present, but Broken
The Raspberry Pi 4 finally adds UAS support into the kernel - but it’s broken with a lot of devices. I don’t know where the blame lies, specifically, but you’re likely to see a lot of this sort of thing in the dmesg output with USB to SSD adapters. If you plug the adapter in and it takes a long time to mount, check for this in dmesg - it’s likely the problem.
[  732.011718] sd 0:0:0:0: [sda] tag#1 uas_eh_abort_handler 0 uas-tag 2 inflight: CMD IN
[  732.011736] sd 0:0:0:0: [sda] tag#1 CDB: opcode=0x28 28 00 00 00 08 60 00 00 80 00
[  732.011981] sd 0:0:0:0: [sda] tag#0 uas_eh_abort_handler 0 uas-tag 1 inflight: CMD IN
[  732.011994] sd 0:0:0:0: [sda] tag#0 CDB: opcode=0x28 28 00 00 00 29 28 00 00 08 00
[  732.051742] scsi host0: uas_eh_device_reset_handler start
[  732.202814] usb 2-1: reset SuperSpeed Gen 1 USB device number 2 using xhci_hcd
[  732.239573] scsi host0: uas_eh_device_reset_handler success
That’s a problem, and it’s going to really hurt performance. There are some adapters that work properly, but most don’t - annoyingly. We’ll have to work around this to force the usb-storage driver.
If you don’t have the above problem, then you can ignore the rest of this section - and please let me know in the comments which adapter you’re using without trouble!
To disable UAS for a particular device, you need to know the USB device ID and vendor ID. In dmesg, when you plug the adapter in, you should see something like this:
[ 1260.617021] usb 2-1: new SuperSpeed Gen 1 USB device number 3 using xhci_hcd
[ 1260.648510] usb 2-1: New USB device found, **idVendor=152d, idProduct=0578,** bcdDevice= 5.08
[ 1260.648525] usb 2-1: New USB device strings: Mfr=1, Product=2, SerialNumber=3
[ 1260.648538] usb 2-1: Product: USB to ATA/ATAPI Bridge
[ 1260.648550] usb 2-1: Manufacturer: JMicron
[ 1260.648562] usb 2-1: SerialNumber: 0123456789ABCDEF
[ 1260.668363] scsi host0: uas
The important thing here is the idVendor and idProduct values. We’ll set up a quirk in the kernel command line to avoid using UAS for this. Why the command line? Because we’re going to put the root filesystem on this device, and the normal quirks database won’t be accessible before it’s mounted.
The kernel command line format is “usb-storage.quirks=idVendor:idProduct:u” - so, for mine, it would be “usb-storage.quirks=152d:0578:u”. You might add it with nano:
sudo nano /boot/cmdline.txt
Reboot, plug the device in, and it should mount a lot faster. In the dmesg output, you should see something like this:
[   61.072113] usb 2-1: new SuperSpeed Gen 1 USB device number 3 using xhci_hcd
[   61.103563] usb 2-1: New USB device found, idVendor=152d, idProduct=0578, bcdDevice= 5.08
[   61.103579] usb 2-1: New USB device strings: Mfr=1, Product=2, SerialNumber=3
[   61.103592] usb 2-1: Product: USB to ATA/ATAPI Bridge
[   61.103605] usb 2-1: Manufacturer: JMicron
[   61.103616] usb 2-1: SerialNumber: 0123456789ABCDEF
**[   61.107160] usb 2-1: UAS is blacklisted for this device, using usb-storage instead**
**[   61.107247] usb 2-1: UAS is blacklisted for this device, using usb-storage instead**
[   61.107262] usb-storage 2-1:1.0: USB Mass Storage device detected
**[   61.107565] usb-storage 2-1:1.0: Quirks match for vid 152d pid 0578: 1800000**
[   61.107690] scsi host0: usb-storage 2-1:1.0
The important thing is that the quirks matched, and it’s using usb-storage instead of uas. Great!
Format the SSD and Move Root Over
Zero the start of the SSD in case there’s something else there - we’ll start with a blank slate. I assume the SSD is the only storage device plugged into the USB ports at this point (if not, make sure you wipe the correct device).
sudo dd if=/dev/zero of=/dev/sda bs=1M count=1
Then, create a new partition. It’s 2019. Use GPT for the partition table type. In cfdisk, new, accept the default, write, agree to the write, quit. Then we’ll make a filesystem (and after past experiments with btrfs having gone poorly, just use ext4).
sudo cfdisk /dev/sda
sudo mkfs.ext4 /dev/sda1
Now we just copy root over! It’s vital to create the /proc mountpoint after copying the filesystem, or the system won’t boot from the new image.
sudo mkdir /mnt/root
sudo mount /dev/sda1 /mnt/root
sudo rsync -axHAWX --numeric-ids --info=progress2 --exclude=/proc / /mnt/root
sudo mkdir /mnt/root/proc
Go grab coffee again. This should copy around 6GB over, and took about 5 minutes on mine - not bad!
Now get the PARTUUID of the new partition:
blkid /dev/sda1
Edit /etc/fstab and /boot/cmdline.txt and replace the existing partid with the new one.
Or… be fancy!
sudo sed -i s/\`blkid --output export /dev/mmcblk0p2 | grep PARTUUID | tr -d \\n\`/\`blkid --output export /dev/sda1 | grep PARTUUID | tr -d \\n\`/ /etc/fstab
sudo sed -i s/\`blkid --output export /dev/mmcblk0p2 | grep PARTUUID | tr -d \\n\`/\`blkid --output export /dev/sda1 | grep PARTUUID | tr -d \\n\`/ /boot/cmdline.txt
Reboot, and you should be on the SSD!
lsblk
You should see something like this - you’re looking to make sure that the SSD is mounted at / (the root mountpoint).
NAME        MAJ:MIN RM  SIZE RO TYPE MOUNTPOINT
sda           8:0    0 29.8G  0 disk
└─sda1        8:1    0 29.8G  0 part /
mmcblk0     179:0    0 29.7G  0 disk
├─mmcblk0p1 179:1    0  256M  0 part /boot
└─mmcblk0p2 179:2    0 29.5G  0 part
Yay! You’re on the SSD! If you want to reformat your existing root partition and put something there (like a swap partition if you’re using zswap), feel free to.
Would You Like to Build a Kernel?
In what might be a first for my “weird ARM desktop” posts, you don’t actually need to build a kernel if you don’t want to! With 4GB of RAM, and USB3 support for the root partition built in, there’s actually no need to mess around with it.
But. But, but, but. I wouldn’t feel like it was a proper post if I didn’t get you set up with a kernel build and zswap, because it’s just that magical.
Swap isn’t evil. Thrashing swap is evil. Letting unused (or rarely used) bits of program data be pushed out to disk to free up the RAM for stuff that’s actually being used is a great way to help improve performance - and on my systems, even with plenty of RAM, I still see a lot swapped out after a few weeks of uptime. It’s just things that can’t be discarded but aren’t being used. With zswap, very little of this swap traffic actually hits disk, so it’s actually safe enough to put the swap file (or partition) on the microSD card. The uSD card will be an infrequently used, nearly write-only repository of stuff that’s fallen out the back end of the in-memory swap region (or, on occasion, pages that don’t compress - but those are surprisingly rare in modern systems).
The Raspberry Pi Foundation keeps a nice set of kernel build instructions laying around, and we’ll use them. They’re on a recent enough kernel that there’s no need to play with bleeding edge - just enable zswap and go. I’m building a 32-bit kernel here, because this is what Raspbian uses stock, and it’s fine. Can you build a 64-bit kernel? Yes. Should you? Probably not. But that’s a separate post.
mkdir ~/pi_kernel
cd ~/pi_kernel
sudo apt install git bc bison flex libssl-dev make
git clone --depth=1 https://github.com/raspberrypi/linux
cd linux
make bcm2711_defconfig
Now we’re going to tweak the kernel config a bit to add zswap and some other related modules. This sequence should be more robust than the patch files I’ve used in the past.
sed  -i 's/# CONFIG_ZSWAP is not set/CONFIG_ZSWAP=y/g' .config
sed  -i 's/# CONFIG_ZPOOL is not set/CONFIG_ZPOOL=y/g' .config
sed  -i 's/# CONFIG_ZBUD is not set/CONFIG_ZBUD=y\\n# CONFIG_Z3FOLD is not set/g' .config
sed  -i 's/CONFIG_CRYPTO_LZO=m/CONFIG_CRYPTO_LZO=y/g' .config
sed  -i 's/CONFIG_LZO_COMPRESS=m/CONFIG_LZO_COMPRESS=y/g' .config
And build/install the kernel. Back up your original kernel if you care, but it’s just as easy to back up your whole boot partition. This is why you do this early - it’s easy to reset if needed. Build the kernel, install it, and toss zswap in the kernel command line parameters. Notice that the Raspberry Pi 4 is using the “kernel7l.img” file, not kernel7.img. The L stands for LPAE - Large Physical Address Extensions. This allows the 32-bit kernel to address more than 4GB of RAM (which, once you factor in device memory regions, is relevant on the 4GB Pi4), even if programs are limited to only 4GB of address space (some of which is used for the kernel).
make -j5 zImage modules dtbs
sudo make modules_install
sudo cp arch/arm/boot/dts/\*.dtb /boot/
sudo cp arch/arm/boot/dts/overlays/\*.dtb\* /boot/overlays/
sudo cp arch/arm/boot/dts/overlays/README /boot/overlays/
sudo cp arch/arm/boot/zImage /boot/kernel7l.img
sudo sed -i 's/$/ zswap.enabled=1 zswap.max_pool_percent=15 zswap.zpool=zbud/' /boot/cmdline.txt
Reboot, and you should be on a shiny new kernel with zswap enabled!
If you’re not using a swap partition, you’ll want to make a larger swapfile. On the Pi4, with 4GB of RAM, 2048MB is probably about right. With zswap, the disk will never see this sort of write traffic, but the size of the swapfile still sets the amount of swap space. It’s possible that every single page could be entirely random and therefore unable to be compressed.
sudo nano /etc/dphys-swapfile
As always, my little zswap utility script might be useful (needs to be run as root, simple enough to verify there’s nothing evil in it).
Now: The Overclock
The last bit to consider (carefully) is overclocking your Pi4. The performance gains are significant - but a heatsink is no longer optional for this. You absolutely have to have a good heatsink (or heatsink case - whatever) for this or you may very well end up slower than you were before if the system throttles.
A few weeks ago, I benchmarked the Pi4 against some other systems - including a Pi4 at 2GHz. The results were impressive - the gains are worth the cost of a heatsink.
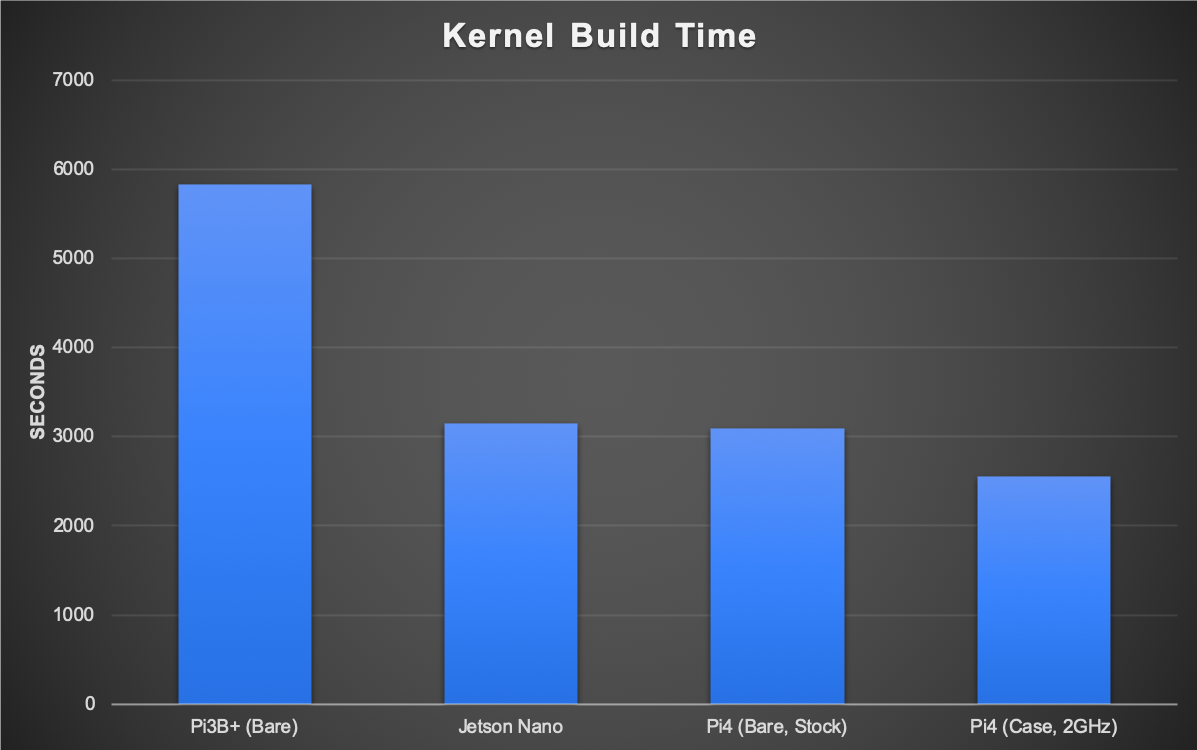
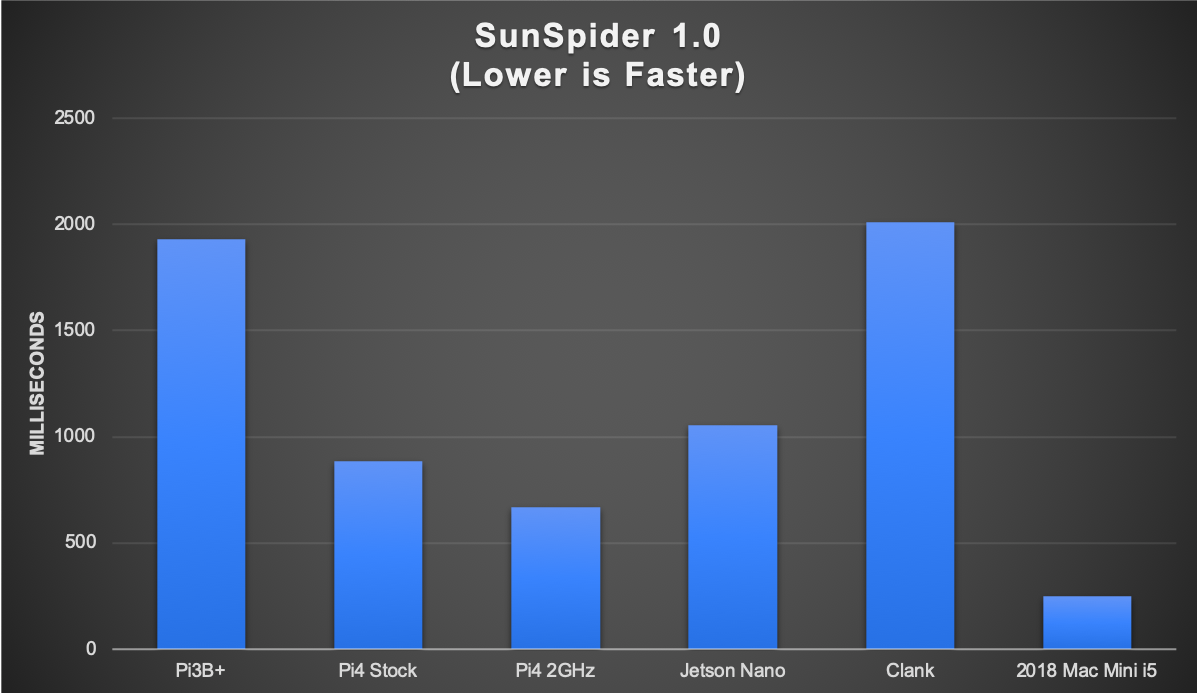
Under the [Pi4] section of /boot/config.txt, add the following:
over_voltage=4
arm_freq=2000
Reboot. If this fails… well, add more voltage or drop the frequency, but this should work quite well on almost all Pi4s. Enjoy the added performance!
Monitor Hacks and Quirks
If you’ve got a nice 4k display, you may notice that the Pi, stock, only outputs 4k/30Hz - it’s usable, but… bleh. Fortunately, there’s good documentation on HDMI stuff - so append hdmi_enable_4kp60=1 to config.txt and reboot.
echo "hdmi_enable_4kp60=1" | sudo tee -a /boot/config.txt
That should let you set 60Hz! Or not, if your cable and monitor don’t support it over HDMI…
If that doesn’t work, just edit config.txt and remove that line on another machine.
The other issue you’re likely to run into is that the system just doesn’t like your monitor - and for that, you’re going to want to look at the video mode documentation. You can manually force all sorts of things, some of which will work, some of which don’t. I don’t have great advice here beyond “The Pi4 is a little bit picky about monitors in ways older Pis weren’t.” Sorry! I’ve got one display I can’t actually get it to drive at native resolution in the OS (even though forcing it in config.txt gives me the boot framebuffer with no problems). But with any halfway decent monitor, this shouldn’t be a problem.
But you’re way more likely to have weird issues with monitors on a Pi4 than on the previous generations. Sorry.
How Usable Is It?
Quite!
With 1GB of RAM (the Raspberry Pi 3s), you can build a useful-ish desktop system that can do a few things at a time, but certain webpages really make it struggle, and if you ask it to run more than half a dozen tabs with other stuff going on, it’s likely to eventually fall over on you sooner or later.
With 4GB of RAM (the Jetson Nano and Pi 4/4GB)? It’s an honest desktop replacement for a lot of uses. Multiple desktops, various communication apps, a dozen or two tabs, and a generally responsive system await. You won’t mistake it for a modern x86 desktop or laptop, but it’s absolutely useful, and for the money, I’d rather have a Pi4 based desktop than a really cheap x86 machine!
If you already have a Jetson Nano, I don’t think the Pi4 is enough of a performance delta to justify replacing the system completely - so I’m leaving my Nano in service for the moment. But if you don’t? Get the Pi4, desktop it, and you will greatly, greatly enjoy what you can do with a tiny little system and a few watts of power!
Comments
Comments are handled on my Discourse forum - you'll need to create an account there to post comments.If you've found this post useful, insightful, or informative, why not support me on Ko-fi? And if you'd like to be notified of new posts (I post every two weeks), you can follow my blog via email! Of course, if you like RSS, I support that too.
