
The worst part of the project, easily, was doing the conduit work. It was the middle of summer, the air was thick with smoke from the fires all over the west coast, and I was outside doing an awful lot of digging with a pickaxe and trenching shovel.
Why?
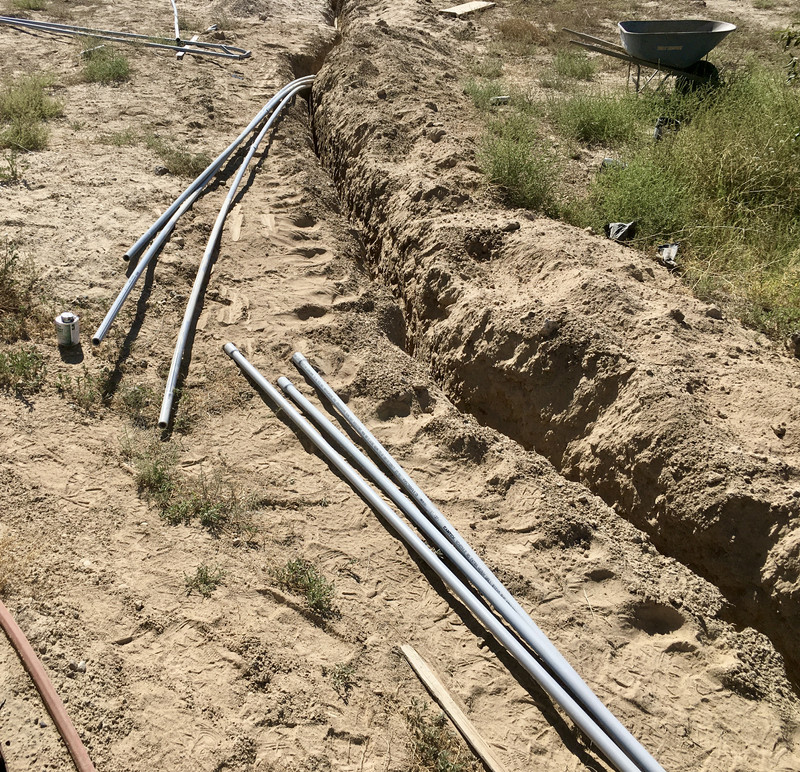
To dig this array of trenches.

It took a month of weekends, beat me up pretty badly, and wow, do I have some suggestions for making the process suck less!
Trenching: Because Buried Conduit
I knew from the beginning of the project that I’d be doing a lot of trenching. The panel frames are out in a corner of the property away from the house, where they won’t really interfere with any of our other plans for the property. However, the interconnect point with the grid is the side of the house - so one has to get power from the panels to the grid. Unfortunately, NEC prohibits “Just toss some cables on the ground,” and I didn’t feel like working with overhead routing either. So, trenching it is!
There are a few ways to trench cables through this area in a NEC-compliant manner. I could go with 6” of trench depth and metal conduit, I could go with 18” of trench depth and PVC, or I could go with 24” of depth and underground feeder. Talking to electricians out here, everyone had the same advice: “Go with PVC.” And, I’ll add that the actual wording in NEC isn’t 18” of depth - it’s 18” of cover. Big difference if you’re throwing a few pieces of 1” conduit down there.
Realistically, for my 3 runs of conduit, I needed a 21-22” deep trench. Of course, I had planned for this to not be an issue, because I was just going to bury the stuff. 24” down, toss dirt over it, on my way.
Except, Covid was a thing in 2020…
Trenchers: No, really, get a bigger one.
This looks like a really big trencher, right? Tracked, big cutting blade, and clearly will do some serious digging! Actually, it wasn’t big enough. Not by far.

I wanted to get one of these trenchers from a local rental shop, but they were closed, for an unspecified period of time, due to Covid issues. Notice the difference in size. This is important.

I called around, found another place that had trenchers that they said would easily do a 18” trench down where I live, picked it up, and set about attacking the ground with a hydraulically powered trenching tool. These are fairly simple - a giant chain digger turns, ripping up the dirt and rock, and the spiral blades on the side push the extracted dirt off to the side.
Unfortunately, this unit was simply too small to really deal with our dirt/rock/etc. It kept getting hung up on rocks, and while I was able to get 18” down, it would not reliably dig much deeper - and it left a few inches of loose dirt in the bottom of the trenches. My initial plan had been to dig about 24” down, toss the conduit in, and have plenty of cover over it to meet the 18” requirement without doing much in the way of manual digging. So much for that plan…

Crossing the trench took a bit of figuring out, where I had the “T” corner. A bit of inadvertent experimentation told me that the trencher would happily get stuck in the trench it dug, and I spent a while cramming stuff under it to get it out. Random pieces of lumber, however, work well enough to get the tracks across ditches you’ve already dug.

If you’ve never run a big trencher like this before, they’re fairly simple. You roll them to where you want to start the trench, use one handle to start the big cutter chain spinning, swing it down into the ground, then start working backwards - they cut in reverse. Dirt comes out, dirt gets pushed to the side, and you ideally have a nice, clean trench in front of you!
However, they are also quite prone to getting hung up on any sort of rocks in the dirt. Depending on the nature of the dirt and size of the rock, it may bang on it for a while, rip it free, and toss it out, or it may simply hang up on it. The trencher is run by a hydraulic motor system, so if the chain hits something immovable, the chain just stalls (the hydraulic bypass opens under pressure, leaving the engine running). Lift it up, get it moving, try again. Or reverse the chain to free it from whatever it hit. Lots of options, and I was able to get most of the obstructions removed via the brute force approach of just letting the chain pound them, powder the dirt, and kick them free. I had to remove a few by hand, bit it wasn’t too bad. I ended up with 18-20” of total trench depth, with about 2” of dirt (very, very fine dirt) left on the bottom.
And, in one particularly annoying spot, an un-dug chunk of dirt. I came from both ends and met in the middle. I decided to dig the rest of it by hand instead of risking getting a 1000+lb trencher properly stuck in my trench - I mean, how hard could it be?

Did you know you can just rent gigantic excavators like this? They’ll even deliver them if you don’t have a truck that can tow them!

But, seriously. If I’d managed to get the trencher I want that would dig a 24” trench, this would have been a far, far shorter part of the project, and I really suggest finding a trencher that can go deep if you need to run conduit underground. Aim for 6-12” deeper than you need, and life should be easy. If you don’t, well… keep reading.
PVC vs Metal vs UF (Underground Feeder)
You have a few choices for conduit. I’ve done my whole project with PVC, and it’s almost all Schedule 80 (thicker walled). Why?
Metal conduit is the easiest to deal with, depth-wise. You only need 6” of cover, so in a lot of areas, that’s a consideration. I made the gamble that there wasn’t any huge underground rock outcropping in the area I needed to trench through, and that was correct. However, metal conduit is quite rigid - especially the larger sizes. Since I needed 3/4” minimum for my runs, it would have put some constraints on the trench that I wasn’t sure I could meet out here. If I found a sufficiently large rock, I was just planning to go around it. Also, talking to people who have done work out here, metal conduit tends to corrode away in our soil. It’s very, very alkaline (north of 8 on the ph scale), and I’ve talked to a few people who said that after a decade or two, metal conduit just disappears. You dig down and find nothing but bare wires. Since the design life for this project is 60 years, and I really don’t want to trench again, that didn’t sound like fun.
UF (underground feeder) wire is flexible and easy to work with, but is apparently a bit of a snack for gophers. We have plenty of those around here, and it also requires a 24” cover depth, which I figured (rightly) would be quite annoying to accomplish.
PVC is flexible enough that you can work with a not-entirely-straight trench (like the “isn’t” stretch on Grand Tour), and offers enough protection that you can pull regular wire through it. There are two options for PVC conduit - Schedule 40, and Schedule 80. Most people are familiar with Schedule 40 PVC from projects, but the Schedule 80 stuff has a thicker wall. The outside diameter is the same, so they join together easily, and Schedule 80 has less interior space. This shows up in the wire fill charts.
For any sort of aboveground PVC that’s at risk for damage (weed eaters, lawn mowers, etc - basically, below about 8’ up), NEC requires Schedule 80. You can use whatever you want for high runs and underground, but I decided to just keep the runs Schedule 80 throughout. Better protection against rocks and gophers, and really didn’t change the cost meaningfully.
My wire fill chart requirements only need 3/4” conduit, but I also have some 100’+ runs - and talking to a few other people, they suggested upsizing to 1”, at least, to make pulling wire easier. So I did!
One truckload of 10’ segments of 1” Schedule 80 PVC later, it’s time to start putting stuff in the ground!

Trenching (Sucks!)
I made use of three tools for this part of the project: A trenching shovel (orange, far less orange after the project), a pickaxe (did you know you can just buy these too?), and a metal measuring stick for ensuring I had sufficient cover depth.
Just… start cutting. I eventually settled on working on about 20’ at a time. Swing the pickaxe while straddling the trench, cutting up the bottom and loosening any rocks. You’ll get a feel for what’s down there quickly. Once the rocks and dirt are loose, kneel down next to the trench with your trenching shovel and, working sideways, clean out the bottom. It sucks. It’s slow. It’s very, very good exercise! I did this during heavy smoke (because, of course, the project timeline works out like that), and was good for about 3 hours of this in the morning before it either got too hot, too smokey, or my body told me it was probably a good idea to quit for the day if I wanted to go back to it the next day.
There is a LOT of trench to cut here, and that took almost all the time of this stage of the project.

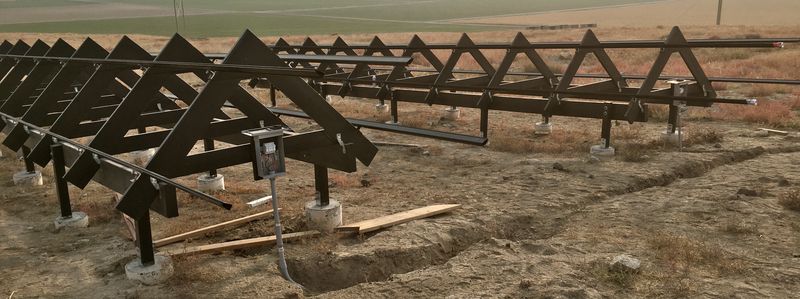
The trenches extend to directly under my array-side junction boxes so the conduit can run straight down into the ground. There’s a 3’ limit on unsupported conduit, so I made sure the boxes were closer than 3’ (by far). In the background, you can see the end of one of my grounding rods bent flat. I drove these at a 30 degree angle until they hit something that they couldn’t break or penetrate (some rock or another, 7-8’ down), then dug a hole and bent the top over. It’s not ideal, but it works, the inspector didn’t have any problems with it, and it beat pulling them out to try again. I have two ground rods per frame (six total for the project), so I’m not too worried about grounding. I drove these with a sledgehammer. It is a far better idea to rent a ground rod driver bit for a rotary hammer, and I did that for the south facing frame.

You’re required to have some sort of expansion compensation in conduit runs coming out of the ground. One of the usual “slider” couplings works fine for this. PVC actually expands quite a bit with temperature swings - a 100’ run of PVC, going from 0F to 100F, will expand 7”! Keep this in mind with your runs. Putting this stuff together in the heat, I made sure to leave some slop where I could for the bits to contract. You’ll note that my joint is “almost tight” - since the PVC will contract in the winter, this leaves the appropriate range of motion. Had I assembled it in the winter, it would be “mostly open” to allow it to compress in the heat.
Here, instead of a pair of 90 degree joints, I ran the conduit down at an angle and used a pair of 45s. There’s a limit of 360 degrees of angle bends in any length of conduit before requiring a junction box, so this saves me 90 degrees and makes pulling wire easier!

My tools, a trench, and some conduit. I built the conduit as I went, because a wind storm would happily move a lot of dirt back into the just-cleaned trench. To help keep the conduit free of dirt, wherever I stopped I put a 90 and a chunk of conduit sticking in the air (visible top-center). It mostly worked!

The trencher was really, really good at filing in trenches at the intersections. At least most of the fill is soft and already broken up, so doesn’t require much pickaxe work! It doesn’t mean it’s fun, though.

Installing Conduit
Installing conduit, underground, is fairly easy. Cut to length (if needed), apply PVC glue, shove ends together with a quarter twist or so to smear the glue around. You don’t need purple primer like you do for water carrying PVC, and the glue does a nice job of lubricating the connection so everything fits together tightly. Then don’t yank on it too hard until things have set! Since I wasn’t doing this all in one day, I didn’t get too terribly concerned about thermal expansion/contraction - the PVC would have time to cool down in the trenches.

It’s hard to get any good photos down in the trench. But I made very sure that there was at least 18” of cover in all the areas, and shoved the conduit down as far as I could. It tends to pile up a bit around corners unless worked into place. Fun with poking things with 2x4s to position them, because it was that or be on my stomach, reaching down into a pit… and I was covered enough in dirt as it was.

One of my fears throughout the trenching was finding Very Large Rocks down in the trench that I couldn’t dig out. I found and removed plenty of rocks, but only one was large enough to really be a pain - this one. It was up near the house, started at least a foot down, and took easily an hour of digging and swinging and prying to remove. I’ve removed a lot of rocks from the property, and rocks down in trenches follow the same rules as any other: If you can get even a tiny bit of movement, you can remove the rock.
Some rocks are small. Some rocks are big. Some rocks are actually less “rock” and more “the upper part of a large basalt outcropping under the ground.” It’s hard to tell the difference at first. Dig around it, pry on it, beat on it… whatever works. If it starts moving at all, keep going and it will eventually come out. If you can’t get any motion at all, after an hour or two, well… it’s probably not going to come out without heavy machinery. Or at least a jackhammer. I knew this one was in the fill dirt around the house, though, so I had a pretty good idea I’d be able to remove it with enough effort.

My trench is not straight. But it gets where it needs to go!

House End Terminations: At the Inverters
The last 10-15’ of trench had to be dug by hand, because it runs along the house. Not terribly fun, but still sucked less than emptying out the rest. And at least there were no huge rocks.
NEC is a little vague about mounting inverters on the side of a house. Are PV circuits running to them “on or in the house”? Is conduit separated from the house by a few inches considered “on” the house? All wonderfully vague. So I called the people responsible locally and got a concrete answer: By their interpretation (don’t expect this to match anyone else’s interpretation), inverters are allowed on the side of the house. However, PV circuits (DC from the arrays) must come straight up from the ground to the inverters, over a minimum feasible distance. So don’t put your inverters 8’ in the air and run conduit horizontally 20’ to them. Mark the circuits, and they’ll pass that out here. Great! However, this means I need to trench along the side of the house to all the inverters, instead of running the conduit along the foundation from the corner.

As I came near the house with the conduit, I realized that I had a bit of a problem: I wasn’t actually sure which bit of the three parallel runs went where. For two, it didn’t matter, but there’s a lower power inverter (3kVA vs 6kVA) for the south facing panels, and that needed to be run properly.
How do you identify long conduit runs? The easiest way I found was to pretend a chunk of conduit is a very, very long tuba. Buzz into one, and have someone at the other end identify which of the frames is making noise. It’s apparently very obvious and impossible to mistake - and, certainly, worked for me!
With the conduit identified, I ran them to the appropriate inverter. I’m using the code-required expansion fitting in the straight vertical rise, and they’re getting ready for wire! You may notice that the run up from the expansion joint looks a bit smaller, and that’s because it is. The conduit fitting for the inverter is for 3/4” conduit, but my main run is 1” - so I used the expansion fitting as the point to neck down. This caused some trouble getting the twine through…

I backfilled around the house a bit early (before the rough-in inspection) because I didn’t want water accumulating down there, and we’ve had some problems with mice getting in - so I didn’t want yet more options. The conduit very clearly has more than 18” of cover, and, no, it’s not a trick photo angle.

Pulling the Wire
I apologize for the lack of photos in this section - it was hot, I was feeling the time crunch, and we just went about actually getting stuff done instead of taking photos. Descriptions will have to suffice.
For long runs like this, it’s easier to use pulling twine than to use a fish (the long metal thing I used for the side of house wiring) - and there’s a trick to getting them through in the first place.
A few people asked why I didn’t just run the wire as I went - and the simple answer is that NEC prohibits it. You have to finish the conduit run before you fill it with wire. So, for a long (100’+ run), pulling twine is the answer. How do you get the twine through? A shop vac!
After a bit of experimentation, I discovered that the handle from a plastic grocery bag is about the right amount of “flag” to put on the end of the twine to suck it through the conduit. If you have too much, it hangs up on everything and, annoyingly, won’t go through the 3/4” conduit I have at the very end.

Seal the shop vac to the opening (more random plastic bags actually work very well for this), have someone hold it tightly in place, and start feeding the twine from the other end. It’ll suck through for a while, then probably hang up on some joint or another. When it does, I found the easiest way to get it moving again was to pull it back a few feet and let it get some momentum. The container of twine is designed so it can come out easily, and if you’re lucky, it’ll just stream along for a while. I understand that a small leaf blower at the “driving” end can help also.
Eventually, the twine just stops moving, no matter what you do. It’s now either hung up at a corner, or has gone all the way into the shop vac. Once the flag is in the shop vac tank, it won’t go anywhere else - so if you’re feeling a bit baffled, check to see if you’re actually done.
With all the twine done, the next step is wire. And here, I had a bit of a problem. For the two large A-frames, I needed to run two reds and two blacks, along with the ground wire - but all my red wire was on one spool, as was all the black. If you wonder why certain sites allow you to order multiple spools? This is why. I decided to unspool one and “double it over” in the middle so I could feed two strands off each spool at once. My first attempt was in the house and ended in utter disaster, tangles, snarls, and took an hour or two to sort out. So, I decided to do something with the space we have around.
I loaded my wire onto the wagon, with my handy little wire stand.

Then, with one end firmly anchored in place, I ran it out along a stretch of weeds. We have plenty of available space out here.

With the wire run all the way out, grab an end, walk it back the other way so it’s doubled up. Tape the “loop” in the middle to a spool, and start winding it back in! Done properly, you can now feed two pieces of wire off at the same time!

Feeding wire, again, involved lots of pulling wire and no taking photos.
You can pull either way, but for the convenience of “All the wire starting at the same spot,” we sourced the wire at the house and I pulled it out towards the frames. You’ll want some pulling lube as well (Home Depot, in the wire/conduit section, comes in a spray bottle with a long tube). Use it - not only does it make pulling easier, it helps protect the wire from abrasion around any corners it has to go through. The “360 degree limit” is probably related to this as well - just because you can pull wire doesn’t mean you should.
-
Tie a loop in the end of your pulling twine. Make sure it’s strong.
-
Strip the ends of your wires, and add about 2” of stripped length per wire. Cut half the strands off each piece of wire.
-
Loop them through the twine loop in staggered order, so you have a smooth cone of wire and not a big blob. Twist the remaining wire around to help hold them.
-
Wrap the whole thing (from a few inches up the twine back to several inches onto the last wire) in electrical tape. It should be a smooth taper back, and you want the overlap such that going around corners slides smoothly (vs trying to rip layers off).
-
Have one person start feeding the wire in, while the other person pulls at the other end. My wife fed the wire while I pulled the twine.
-
With the pulling end, you’ll start feeling how it works, but keep a constant tension on the twine. As the other person feeds a few feet of wire in, you’ll feel things start to move. Just keep the tension and let the wire pull through. When it stops, they’re probably lining up more wire to feed, so don’t force it - you’re not pulling it off the spools, you’re just making sure it comes through as they feed it.
-
The person feeding needs to line the wires up so they’re not tangled around each other, and toss in a squirt of cable lube every 10’ or so of wire. They line the wire up and push it in. The whole collection of wire should scoot easily along!
-
Repeat until finished, then do it for the rest.
And that’s how you get the wire through!

Final Advice
My advice here:
-
Rent a larger trencher than you think. You really, really don’t want to have to clear the trenches by hand.
-
Figure out how much wire you need. Add the usual adjustments, slop, tails, etc. Then double it. I had to make multiple additional wire orders because even my normal “Oh, that should be more than enough…” estimates weren’t enough. If you have a 100’ piece of conduit, and 95’ of wire? That wire is useless. You can’t use it for anything related to the conduit, because you can’t have wire joints in the conduit.
-
Try not to time your trenching for the heat of the summer. It turns out that an ideal spot for solar is actually really, really sunny!
Assuming nothing else interesting comes up, I plan to cover getting the rails mounted in my next post, then another post on mounting panels and wiring. Then, for style, some commentary on NEC, local regulations, and why I had to rework the side of the house a bit to meet some very, very buried requirements. And, if all goes well, an office-style summary post after that with the whole thing summarized in one decent post! I should even have some good spring production data by then.
Comments
Comments are handled on my Discourse forum - you'll need to create an account there to post comments.If you've found this post useful, insightful, or informative, why not support me on Ko-fi? And if you'd like to be notified of new posts (I post every two weeks), you can follow my blog via email! Of course, if you like RSS, I support that too.


