
Alright, after a nice Lent and Easter, I’m back to posting - and I think I might actually get the solar writeups finished this time before I launch into some other fun things. Or I might interleave them… I’ll see! But I should be back to something resembling a regular(ish) posting schedule now.
This week, I’m talking about mounting the panels - if not the final step, an awfully fun one that leads to something looking more like an intimidating solar array and less like a weird birdhouse.

When we last left off with the install progress, the frames were built and the rails were mounted.

And, my wire routing up to the panels was finished. This arrangement protects the wiring in conduits until it “pops out” at the top - where it needs to be to be protected from casual finger access.

You can see the ground wiring above - the bare copper loop across the top. This uses the Iron Ridge grounding clips, which clamp down firmly on the grounding wire, connecting it firmly it to the rail in an electrically conductive manner (theoretically). I’ve run “full loops” on each end of the big As. They go from the ground rod (one at each end), to all four rails, and back down to create the loop. Plus, a run from the ground rod to the junction box. Is it overkill? Yes. Should it keep things moderately well grounded? Also, yes. Should you tighten these with an impact driver? Probably not. They tend to bend out the lower “wire cup” if you do this, but I’m pretty comfortable in the contact created when I do that!

Mounting the Panels
With a calm day, we started hanging the panels. I borrowed my wife and some nearby family to help out, with no real idea as to what we’d actually need in terms of people. The right answer for ground mount? Groups of 3. And, like some of the other parts of this project, I just don’t have any amazing photos of the process. I did give our 5 year old a camera and told her to take pictures, but… well… I have a lot of pictures of footprints in the dirt.
For all the runs of panels, I started in the center. Measure in from both end rails, find the center point (which, ideally, is directly over the center frame), and work out from there. A piece of chalk works very well for marking rails. Working from the center out resolves alignment issues at the ends and keeps as much as possible over the frames. You can cantilever the rails out some, and I do (Iron Ridge recommends doing it to reduce the frame/mounting points required), but no point in having them hanging further off one end than the other.
The main challenge is to get the panels actually aligned with the rails well enough that there’s no major rise or drop compared to the rails over the course of the run. I tried a few methods over all the strings, and found that while a square would get you close, the right answer is measuring from the bottom of the panels to the rail. As long as the rails are straight (which mine are), this gets you the most accurate picture of the rise/fall of your strings over the rail. Put one panel up, measure it on both sides. Put another panel or two up, measure it, and if it’s within a eighth inch or so, you’re fine. Obviously, roof mount panels have different tolerances, but for my frames, it would be obvious if they were badly misaligned.
I’m using the Iron Ridge UFOs (Universal Fastening Objects) to connect the panels to the frames. These clamp the panels in place, and also serve as grounding paths - the sharp teeth cut through the aluminum anodizing on the frames to make a metal-metal path.

For the ends, when there aren’t panels on both sides, the clamps are supported by little sleeves that keep the UFO from sliding off the panel - just snap them around and you’re good! Of course, these have to match your panel thickness, but they’re available in just about any panel depth you need.

Line up the center panel, then just start working out! Set the UFOs in the gap, bring the new panel into place, line it up at the bottom, tighten the first UFO (cordless drills are useful), make sure the panel is tight against the second one, clamp it, and go on your way! The third person can help removing the protective panel corner pieces and bring the new UFOs to slide in place.

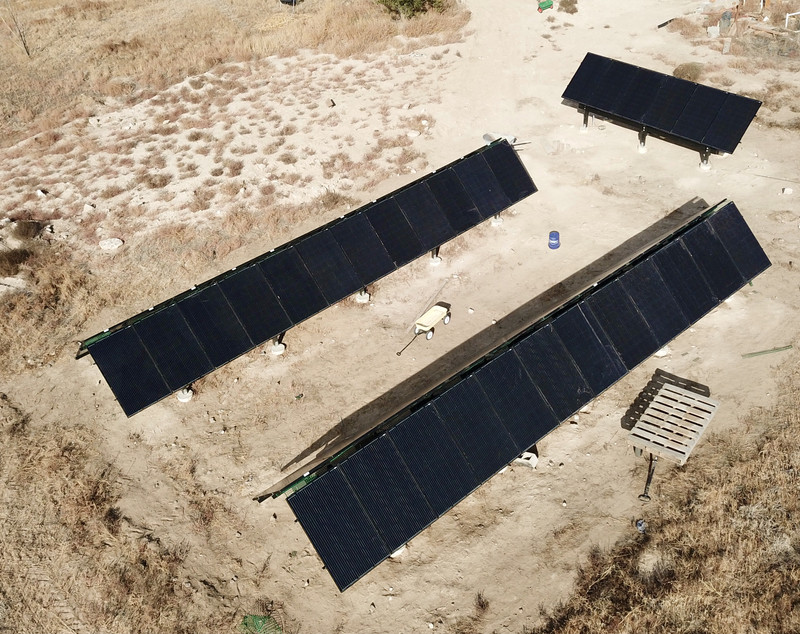
Mounting the panels went far more rapidly than I’d expected. For the big As, we just started in the middle, aligned the first few, and slapped up the rest. I knew the rail would extend well beyond the end of the panels, planned to cut it to length, so just let them be where they were. The random cans on the end are an attempt to keep people (myself…) from walking into them.
Solar panels are large and cumbersome to move by yourself. When I moved them from the trailer to the shipping container back in 2019, my wife helped, but it still was less than fun. Installing them with a couple people? They’re really not bad at all! Two people is plenty to move one easily, and while they’re very cumbersome, they’re not that heavy. Once it’s leaning on the rail, one person can easily keep it place while the next person anchors it. Eventually we got smart - we put a pallet on the garden wagon and loaded 6-8 panels at a time to bring over to where we were working!

I knew the frames would start looking pretty well impressive with the all black panels on, but this? This exceeds expectations! These look awesome. Very Vader-like. My evil solar panels, sucking up energy from the sun, evilly… uh… stealing the sun! Muahahaha!
When installing them, I used a cordless drill with the appropriate socket, set to clutch fairly early. The UFOs went in tightly enough to hold the panels on a calm day, but they weren’t fully torqued down. After finishing with the panel installation, I went back through with a torque wrench and set the UFOs to the actual torque spec indicated in their installation guide. You really should do this - “close” isn’t a great idea for something that’s both cutting into a frame for grounding and holding an awful lot of solar panel from blowing away. An inch pound torque wrench is well worth the money, even for just a single install.

Wiring the Panels
With the panels installed, the task is almost done, right? Not so fast. There’s still quite a bit left to do, and it involves working under the panels extensively. The panels come with the connectors wired up and coiled (you can see them on the back of the left panel here). These are, on mine, MC4 connectors. I’ve run MC4 extensions along the rails so that I can finish wiring things up, and you can see the black wires hanging out of the combiner box (really, just a panel side disconnect) on the frame.
The good news about MC4 connectors is that they’re keyed - so once you have the details worked out, just go along and clip them together. Quite fast, at least for this part.

I spent a lot of time working under the As here, though. It’s an interesting place to work. Not terribly enjoyable on cold, windy days, because it funnels the wind nicely. However, this means that with the panels actually producing, they’ll have a nice cooling breeze through them. Throw in the gap at the top, some convection, and I expect these panels to run far cooler than they would on a roof. Since installation, this has generally proven correct - they run quite cool to the touch! I’m sure on some hot, stagnant summer day they’ll get hot, but this panel arrangement is really well suited to staying cool (near ambient). On any day with a light wind, they’re at ambient, and on days without wind, they still create their own convective flow (you can see the heat distortion coming out the top). This helps production significantly - the difference between an 0C panel and a 40C panel is nearly 16% under identical lighting.

The panels comes with positive and negative terminals attached to MC4 panels via the junction boxes in the back. I could replace the junction boxes with Tigo loggers/optimizers (which is part of the reason I chose this particular panel from the options available), but as I’ve no reason to, I didn’t spend the money on it. There are some mnemonics I created to help remember which of the MC4 connectors is positive, and I won’t bother posting the phrase I used here, because it’s really not appropriate for this blog. It was, however, exceedingly memorable!
You can see the Iron Ridge cable clips here - these clip into the rail and provide a path to route the cables. On a rooftop install without access, this would be sufficient, but for a ground mount install, you’ll probably need additional guards, and I certainly do.

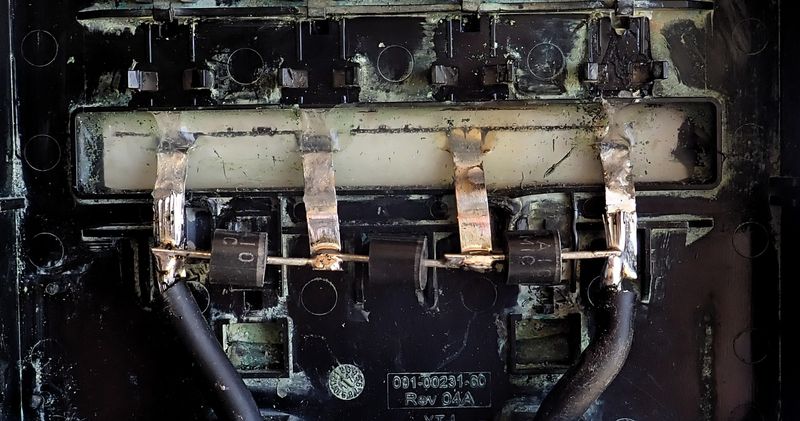
However, before getting the wire guards in place, I actually got around to wiring the stuff through to the inverters. I’ve got a “combiner boxes” on the array that doesn’t actually do any combining. I’m using “touch safe fuse holders” - they hold fuses (15A) and ideally don’t zap me when I touch them. These also serve as the junctions between my PV wire (the black wires looping up from the bottom sides with red electrical tape to mark positive) and the run to the inverters (the black/red wires heading down the center hole). I put this together in the fall when it’s fairly hot, and wire does expand/contract, so the loops are deliberate to allow for that. I’m not worried about expansion/contraction causing issues with how much slack is in here, regardless of temperature extremes - and with most of the run being underground, it won’t see the same temperature extremes as the above ground sections.
Are these disconnects needed? NEC 690.15(A) seems to imply they are, the inspector said he expected them to be there, and I think they’re very useful. These provide me a way to break the power at the panel side, before it runs through the ground to the inverters. The fuses are not break-under-load capable, and the boxes are labeled as such. But, should I need to work on the inverters, I can shut off the disconnect at the inverters (stopping the current - that end is load break rated), open these fuses (disconnecting the array), and then do what I need over at the house. Should I need to work on the array or combiner box, I can do the same process, then open one of the MC4 connectors to disconnect everything.

Keeping Fingers Out
I mentioned the need to protect wiring from hands - and I solved it with some plastic garden fencing! This is garden fence from the local home improvement store, and is, importantly, plastic and therefore non-conductive. Conversation during the rough-in inspection led to a consensus that plastic was an awful lot better than metal, because it wouldn’t require stout grounding or anything else to avoid carrying dangerous voltages. So, plastic it is!
The primary goal here is protecting the wires from “casual fingers.” I don’t know what the exact requirement is, beyond “What the inspector will sign off on.” However, my guideline (which met his standards!) was simple enough: can you, casually, get at the wires? If yes, that’s a problem. If no, it’s probably fine. I used zip ties to secure the mesh to the rails on the side - which, for what it’s worth, added quite a bit of support to the wires as well.

The ends? Staples. There was a lot of “kerchunking” for this part of the project, and a staple gun is every bit as satisfying as one might hope. The mesh isn’t strung tight - like everything else, there’s some room for expansion and contraction. What’s the thermal expansion coefficient of plastic garden fence? I have no idea at all. So I just left some slack.

Final Pieces
The one remaining piece left? Trimming all the rails. I initially tried doing this with a hacksaw, then decided that there was nothing wrong with a good reciprocating saw and used one of those. For all the rails, I marked them an inch past the final connection, with no logic there beyond “That leaves a good amount of material that shouldn’t bend.” Mark the rails with a square, proceed to cut.

I could have run a chain of extension cords out, but… why? I’ve got a perfectly good power toolbox I can use for this sort of thing!

Slip in the end pieces (which aren’t the same size for XR100 and XR1000, because the rails are different), and I’m good to go. The rails are closed off so they ideally don’t fill with wasps, the ends won’t gouge anyone’s forehead, and… I’ve got something that looks like a solar array! More importantly, it acts like a solar array!

Configuring and Testing the Inverters
With DC power available to the inverters (required for configuration according to the manual), I was able to go about getting the inverters joined to a wireless network (not hard, they’re joined to my “Things” SSID that’s isolated from the rest of the network). Follow the manual. I updated the firmware, and set them up for California Rule 21, per conversations with the power company people. This is a 1741 SA based set of parameters that allows the inverters to be helpful on the grid. If the voltage is too high, they’ll curtail power (but not disconnect), and if the voltage or frequency drops, they remain connected as long as things don’t get too far out of spec. I may talk about these changes to inverter behavior a bit more in the future if I get bored.
One problem I thought I was going to have was how to configure the inverters before having permission to operate - the inverters need to be connected to the grid to be configured, but that also means they’ll start producing. A quick call to the power company resolved it - they didn’t care if I ran the inverters for a little bit to configure and test them, but try not to export, and don’t just leave them connected indefinitely without them having signed off. Good enough!
The South Frame
You’ll notice, in a lot of the pictures, a south facing set of 6 panels I’ve not detailed yet. Don’t worry - I’ll talk about that in the next post! That was a fun, quick little build the adds a decent amount of mid-day power production. Not that we need it, with the lack of driving we’ve been doing in 2020…
And I’m back to posting on something like a regular schedule, so look for that in about two weeks!
Comments
Comments are handled on my Discourse forum - you'll need to create an account there to post comments.If you've found this post useful, insightful, or informative, why not support me on Ko-fi? And if you'd like to be notified of new posts (I post every two weeks), you can follow my blog via email! Of course, if you like RSS, I support that too.


