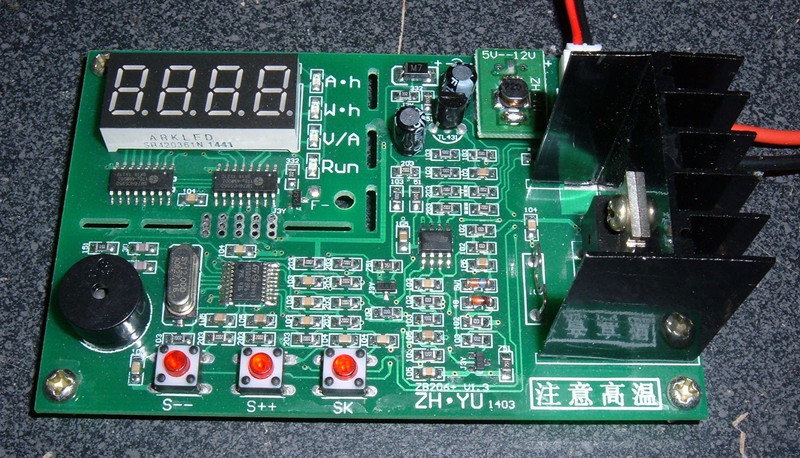

I bought this unit from eBay as a DC 5V USB Battery Capacity Tester / Battery Life / Internal Resistance Analyzer. It’s a ZH-YU ZB106+ v1.3, and it’s still available from a variety of sources.
Mine is 5v USB powered, though a version exists that runs on straight 12v. The USB version has a 5v to 12v boost converter for power (the small square labeled “5V–12V”).

It’s an excellent unit, and I’m quite happy with it! This is my “go-to” unit for battery measurements now. A major part of this is because it supports four wire measurement and measures watt-hours in addition to amp-hours, and supports from 0.1A to 2.6A in 0.1A increments. It’s much more configurable than my other units.
As always, if you’re interested in such things, read on.
Overview
This is another semiconductor based battery tester, similar to the TEC-02 I tested a while ago.
Instead of using a fixed ohm load, this type of tester uses a semiconductor to drain the battery. The fine grained control means that if you specify a 1A draw, it draws 1A, regardless of the state of battery charge. The heat is dissipated in the semiconductor, which has a large heatsink attached to it.
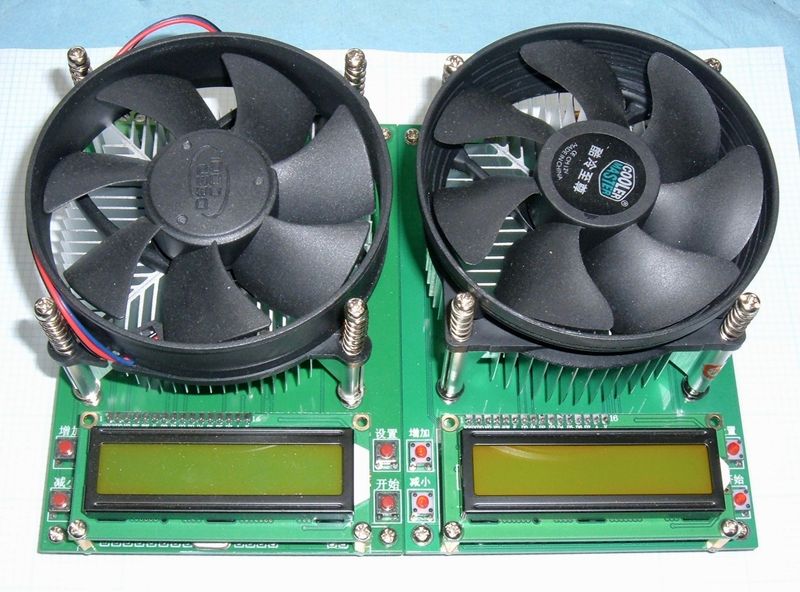
Of the units I’ve tested so far, this is the highest quality in terms of construction. The board is well assembled, with high quality solder joints.
It has two connections for the battery battery: Two screw terminals for the discharge current, and a small two pin terminal for use with the four pin test mode. I’m still not sure what connector style the additional pins are, but I’ve got something that sort of works.


Manual Translation
The manuals I’ve found for this unit are very poor. I’m not even going to bother to try and translate all of it, because it’s just pointless. I’m going to borrow the parts I need and write my own.
http://powercartel.com/teardowns/zh-yu-zb206-battery-tester/ is a most useful reference for this device, and has helped me fill in the missing parts of other manuals I can find.
Specifications
Power supply: 3.5-5.5v, less than 70mA. Do not use a laptop or desktop for power, use a standalone charger.
Maximum input voltage: 8.5v
Current maximum error: 1%
Voltage maximum error: 1%
Test current: 0.1A - 2.6A, in steps of 0.1A
Maximum capacity: 80Ah or 500Wh
Three Measurement Modes
- Two line batch mode: Cuts off the discharge current during battery voltage detection to prevent line losses from affecting the measurement. The test cuts the current for a few milliseconds to measure terminal voltage rather than load voltage.
- Four wire mode: With a special fixture, the battery can be accurately tested.
- Internal resistance mode: The unit can detect battery internal resistance with a 4 wire harness.
Supported Battery Types
These are the types recognized in automatic battery detection and termination voltage setting. It supports 17 battery types in 13 voltage categories.
- 1.2V nickel-metal hydride nickel-cadmium battery
- 1.5V alkaline batteries
- 1.6V nickel-zinc rechargeable battery
- 1.8V lithium disposable batteries (such as L91)
- 2.0V lead-acid battery
- 2.4V Nickel hydride nickel-cadmium battery pack
- 3.0V lithium battery
- 3.2V lithium iron phosphate battery
- 3.6V nickel-metal hydride or nickel-cadmium battery pack
- 3.6-3.7V lithium (polymer) battery
- 3.8V lithium battery high voltage (full voltage of 4.35V lithium battery)
- 4.0V lead-acid battery
- 5.0V mobile power (USB charging pack)
- 6.0V lead-acid battery
- 6.0V nickel-metal hydride or nickel-cadmium battery pack
- 6.4V double lithium iron phosphate group
- 7.2-7.4V double series lithium battery pack
Configuration Options
To enter the configuration menu, power the device on while pressing the “SK” button. If you’ve done it right, you’ll see “LJ 4” on the screen. To change the options, use “S–” and “S++”. To select the next option, press “SK”. Once you’ve gone through all the options, you’ll be back in the normal operation mode.
“LJ” - Two Wire vs Four Wire
The “LJ” setting is for the tester mode. If you have only the two main wires hooked up, set “LJ 2” for two wire mode. If you have a four wire test harness, set “LJ 4” for four wire mode. Most features work fine in both modes, but accuracy will be somewhat better with a four wire test harness.
“Au” - Automatic Voltage Setting
If the unit is set to “Auon” (Automatic On), it will try to detect the battery type based on the starting voltage, and set the termination voltage automatically. If it is set to “Auof” (Automatic Off), it will require the user to select the termination voltage before starting a test.
The automatic voltage detection is pretty good - it knows quite a few battery starting voltages (see above), and will probably do the right thing unless you’re testing a partially discharged battery
“bE” - Beeper
This sets the end of test beeper to on (“bEon”) or off (“bEoF”).
“LP” - Limit Power
If this is set to on (“LPon”), the unit will not allow more than 10-12W of power to flow. In order to exceed this limit safely, a fan must be blowing over the unit. This can either be a fan powered by the unit, or an externally powered fan.
“SF” - Set Fan
When the power being dissipated is larger than this value (in watts), the fan will turn on. If it’s set to SF00, the fan will always be on during discharge.
In order to use the automatic fan control, connect the proper fan to the incoming voltage, and ground it to the “F-“ pin just below the “Run” LED.
Error Codes
Err1: Battery voltage too high. Ensure battery voltage is below 8.5v.
Err2: Battery voltage too low (below set termination voltage).
Err3: Battery sagging too much - cannot supply requested current. Ensure the conductors are large and tight, otherwise use a lower current setting.
Err4: The semiconductor is damaged. Replace it.
Err5: Power limit exceeded (see LP setting above).
Err6: Power supply voltage out of range.
How to Use it

Power it on and insert a battery into your test rig.
You’ll see “1.00A” on the display. This is the discharge current. ”S–” and “S++” adjust it in increments of 0.1A. Set your desired current.
Press “SK” and if you have automatic voltage setting on, things will start. If you have automatic voltage setting off, you can now set the cutoff voltage. It shows what it thinks you should use (perhaps P3.0v for a fully charged lithium cell), and you can adjust as desired.
Press “SK again, and the testing starts. The “Run” LED comes on to indicate it’s discharging.
The display will rotate through four modes:
Ah: How many amp-hours have been provided.
Wh: How many watt-hours have been provided.
V/A: Shows both the current voltage and the current amperage.
“SK” does nothing during the test.
If you press “S–” or “S++” during the test, it will cancel the test and allow you to reset the amperage/cutoff voltage. However, it resets the measured capacity. Once this startes testing, you shouldn’t muck with it.
Once the battery has dropped to the cutoff voltage, the display will flash to indicate the test is complete.
Press “S–” or “S++” to cycle through the various measurements: Amp-hours, watt-hours, and final voltage.
Press “SK” to reset the unit and start another test.
Internal Resistance Test
If you wish to test a cell’s IR, power the unit on while holding the “S–” key. r000 will show. If you insert a battery into the test harness, it will show the calculated internal resistance in mOhm (so 056 means 0.056 ohms, or 56mOhm). If you press “SK” the display will toggle between the measured IR and the current battery voltage.
Capacity Testing
One of my standard tests is to drain a few batteries and see how close the discharge capacity comes to my VC4 charger’s charging measurement.
Battery A, 0.5A: 2590mAh discharge, 2621mAh charge
Battery B, 0.5A: 2564mAh discharge, 2587mAh charge
Battery A, 1A: 2619mAh discharge, 2526mAh charge
Battery B, 1A: 2533mAh discharge, 2527mAh charge
The charging puts in slightly more capacity than the discharge (or very close) - the only major (0.1Ah) discrepancy is on Battery A @ 1A.
I’m quite happy with these results. It’s accurate to within my equipment, and certainly matches well to the other devices.
Conclusions
This is a great tester. Beyond just amp-hours, it gives you watt-hours, which is useful for testing battery capacity at different draws. It supports a fan for higher power dissipation, and is generally a well constructed unit.
If you need a tester, this is certainly the one I’d buy right now!
Comments
Comments are handled on my Discourse forum - you'll need to create an account there to post comments.If you've found this post useful, insightful, or informative, why not support me on Ko-fi? And if you'd like to be notified of new posts (I post every two weeks), you can follow my blog via email! Of course, if you like RSS, I support that too.


