
For the most part, I’ve been very, very happy with the solar power system I set up for my off-grid office. Functionally, does exactly what I hoped (and rather exceeds expectations most of the time). But I have one complaint about it: The MidNite Classic 200 is really, really noisy. And this noise comes in a fairly distracting form at times.
I’ve substantially improved it, though. And learned a few things in the process. And made a really, really goofy looking attachment.

There are several pieces of this post, so dive on in and let’s reduce some noise!
The MidNite Classic 200
MidNite Solar makes a variety of solar equipment, but most notably makes charge controllers. Their flagship product is the MidNite Classic (150, 200, 250) series - named based on the maximum input voltage they can handle. This is a MPPT (Maximum Power Point Tracking) charge controller, which means it will efficiently convert high voltage solar input (my panels normally operate in the 130-150V range) into whatever the battery bank needs (47-62V, in my case). On top of that, it regularly “sweeps” the panel voltage to find the point that generates the most power - this varies somewhat based on illumination, panel temperature, clouds, shading, and the phase of the moon, but the controller will find and sit at that peak point.

It’s a very nice unit, and it has some great features for solar power use. It comes with a remote temperature sensor for the battery bank (this is vital for proper year round charging), it’s ethernet enabled for remote monitoring (barely - it supports one TCP connection on one port), and you can attach the WhizBang Jr and a nice shunt to your battery bank to enable amp-hour tracking (helpful for calculating state of charge) as well as doing current-based charge termination (helpful for not overcharging your battery bank). The console can be mounted remotely as well if needed, and it’s quite configurable. Plus, it looks pretty slick. All in all, I’m quite happy with how it functions.
Except for the fans. This charge controller has a bunch of pins on the back to help radiate heat from the switching transistors, but it also has three fans. The bottom contains a pair of 40mm fans for normal cooling, and the “stack” on the right with all the pins contains an extra “turbo” fan at the top for high temperature cooling.
And they’re LOUD! Even when the fans are in good condition, they’re loud enough in my office that they’re the dominant source of noise on a quiet day. Fortunately, I don’t hear the turbo fan kick in ever (I’m not loading this controller up that much - the unit is rated for 79A output, and with my array, I rarely see 35A), but the other two are loud enough. And when they start to go bad, they get even louder.
Replacing the Internal Fans
After close to a year of operation, I noticed that the fans on the Classic were getting louder. Not just noise, but the quality of the noise had more of a rattling and grumbling quality to it. I’ve had enough failed computer fans over the years to recognize the sound of a failing sleeve bearing fan, so I contacted MidNite support and they very helpfully shipped me a new pair of fans.
On the earlier Classics, you replace the fans by dismantling the whole unit. Fortunately, I have a newer unit, in which there’s a fan drawer on the back (helpfully labeled “fan access”).
Since my desk is near my charge controller, I didn’t even have to remove the cables from the unit. I simply shut everything down (I have breakers on both the panel side and battery pack side so I can disconnect power from the unit), removed the unit from the wall, and flipped it down onto the desk. You can see the cooling pins here - it’s a pretty slick little setup that, at least for my loads, seems to cool nicely enough via convection. I’ve never heard the turbo fan kick on except for the initial self test on power-on.

A pair of large Phillips head screws comes out, and the drawer pulls out. You’ll need to reach in and disconnect the fan power connectors, but it’s not that difficult to get at them.

With the drawer entirely out, you can see the two fans that blow air through from the bottom. Yes, my environment tends a bit dusty - why? It’s something I’m working on - I think I need to build an external filter box to positive pressure my office a bit to help keep dust out. But I live in a very dusty environment, so even inside my office, things collect dust.
Why does one side have the blue clip? I’m really not sure. It just does.

Remove the old fans, install the new fans. They slide out and back in. I used some silicone caulk I keep around to help stick them in place so they don’t rattle - make sure it doesn’t get in the path of the blades, but this helps keep them from shaking about and making a horrendous racket. Installation is the opposite of removal. You should hear all the fans power on when the unit receives power from the battery bank. It’s a good idea to visually verify that both fans are turning after replacement.

The old fans are 40mm Hondaly DFB401012H fans - 12V, 0.1A, 6.4 CFM. If you’re replacing the fans on your own, you might want to find something a bit nicer with comparable airflow.

With the fans replaced, the unit certainly sounds better. The rattling is gone, and they’re back to a smooth whoosh.
Silent Office and Fan Noises
The quality of noise is better, but it’s still annoying how loud the fans are. They’re the dominant source of noise in my office, and, worse, they’re intermittent! It would be much nicer if they were variable speed, or at least could be configured to run for long periods of time. Under certain solar conditions, they can switch on and off remarkably frequently, which is just annoying!
I’ve got my Folding@Home box and such to soak excess power, but if I don’t have that much power coming in, or feel like a quiet space for concentration and writing, I put my office in “silent mode.” With less than about 250W coming out of the inverter, the inverter fan is off. My base running computers don’t make much noise. And, really, there’s nothing else that makes noise normally (beyond a property cat drumming on the door to get in and go to sleep). So, I’m sitting there in a super quiet, still environment, perfectly suited to concentrating. And, then, WHOOOOOOOSH. The Classic fans light off. In that sort of silence, they’re really, really loud!
And I don’t like that.
I considered moving the Classic outside, but that requires a lot of rewiring, and is a lot of work. What if I could reduce the noise, significantly, and change the nature of the noise, without much cost or effort?
Adding Auxiliary Airflow Augmentation
In other words, taping a fan to the unit and powering it from the AUX1 connector.
It’s not that I mind fan noise. I really don’t - as long as it’s consistent. I would far rather have a steady low background noise than silence punctuated by loud racket every now and then. The dynamic changes are annoying, not the basic noise.
With how my Classic is loaded up, it only runs the bottom fans. I’ve never heard the “Turbo” fan kick on, so theoretically, I should be OK with simply adding some airflow to the core of the unit. If I can get enough airflow through there with a quiet fan, the main fans shouldn’t kick on at all (or, at least, far less often).
There’s a sealing kit that closes off the openings and should help with noise, but that runs the electronics a good bit hotter, and I don’t like that idea. My goal is lower noise and a cooler unit.
I considered a few places to put an extra fan, but that nice big vent opening at the top (you can see the PCB through it) just is too appealing. It’s a great place to stick a little booster fan to help suck air up and out of the unit!

The MidNite Classic has two AUX outputs. AUX1 is either a 12V/200mA source, or a 1A “dry relay” (the relay closes a connection, keep the current through it below an amp). AUX2 is a fancy transistor controlled input/output, but I’ve got that connected to my WhizBang Jr current sensor, so that’s not available. I’d like to avoid more external power supplies if I can avoid it, so I set about looking for a quiet 120mm fan that would run within the 200mA power limit of the 12V output.
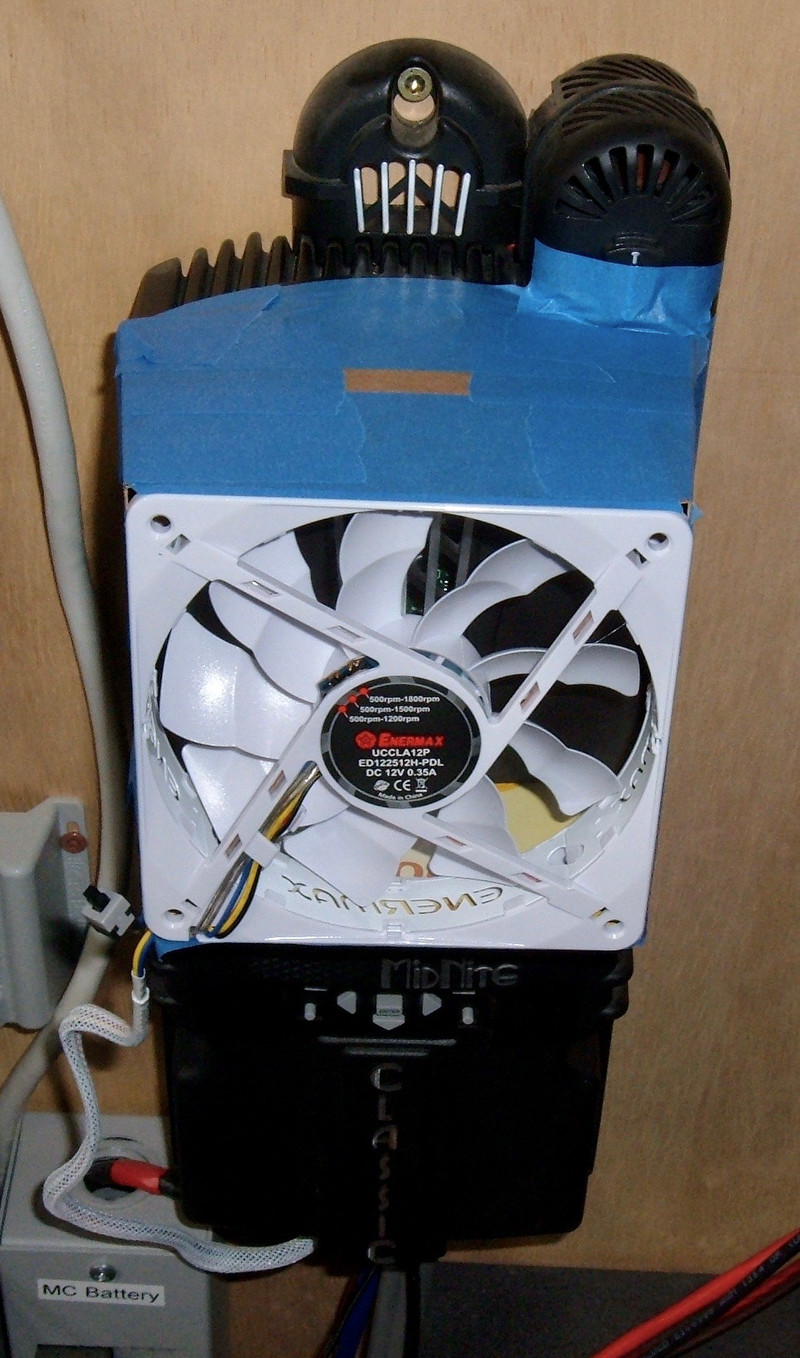
What I found is the Enermax UCCLA12P (I got mine for $9 on eBay, shipped). This fan has a RPM control switch that limits the maximum RPM, which limits maximum current draw. It’s also got a bunch of white LEDs that I don’t particularly care about. I think.

What I’m really interested in here is the “Ultra Silent Mode.” This has a rated input power of 0.18A - which is less than the 0.2A limit of the Classic aux output.
Recall that the two fans in the Classic are rated for about 6.5 CFM (cubic feet per minute) each. They’re fairly high static pressure fans, rated for 3.3 mmH20 static pressure. Doing the math, 13CFM is 22 m^3/hr. Even at the low speed rating, this fan exceeds the rated airflow by a good margin, though the static pressure is rather significantly less. Will this work out well enough? Actually, I have no idea. That’s part of why I’m trying this - I hope it does work. If it doesn’t, well, I’ll find a better solution and include this as part of a post for “lessons learned.”

The bulk of the features aren’t things I care about. “Will it move air?” “Will it stay under 200mA?” “Will it keep my MidNite Classic cool?” That’s about the extent of my list. I hope this unit delivers!

The back of the fan contains a current rating (presumably for peak draw), and the little switch in the top left corner that selects between the various peak RPMs. I could PWM it down from there, if I felt like it (this is a four wire fan with PWM input), but there’s no trivial way to do that, so I’m not going to bother (yet).

One particularly slick feature of this fan is that it comes apart - which isn’t that exciting (I’ve torn plenty of fans apart, usually unintentionally - cleaning your computer case out with a leaf blower, for instance, is a really bad idea), until you realize that it’s designed to come apart, and to go back together. It should make cleaning the blades in a year much easier!

Sanity Checking Current
Before I go about bolting some fan to a unit that has a rated current limit, I want to know if it actually does what it says on the tin. It’s rated at 12V/0.18A for the low RPM mode - but does it actually meet that?
To find out, I wired it up to my bench multimeter. This is an absurdly nice unit with helpful features like max current logging, and it’s fairly accurate (I really need to take it in to be calibrated).

So, the results are in. Drumroll, please.
Wow. The fan actually draws less than rated current, and rated current includes the LEDs! So I tested with the LEDs off, because that’s how I’m likely to use the fan.
In the low speed mode, peak startup draw is 143mA and sustained draw is 92mA.
In the medium mode, peak startup draw is 228mA, sustained draw is 150mA.
High speed pulls 333mA starting, 225mA running.
And the LEDs draw about 65mA on the low speed setting, if you care.
So I can run this safely in low speed mode without the LEDs, and be just fine! I could even run it in the medium speed mode, though the brief startup surge does exceed rated power. I’m not sure if that matters, but my goal is low speed mode anyway. And, there’s power budget to turn the LEDs on for ambiance, if I care!
But I’m not quite there yet.
Installing the Fan
This fan has a 4 wire connector - positive, negative, PWM control, and a tachometer output wire. I only care about the positive and negative, because I don’t have a PWM controller and don’t have a way to hook up the tach. To turn the normal wires into something I can stick in a terminal block, I used a technique I use regularly: Tin & Trim. Strip the wire end a bit further back than the end you need, flux the wire, flow some solder into it, and then (because there’s usually a slight ball on the end of the wire), trim the very end off. You get a nice solid end that’s perfectly suited for terminal blocks or breadboards. I’m not doing anything with the other wires, but I’m leaving them around in case I want to add PWM control later.

Next, I decided how I wanted to mount it. Since this is a prototype, I went with a proper prototype construction method: Chipboard. The thin, single layer stuff you find in cereal boxes and cracker boxes is perfectly suited to building simple structures like this. It’s easy to cut, easy to tape together, and is actually quite strong if used properly. Mark and cut. A good metal ruler is a useful thing to keep around.

After playing round a bit with how to secure the fan to the cardboard, I worked out that I could use my blue painter’s tape on the edge of the fan, with the chipboard butting up behind. It works well, and is a good bit more solid than it looks like it should be. Since the fan will be secured on all 4 sides, I’m not worried about it going anywhere.

The sides are squares, but the bottom is a bit more complex. I can slip the chipboard in the gap above the remote console if I try, and that gives me a nice strong base to support the fan vertically. A bit of diagramming, a bit more marking, and some cutting gives me a useful shape to slip in as the lower support.

You can guess, perhaps, what sort of snack my building material was from. The board fits nicely in here, though I had to trim the left side a bit to clear a latch.

The remaining build steps are pretty simple - just cut the pieces to fit, and tape them together. I’m using 2” wide painter’s tape, simply because I have it laying around my office. Duct tape would also work fine, though the cheaper (thinner) stuff would be better than the high quality thick stuff for this build (because of the sharp corners). It’s just basic papercraft work with a thicker stock and less glue.
One of the things I’ve been trying to work on recently is using discarded materials as feed stock for building or repairing things. There’s no point in purchasing something if you can find something in your trash trailer that works fine (actually, I try to avoid getting useful things into the trash trailer in the first place - I keep a few boxes like this in my shed for projects as needed). Yeah, I could have gone with some fancy 3D printed framework, but this works, and it’s cheap. And quick. It took me an hour for the whole project, and that was with a lot of figuring out where things needed to go. Also, I don’t own a 3D printer (people with them seem to spend an awful lot of time calibrating and fiddling, with output being a distant second focus).

Reinforce the corners with a bit more tape, and a test fit demonstrates that everything fits nicely! It’s certainly not the prettiest piece of office hardware ever, but if it works, I don’t care that much what it looks like.

Before mounting the fan, though, I need to connect it to the controller. This involves shutting down power to the charge controller (I have breakers on the battery side and the solar panel side), opening up the case, adjusting some jumpers, and hooking up the wires.
You know what I really, really like? Good labels on PCBs about jumpers. It’s worth the space. The jumpers are currently configured for “dry relay” use on AUX1, but it’s easy to reconfigure them to provide 12V.

Shove my two tinned wires in the AUX1 terminal block, and I’m good here! That hole is increasingly full of cables. I’ve got solar in, battery charge out, ethernet, temperature, fan, and WhizBang Jr (a single wire connection to AUX2) going through there - it’s almost out of space.

While I’m in here, I don’t think I’ve shared a good picture of the inside of a MidNite Classic. It’s a good looking unit on the inside! The power FETs are along the right side, the blue cable (on the top) goes to the remote console unit, and the other terminals directly below it are for communication between units. You can gang a whole bunch of Classics together and operate them in sync - one master unit controls what charge mode everything is in, shares the temperature reading from the battery pack, etc. They’re quite fancy units when you dive into the capabilities!

Final Installation
With the power hooked up, I powered the unit on to verify that the fan turns, then closed everything up and taped the fan box to the charge controller. Once taped in place, it’s actually very solid feeling - the unit doesn’t wiggle around at all, which is good. Far more solid than one might expect of something made from a fan, chipboard, and some tape.
A downside of this installation method is that I’ll have to remove the fan box to open the controller - I can’t access the top screws with the fan box in place. It’s not a problem to remove, just a bit of tape. And I’m not inside the unit very often at all.

As much as I don’t think the LEDs are that important, I won’t deny that they look cool…

Results
Obviously, the important bit of information is, “Does this actually work?” If it doesn’t, and the internal fans kick on, I’ve made things worse. I’ve added new noise on top of the existing noise.
So, does it work?
Yes. It most certainly does!
It seems that the PCB temperature is the critical one for my unit loading, and that is radically lower with this fan turning. During light to moderate loading, this fan pulls more than enough air to keep the PCB cool and keep the internal fans shut down.
I’ve taken some noise measurements as well. These are taken with an iPhone, so while probably close, the relative values are the important part here.
Office, low noise computers on, no charge controller fans: 38-39dB
Office, new fan running: 42dB
Office, internal charge controller fans running: 49dB
For those of you who are still suffering from open office nonsense, may I suggest comparing my numbers to yours? But, the reduction in noise is very substantial.
The internal fans do spool up on occasion if I have full sun and a lot of demand (so lots of power flowing through the unit), but this doesn’t bother me nearly as much, because if I’ve got solid sun, I very likely have my Folding@Home/BOINC desktop running. If that’s running, the fans in that PC make some noise, and the AC current draw is high enough that the inverter fan is running. So the charge controller fans don’t really stand out and I don’t mind them as much. The goal was eliminating the silent office fan noise (which is mostly an issue on cloudy days), and this does the trick.
If anything, the fan is a bit more than I need during light sun. I could probably PWM regulate it back (these fans use a 25kHz PWM signal) based on output air temperature and make things even quieter during light load!
I’m still fighting one source of noise on my controller, though. There’s a high pitched (8kHz-14kHz) whine in certain conditions (it seems like bright sun and high battery bank voltage from cold temperatures trigger it) that’s bugging me every now and then. I’d rather not send the unit back for warranty work, because I do actually use it regularly. Changing the unit temperature shuts this particular whine up, though (just turning off the fan or restricting output will quiet things down), and I really should get around to doing some firmware updates…
Final Thoughts: Keep Your Classic Outside Living Spaces
As much as I like this charge controller, I can’t help but be slightly frustrated with how much assorted noise it puts out - and how annoying this noise is. The fans aren’t speed controlled at all, so they come on abruptly and loud, and then shut down abruptly as well. A bit of speed control would make them a lot nicer to deal with, though using cheaper 40mm fans to cool something like this is a bit silly as well (one could design it for larger, quieter fans).
Your main takeaway, if you’re reading this article, should be simple: Don’t put a Midnite Classic charge controller anywhere you can hear it. I like the unit, the WbJr shunt is awesome, and I like how configurable it is, but it’s just annoyingly loud. Stick it somewhere it can’t be seen or heard, and you’ll like it an awful lot more. I’m still debating putting mine outside in a little enclosure…
Comments
Comments are handled on my Discourse forum - you'll need to create an account there to post comments.If you've found this post useful, insightful, or informative, why not support me on Ko-fi? And if you'd like to be notified of new posts (I post every two weeks), you can follow my blog via email! Of course, if you like RSS, I support that too.


