
One of the misconceptions about electronics is that if there are no moving parts, the system should last forever. This is closer to true than not, but one really common item that does wear out on many systems are capacitors. Electrolytic capacitors are the usual problem, but, fear not! You can repair them easily and at home! Beyond just repairing a mainboard, this week is a bit of a discussion on the art of repair, and why you should get good at it.

Get out your soldering iron and join me!
Mainboard Failure and Symptoms
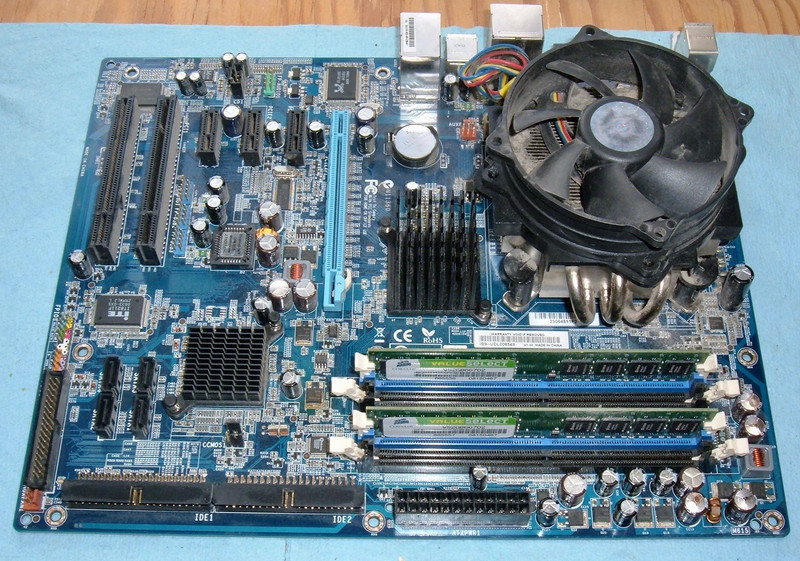
This particular mainboard has been in service since around 2008 in my main home server. It’s an Abit IB9, an old Core 2 Duo 1.86GHz chip, and a whopping 4GB of RAM. The CPU was the cheapest one I could find, but this was my home workhorse for many years (it made it a decade, and I haven’t been gentle on it). But, one day a few months ago, I noticed my fileserver was not responding. I power cycled it, and that didn’t bring it back on the network, so I dragged it out and attached a monitor to it.
At which point things started to make less and less sense. It would start booting, but fail to find the device for the root filesystem - which was on the same drive it had just loaded the kernel and initrd from. Weird. Before I could puzzle this particular issue out, though, the problem got worse and it simply stopped finding the IDE drives at all. The IDE controller didn’t even show up in the boot sequence trying to enumerate the drives. Sigh. I ordered some replacement parts for the server to bring it up to modern specs, since an ancient CPU, 4GB, and some old IDE drives just don’t work very well for what I’ve been asking of it lately.
I pulled the board out of the system, and tried to boot it without anything attached. Sometimes it would boot, sometimes not. Nothing reliable, and nothing particularly repeatable. Obviously, it was toast.
And then I saw the capacitors. Now, if you’re not one who stares at electronics regularly, take a look at the capacitors (the round things sticking up) in the upper left. Now compare them to the ones at the bottom and along the right. See how the tops are bulging up, and there’s crud leaking out? They didn’t come from the factory like that!

Looking around the board, I found more bad ones in the center section. These are all 6.3V, 1500uF capacitors - and about half of them on the board are visibly bad (bulging and leaking). That’s generally not a good sign, and capacitors (of this size) are usually related to power supply regulation and powering things. Like an IDE controller!

The Capacitor Plague of the Early 2000s
If you were working with electronics in the early 2000s, this issue probably sounds familiar. There were a ton of electronics that failed due to bad capacitors in the 1999-2005 era, and it was a bad enough problem that it has it’s own Wikipedia page. Everything was affected by what, as near as researchers can tell, was industrial espionage gone wrong (or right, in that the stolen formula was incomplete).
During that era, it was common to be able to buy “failed electronics” for remarkably little, replace the capacitors with ones that didn’t suck, and go on your way with a screaming deal on a computer, TV, etc. At least if you were one of the people replacing capacitors. If not, you were probably stuck replacing things, or paying one of those people a hefty chunk of change to fix your stuff.
But, what it boils down to is that if your capacitors have failed (which some of mine very obviously have), it’s not that big a deal to replace them. Even if they haven’t obviously failed, capacitors age with time, and it’s a good idea to understand the process of replacing the failed ones on equipment that has gotten flakey, especially on the power front. If we do hit an era in which new equipment is harder to come by (likely during the decline of an empire), those who can fix things are likely to be in demand - and those skills are seriously missing in our culture today.
Replacing Capacitors
In general, solid state capacitors don’t tend to have issues (which is most of the surface mount ones). The ones that (usually) fail are the electrolyte ones, and on most systems, they’re through-hole mounted! This means that they have a pair of pins that go all the way through the circuit board to the backside, where they’re soldered in place. It also means that they’re the easiest style of component to replace!
You can see quite a few rows of through-hole mounted components here - they’re all the little legs sticking up through the back of the board (this is the back of the mainboard). Replacing them involves removing them, cleaning out the holes, and putting new ones in.

Of course, one must first figure out what capacitors one is replacing and buy some replacements. I decided, based on the visible failure of 5 of the 10 of one particular type, that I’d replace all of those. The failed ones are entirely 6.3V 1500uF capacitors, and eBay is a great source for replacement capacitors (though I’d stay clear of the incredibly cheap ones). Just make sure the diameter is the same, and the height is close (it usually doesn’t matter, but sometimes there are clearance issues with taller ones). If you really wanted to hunt down the detailed specifications of the failed ones (ESR, ripple current rating, etc), you could, but my experience has been that “close” is more than good enough for capacitors. Any decent board will be designed so that the exact ratings don’t matter much on the capacitors that change as they age.
Removing a capacitor is fairly easy. Get your soldering iron hotter than you think is reasonable. This is lead free solder (which I hate), so you need a hotter iron than you might use for proper solder. I normally keep my iron around 250C for lead solder, 300C if it’s a big surface, and for lead free I crank it up to 350C or a bit higher. You’ll want to use the heaviest tip you can, because a lot of capacitors will have one leg in a ground plane, which will soak a ton of heat. I’ve met some things I can’t remove from a ground plane, but hopefully you can get the capacitors out.
Put a bit of fresh solder on the tip for heat transfer, and go back and forth melting the solder on the two legs. You can either get both legs molten, or do one at a time and “rock” the capacitor out. Eventually, it should come free!
I’ve tested a few of these, and the bulging ones are less than 10% of rated capacity (about 130uF instead of 1500uF). That’s enough to cause problems…

After the legs pop out, you’ll almost certainly have a hole filled with solder. To resolve this, use your handy desoldering braid, flux the joint up, put a bit of solder on the braid, and it should suck the solder right of the holes. You may have to try a few times, but it should work quite reliably.
If that doesn’t work, you can always use a solder sucker, but that runs a non-trivial chance of ripping traces out and trashing the interior plating on the hole, so… use a desoldering braid.

Installing the new capacitors is easy - just solder them in place. With your proper 60/40 lead solder. One thing to be aware of: Capacitors are directional! You must make sure you get the negative on the proper side, or the new capacitors are likely to blow up or, in the best case, just not work. On this board, the negative side has white silk screening, but pay attention to the alignment when you pull the old ones out and match it. Capacitors typically have a stripe with “-“ along it indicating the negative pin.
You can see my shiny new caps here, next to one of the old ones (the brown one at the top). That one hasn’t failed (yet), but you can see that the new ones are slightly taller. It’s not a problem for this board, so I don’t care. Both of the capacitors I’ve removed are leaking. They haven’t blown the bottom rubber plug out, but they’re both toast. Luckily, they’ve only been venting on the top, and haven’t blown crud down onto the board. That’s no good at all! If your capacitors have blown gunk onto the board, you’ve got to clean it up - that stuff can cause short circuits and literally burn up your mainboard.

(The Count)Six! Six new capacitors! Ah hah hah hah!</> Yes, I have a toddler. Why do you ask?

The other four I replaced are in the center of the board, right around the BIOS chip (socketed for your hacking enjoyment, if you’re the kind of person who keeps chip readers around and enjoys messing with BIOS images). Yes, the mainboard is really dusty. I blew it off after taking these pictures and realizing just how bad it was.

I’m left with a pile of 10 removed capacitors. Five of them are definitely shot, but I wasn’t about to give the rest the benefit of the doubt since they’re obviously the same type. Overall cost? About $3 (I ordered more capacitors than I needed, because… well, who doesn’t need more capacitors?) and about an hour of time to replace them. You might need less - any blog project takes longer because I’m taking photos and interrupting my work cycles.

The Results
After replacing all the capacitors, I powered the board on with a drive attached to the IDE controller…
And it properly recognized the drive! I rebooted a number of times, and it rebooted cleanly without hanging. Everything is back to working, as near as I can tell! Yay!
On Repair
With the board working again, I’d like to dive into the (increasingly lost) art of repair, and offer some advice and encouragement for my readers on the advantages of learning to fix things.
I’ve been doing deep level repairs on computers and cars for the past 15 years or so, and it’s been very beneficial. I’ve been able to get some awesome computers over the years for nearly nothing, I’ve been able to keep my cars running for very little money (when money is tight, that’s a useful skill), and I’ve generally been able to build a reputation as a “Fixer of Things” that’s served me very well.
I can even tell you the event that started it. Back a long time ago in undergrad, my roommate and I picked up some old Powerbook 520s from the university surplus sale (a dangerous place for what little money one might have). They worked well enough, until one day, for some reason or another, a can of soda ended up dripping through the keyboard of one, filtering down through the rest of the components. And the unit stopped working. After much debate about how one might repair this and if it was worth trying (neither of us having any sort of laptop repair skills in the early 2000s), we realized something that’s been fundamental over the years since.
If it’s already broken, you can’t possibly make it worse! This isn’t something I grew up with, but it’s something that, once grasped, is the key to getting good at repair. If some gizmo is not working properly, the absolute worst you can do with a failed repair is… have it not working properly. But you almost certainly learn something in the process, even if the repair doesn’t work (I’ve learned the most from repairs that failed initially and I had to bodge into working condition - IDE cables are a wonderful source of very fine bits of wire, once you destrand the individual conductors), and that builds your knowledge base for future repairs. Iterate on this over time, and you get some awesome skills built up that let you tackle things nobody else around you will even dream of doing!
The Value of Broken Things
Quick: How much is a broken laptop worth? Let’s say the power jack broke internally and it won’t charge anymore. If you’re most people, that’s a catastrophic failure and the laptop isn’t worth anything at that point, because it doesn’t work after the battery discharges. If you’re handy with a soldering iron and have a set of geekdrivers (those tiny little screwdrivers you need to work on laptops and phones), that laptop is an hour or two of work away from being almost entirely functional again. I’ve repaired an awful lot of broken power jacks (the Pentium 4 era laptops were horrible about melting the solder away from the center pin where it went into the mainboard), and for a while, I got a steady stream of used laptops in from people with broken ones who would give them to me for free, or barely more than free.
Even if the laptop doesn’t work for deeper issues, it’s still worth something. The screen is probably still good (or maybe it’s not, and the rest is). The keyboard probably still works. The CD drive is probably fine. And on and on. Even a badly shattered laptop that’s fallen out of a car has some parts of value left on it. If you can build up some common parts for popular laptops of the time, it’s often possible to mash a few together and get something that works. I ran around with a MacBook for a while that had a mismatched screen and body (I think it was a white screen and a black body) - because I’d been able to scrounge enough broken ones that I could put a working one together.
My favorite repair in this category revolved around an old 12” Powerbook G4. Remember those sweet little machines? This one had what, for nearly everyone who looked at it, seemed to be a catastrophic failure. It had bad display corruption on power on, and refused to boot more than a few seconds before kernel panicing. Some analysis indicated that it was likely the onboard RAM chip having gone bad (the machine had 256MB onboard and a slot that could take up to 1GB). What do you do with bad onboard RAM?
At the time, I didn’t have surface mount soldering skills (or an iron to do so). So, I did the next best thing and simply disconnected the power for the onboard RAM. Those Powerbooks were a royal pain to take apart (about a million tiny screws), but I got it apart, found the RAM chips, verified which pins that were the power pins, separated them all with a tiny knife and pick, stuffed some external RAM in, booted it, and… hey! It worked! And I had a 12” Powerbook, nearly free except for the 2 hours it took me to disassemble, analyze, repair, and fix the problem. It was broken already, the only “official” repair for it was a whole new mainboard, and there was really no risk in trying to fix it this other way - if it failed, well, I’d have to find a new mainboard, which is exactly where I started.
Repairing Cars
Have you ever had one of those deals where both parties think the other side is a sucker for taking the deal? That describes an awful lot of the cars I’ve owned in college and post-college. In the days before Cash for Clunkers ruined the used car market, you could find some properly cheap cars. In order of cost, from cheapest on up, I’ve paid $100, $150, $200, and $350 for cars that more or less ran. The $350 car was one that involved spending the morning at a junkyard trying to get it running, failing, going back home, removing parts from my other car (that had just tossed a timing belt - non-interference engine so it wasn’t a big deal to get running again), and bumming a ride back to the junkyard. The people behind the counter thought I was some variety of idiot for spending my day at the junkyard, in the mud, to get this old beat up Subaru wagon out. I thought they were silly for selling me an ‘87 Subaru GL wagon, with dual range, for $350. Yeah, it pissed fuel and the brakes didn’t work well (you had to pump them a few times to get pressure), but they didn’t realize that the leak was from the fuel pump (which was on a separate plate in front of the fuel tank) and that the rear brakes were just comically out of adjustment because this particular model didn’t have automatic clearance adjusters on the rear brakes. I didn’t tell them these things, either.
Over the years, people have asked me how I learned to work on cars (mostly when I lived places where most people didn’t work on their cars). I didn’t grow up with it. I learned it because, quite honestly, I didn’t like walking that much. I bicycled a ton as well, even through the winter (studded snow tires on a bike are incredible), but if I wanted a running car, there was a long period of my life when the only person who could make that happen was me. A shop bill wasn’t an option on my budget. So I learned. I’d buy a Chiltons or Haynes manual for a car, and dive in. They’re really helpful guides, and this was long before YouTube had videos for every car under the sun (that’s one area where video can be helpful). I’d go hang out with other people who were doing things on their cars and learn. I’d find forums for cars and read. The old Subaru forums were awesome, because if there was a way to fix the car with bubble gum and a half piece of duct tape, there were about 5 writeups of it. Such a lovable bunch of cheap rascals. General wisdom was that if you bought an EA82 Subaru with “a blown motor cuz the timing belt failed” for $100, you really should get a friend to help you tow it around the corner before you put a new timing belt on and drive it home. There were a few… incidents… when someone bought a car for $100, spent the half hour to put a new timing belt on it, and drove it off. The old Subaru motors, unusually for the time, were non-interference engines. That means that if the timing belt fails, the pistons and valves don’t collide - which means that the repair for a failed timing belt is to simply put a new timing belt on, retime the cams, and drive off. Most engines were interference engines at the time, and so people would get faulty advice from mechanics. Their loss!
I hate to dive too far into the personal finance realm (it’s badly overdone, and there are only so many ways to say, “Don’t spend more than you make”), but if you’re on a tight budget and need to own a car, one of the best financial decisions you can make is to learn how to fix your own car. The vast majority of repairs can be done at home, or in your apartment parking lot (yes, I know that the lease usually says you can’t do that, and I’ve done an awful lot of repair work in those sort of lots - just don’t be obvious about the jack stands if you have the suspension torn apart, and maybe park so the wheel you’re working on is the least visible one).
Getting Started
So, what do you need to get started? In any realm you choose to start fixing things in, you’ll need the proper set of tools. For electronics, a set of geek screwdrivers is a requirement, as is a good soldering station. I’m a huge fan of the iFixit guys - and if you can swing $60, get the iFixit Pro Toolkit. It’s got just about everything you might need for modern electronics repair. If you can’t afford $60, try the $20 Essentials kit.
You’ll also need a temperature controlled soldering station. Yes, you can do some repair work with a Radio Shack woodburner, but a good station makes a huge difference. I had an Aoyue 936 for quite a while, and I did a ton with that - including some surface mount repair. I’ve recently upgraded to an Aoyue 968A ($175 on eBay). This is a far, far nicer station with a solder fume extractor (no more stream of flux smoke in your face) and a hot air rework gun. It has a digital temperature readout for the various hot bits, and it’s fast. It gets up to temperature in under 15 seconds and comes with about a dozen tips for all sorts of work. I really, really like this unit.
You’ll also need some solder wick, some flux, and (obviously) some solder. Keep your sanity intact and buy lead based solder. So much easier to work with. If you have a Micro Center nearby, they may have an amazing DIY electronics section by now!
For car work, if you don’t have any tools, pick up a Mechanic’s Tool Set on eBay (or at your local parts store). This will take you an awful long way to car repair. If you don’t have a torque wrench or an adequately calibrated arm, get one of those as well so you can torque fasteners properly.
And then, as you run into things you need for projects, go buy it. I don’t feel guilty about buying tools for repair work. In almost every case, the cost of the tool is far less than the cost of having someone else do the repair, so I still come out ahead - and I have a new tool! New tool day is exciting…
So - Get Fixing!
Hopefully this encourages you to go fix something! Beyond just fixing your own things, fixing other people’s things is awesome. And, if we truly are an empire in decline, these sorts of skills will be ever increasingly in demand. If you’ve got the tools and the skills, you’ll be a very valuable person in times of economic contraction when people need things to last longer.
And, on that note, I’ll end with one of my favorite memes, created by a friend many years ago. Be that guy!

Comments
Comments are handled on my Discourse forum - you'll need to create an account there to post comments.If you've found this post useful, insightful, or informative, why not support me on Ko-fi? And if you'd like to be notified of new posts (I post every two weeks), you can follow my blog via email! Of course, if you like RSS, I support that too.


