
It’s been a while since I’ve done a pack teardown and rebuild of a new pack. The most recent one was the Trek Valencia Ride+ pack teardown and rebuild back in January (Part 1, Part 2, Rebuild). That one was a bit of a mess - corroded cells, held together with some sort of adhesive foam, and generally not at all fun.
This one is somewhat nicer to work with! It’s a very welcome improvement.
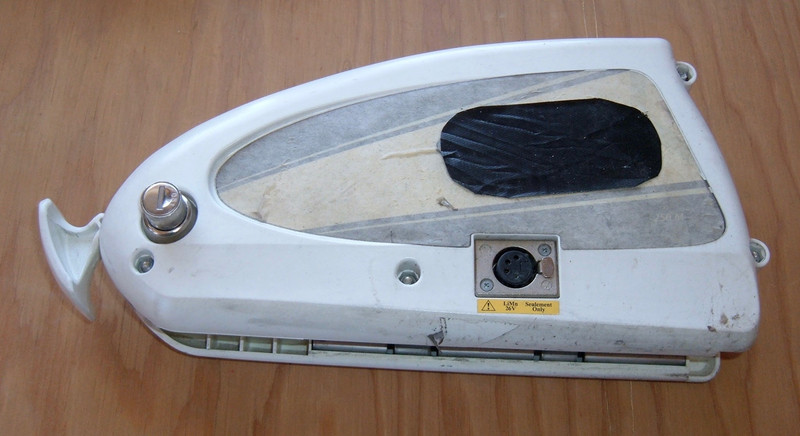
I have here in my hand ~a list of 205~ a very well used BionX 26v LiMn battery pack. It’s rated at 9.6Ah, and is in the same form factor they seem to use for all their packs. Interestingly, the capacity is the same as the 36v packs (9.6Ah), but the voltage is lower (so fewer cells). It could make one wonder…

Read on for tons of photos, a full teardown, and a stunning rebuild to a whopping 18Ah!
But, first, the warnings.
The Warnings
Ah, yes. The warnings that tell me not to do what I’m about to do. The remainder of this blog post involves a lot of “Disassemble.” The warranty is already void, so I’m not worried about that. And, really, “No disassemble!” would be just as adequate, and most people reading it would read it in the voice of Johnny Five.
Also, related to this label, have I mentioned I hate RoHS? Lead-free solder is just junk compared to the lead stuff. It’s not good solder. And don’t get me started on lead free brass plumbing fittings. If forced, I can say good things about them, like “They only leak profusely from the threaded parts.” I’m sure there’s a trick to getting them sealed, but I sure can’t figure it out, and neither can anyone else I talk to. There’s a reason that everything is PEX now, and I’m pretty certain lead free brass is a major part of that.
Yes, I get it. Lead isn’t great for humans. But neither are tin whiskers causing failed boards, cracked plumbing, or the variety of other problems one has with lead free stuff.
The people who developed leaded solder weren’t nasty, mustache twirling villains, cackling in their dank, dungeon labs as they tried to find the most vile substances they could possibly put in solder, because they were being evilly evil for evil’s sake. They used lead and tin because it worked the best. Of all the elements one can put into solder, tin and lead combine together to make a really good solder.
And, besides, there are enough exemptions to RoHS that it’s basically useless anyway. Your car’s circuit boards are lead free (so, they’re probably growing tin whiskers), but don’t ask about the huge lead acid battery under the hood.
On the other hand, I guess it’s safe to repeatedly lick circuit boards now.
Anyway. I’m not planning to incinerate this pack, at least…

The label at the other end is just fun.
“Do not allow this battery pack near a crippled droid with a broken axle”?
“Do not fire your large cannon into the ground”?
“Do not shoot this really complex bullseye”?
“I got rejected from the museum of modern art, so now I make random stickers”?
Something like that…
In any case, I don’t plan to throw this pack away. I plan to fix it, and make it better in the process_._ We need more of that these days, by the way.

Diving In
The pack opens just like any other triangular BionX downtube pack, with four hex head bolts running through the pack, and two plastic latches along the top.
Inside, there’s the usual stuff. A battery, and the BionX BMS. All of this is routed (with wires, imagine that!) to the connector in the lower left corner.
Interestingly, the newer BionX packs seem to be a bit better about holding the battery in place. I’m not sure if there’s a dimensional change somewhere, or why they’ve started adding the padding blocks and the silicone caulk, but there’s nothing wrong with keeping the battery in place better. And, this stuff is sticky enough to stay in place, but it doesn’t glue the whole pack together - which is awesome! I’m not a fan of the stuff used in the Valencia Ride+ pack, which really does glue the whole thing together.
A quick count of bulges indicates the pack is four cells tall on the right, and three on the left. This case looks identical to one that can fit a five-tall pack all the way across, and that looks suspiciously like a big block of foam across the top…

Further detailed investigation reveals that, yes, that’s just a block of open cell foam across the top, filling space and keeping the battery from rattling around.
I suspect this is why the caulk is used - otherwise, the battery could shift inside the pack. It’s not a bad idea, though, and I’ve started using some silicon caulk in my rebuilds.

With the big block removed, the smaller, denser foam blocks holding the pack in place are clearly visible, as is a thermal fuse that will trip if the pack gets too hot. All the older BionX packs have this, and it’s wired on the negative side. It’s worth noting that the body on it is electrically connected to the wiring - so be careful where you let it swing. It’s a dead short if it touches the exposed pack anywhere. It’s not a bad idea to wrap it in tape when you remove it from the pack. I hear that it creates some impressive arcing if it swings onto a pack.

The BMS looks about like an old BionX BMS does - no surprises here. There’s nothing particularly exciting on this BMS - a beeper, a fuse, and a set of connections to the battery and to the external connector.
Observant readers, familiar with modern packs, will note the lack of balance leads going into this pack. They’re not needed due to the nature of the battery chemistry used.

It’s a bit hard to see in the photo, but the “gunk” on top of the board and components is a conformal coating of some variety or another. This is great to see! A conformal coating helps protect the board and components from water and debris. Some of the BionX packs have this, and some don’t. I’m a big fan of it, though. Personally, I’d rather see a full potting, like Rad Power Bikes did with both the Rad Wagon and Rad Rover controllers, but I’ll take what I can get, and a conformal coating is much, much better than nothing (which, sadly, is also found on some BionX packs).

The Battery
The battery pulls right out, and as usual for the older BionX batteries, there’s a very helpful label on it.
This tells me it’s a BMZ 7S6P pack (7 cells in series, 6 cells in parallel for each group), with a nominal voltage of 25.2v (3.6v/cell), and a fully charged voltage of 29.4v (4.2v/cell). A 6P pack with 9.6Ah capacity means 1600mAh per cell - so it’s almost certainly 42 of those cute green Sony US18650V cells.

I’m not sure exactly what the caulk they use is, but it feels like a standard silicone caulk, and peels off easily enough. The combination of the foam spacers and the caulk keeps the battery solidly located, and gives it some shock absorption as well.

Inside the Pack
With the black plastic cut off, it’s clear exactly what’s going on here. Groups of six cells in parallel, with seven of those groups in series. I’d personally describe this pack as a 6P7S pack to make the layout explicit - this would be a 6P7S pack because the parallel groups are first, whereas a 7S6P pack would have strings of 7 cells in series, with 6 of those in parallel. The standard BionX 36v pack layout is a 10S6P pack, and I tore one of those apart a year or so ago. I’ve also seen a 6P10S 36v pack, so… I have no idea why they switch around.
A ruler and a micrometer indicates that the nickel strip is 10mm wide, 0.15mm thick - which I have on hand for the rebuild.


As I expected based on the fact that this is a BionX pack of 9.6Ah, it’s built around the green Sony US18650V cells - 1600mAh per cell, and capable of quite a few amps. I rebuild packs with Sony US18650V3 cells, which are the same chemistry but 2250mAh. However, I think I can cram a few more in this pack…

Looking at the welds, it’s clear this pack was hand built. That’s not a problem at all - I hear people will pay good money for Artisanal Small Batch Handcrafted Batteries (and if you’re one of those people, the contact form is on the right - I build such things). It’s just interesting to see. They use two welds per terminal for the most part (some have three), and I use three welds on all my terminals.
The cells are hot glued together, just like all the other BionX packs, and the battery as a whole is very solid. I have no complaints with how these were made - and they’re certainly easier to rebuild than some of the newer exotic layouts!


That’s it for the teardown part. There’s no point in pulling the battery further apart, because there’s nothing to be learned there - the layout is obvious. Also, it still holds voltage, so I’d rather not rip it apart “just because.” I have a use for these worn out packs. I’m not entirely sure what. But I’m sure it’s something.
Rebuilding to 18Ah
As I was pulling the pack apart, with all that empty space filled with foam, I started thinking.
After I got it entirely apart, I stopped thinking and started test fitting. I confirmed that, yes, a 6x10 brick of cells will fit just fine in the enclosure - it’s the same enclosure size as the 36v packs! So, that means I can fit up to 60 cells. The largest multiple of 7 that’s less than 60 is 56 - 4 cells short, but still a big improvement from 42. If I rebuild with 8P groups, my 2250mAh cells will give a whopping 18Ah of capacity on this pack. That’s a big improvement over stock, and I’m pretty sure I can do it!
A bit of playing around on a sheet of paper gave me a layout that should work - strings of 8, wrapped around as needed. You’ll see the details later.
The first step is building blocks of 4 cells. This will let me build my “8 long” and my “4x2” clusters I need. I’m using my standard 18650 jig, and hot gluing cells together.

These groups of four then get glued into some groups of 8 as needed.

Once the groups of 8 are glued together, it’s time to group them electrically. Out comes the nickel strip and my spot welder.

To make the 12 long grid I need, I’ve got 8 cells in a line on the right, and a 2x4 grid of cells on the left. It works out. I have to build the pack and weld it up as I go, given the short arms on my welder. I’d love a freeform spot welding pen, but I don’t have one, so I’ll work with what I have. Figuring out how to build new pack layouts with the tools I have is a bit of a puzzle, and I enjoy it.

Importantly, one should insulate once one no longer needs access to voltage regions. These cells are at shipping charge (3.61v), but they’ll still source more than enough current to spot weld any short they get the opportunity to.

And, test fitting the completed pack. It fits! Why BionX didn’t do this in the first place is beyond me. I guess this was supposed to be the “discount” system.

For installation, the ends are covered with insulating paper. This is a thick, adhesive paper that does a great job of keeping everything in place and preventing shorts.

And, back in it goes!
I used the small foam pads and the same type of silicone caulk as the pack came with. It’s properly secured in the case, the case is back together, and everything beeps as it’s supposed to during testing.

Nearly twice the stock capacity. Not bad for a rebuild!
Final Thoughts
This is very clearly a BionX pack - show me any of the older packs and I’ll recognize them at this point. I suspect they went with the parallel-then-series layout because it’s easier than making a series-than-parallel arrangement work for this particular cell configuration, but they’ve experimented back and forth with different layouts over time, and (spoiler alert for future posts) it doesn’t make a bit of difference in balancing behavior.
I have to assume this was supposed to be the “discount system.” Otherwise, I have no idea why it isn’t full - it’s no harder to fill it than it is to toss in foam, and going from 42 cells to 56 cells doesn’t add that much cost. Even in 2008 or whenever it was built.
These older packs are really just a joy to work with. They’re dead simple, obvious in layout, easy to rebuild, and cell technology has advanced enough that adding capacity is easy.
Despite the lack of a fancy BMS, the spinel LiMn chemistry does a great job of staying balanced. It’s really just not a problem.
I know they’ve moved to newer chemistries and much more complicated layouts, but I’m not sold on the advantages yet. These old packs are really, really nice - and I’m happy to help keep them rolling around as long as possible.
How do you like your 26v BionX system? Let me know in the comments. If your pack is getting old and could use the same treatment, the contact form is in the right column, near the top.
Comments
Comments are handled on my Discourse forum - you'll need to create an account there to post comments.If you've found this post useful, insightful, or informative, why not support me on Ko-fi? And if you'd like to be notified of new posts (I post every two weeks), you can follow my blog via email! Of course, if you like RSS, I support that too.


