
It’s time for another Property Progress post - covering most of the stuff I’ve gotten done as we head into winter. So far, no snow, but the clouds and rain have most definitely hit hard, and are forecast to continue. The generator is fueled, the tractor is ready to go for the snow, the snowblower is ready, and I’m set to hunker down and ride out the winter with plenty of design work for next year’s projects.
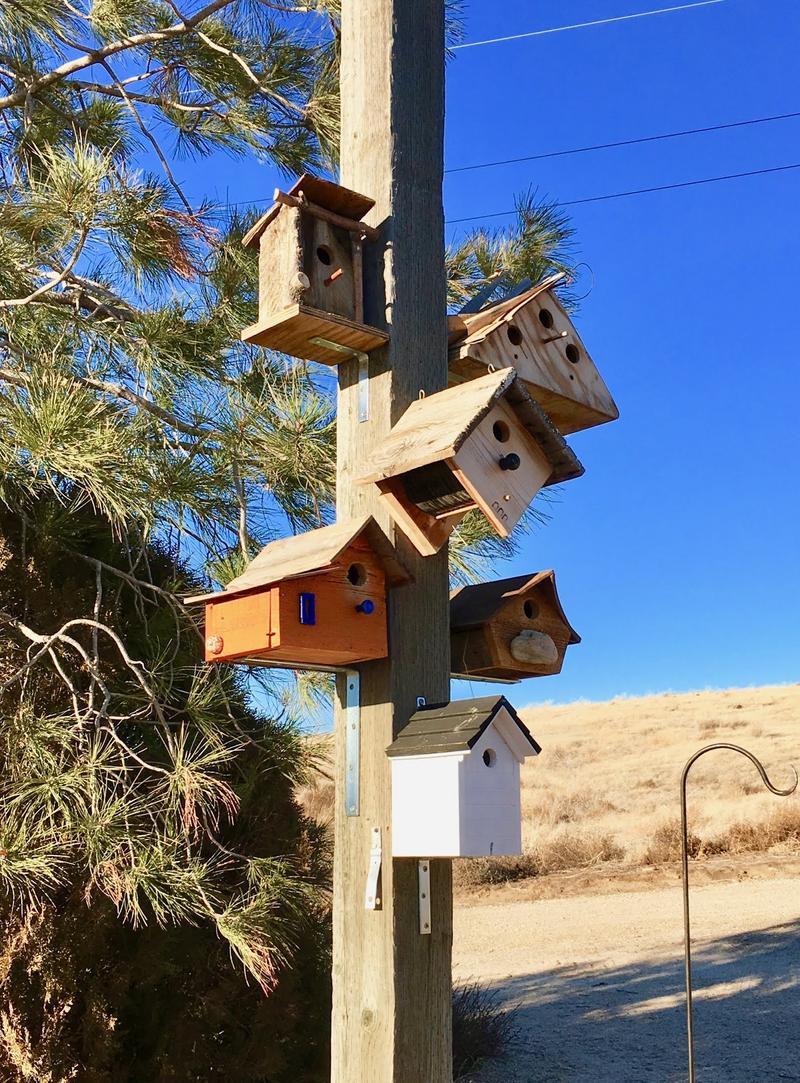
And, as happens regularly, we’ve added birdhouses to our post-of-bird-houses. The lowest one came from a silent auction at the school our church meets at. This post is one of those “totally unplanned things that’s happened and become cool” - we hadn’t ripped the post down because it was out of the way, we wanted to put a few birdhouses, and the post seemed a good spot. It turns out that, with the bushes behind it, it’s a very good spot, and the local birds love it. So we’ve added more houses. Eventually, it’ll be birdhouses all the way up!

What else have I done? Keep reading to find out!
Hawks
In the “Larger Birds” category, we also have a ton of Swainson’s Hawks out here. They’re always in the air, and I think our firebreak has really encouraged them (and the owls) to hang out - it’s a good open area that is basically a death trap for small critters, if you’ve got a sharp-eyed hawk orbiting overhead.
Am I OK with small mice and such being eaten by hawks? Yes. Yes, I am. Please, eat more. We have too many of the things.

Midway through the summer, I was out working, and I was treated to an amazing airshow by three hawks - they were having a grand time up in the air, and were absolutely beautiful. All I had was my cell phone, so the photos don’t do them justice, but it was amazing to watch - I really enjoy our local large birds, though I do wish the owls would quit crapping on the Ural…

Tractor Stack: Less Weedburner
One of the recent changes I’ve made to my tractor is the addition of a stack. It looks a bit wrong on this tractor, but it’s massively functional (to me). My Ford 9N, stock, comes with an underslung exhaust. It drops down from the manifold and heads back along the underside of the tractor, exiting behind the axle. It’s nice for keeping exhaust out of the operator’s face, but it’s also known as a “weedburner exhaust” in certain circles, for what should be obvious reasons.
In that my property is a hillside of dry cheatgrass, mustardweed, and other tall, flammable dried grasses for most of the year, having a hot, underslung exhaust badly limited where I could run the tractor. Running through dirt? Fine. Running through grasses? Likely to start the sort of grass fire I just don’t like fighting.
With the stack, the exhaust curves up and doesn’t go very far down. This keeps hot exhaust bits out of the weeds, which means I run a far lower risk of starting grass fires! The only downside to this setup is that, depending on the wind, I get a face full of exhaust. I’m planning to add a bit of an extension to the stack as I don’t regularly drive under anything with this tractor.

Stump Hauling
After bending the tines on the pallet jack I was badly misusing as a forklift, I rethought my plans, and borrowed some wisdom to fix the problem. The result? Tines that are far stronger. We bent them back and added some new plates in the weak spot to strengthen them.

I’ve then tried to be smarter about hauling things, and have been putting stumps on a pallet before lifting them. So far, so good - nothing bent.

The stumps are from the various woodpiles I’ve been trying to get rid of. After cutting most of the tree off, you’re left with a stump that’s not really useful - there’s too much dirt and rock in it to cut it up, and it’s too large to burn. So, off to the hillside to sit until either the next grassfire goes through or I figure out something else.

Logging Chains and Log Piles
In the “continued battle of the log piles,” I’ve hit a point on one of the piles where I can’t really get much more out. There’s a lot of wood, but it’s all tangled up, laying on top of other wood, and generally not being easy to get at.
If only I had some way of pulling those pieces of wood apart, and separating them from the stack so I could cut them up…

Wait, I do! Logging chains! I borrowed these from up the hill for a bit. They’re just large chains you can wrap around logs, attach to something like an old tractor, and use to pull a log pile into pieces you can cut up.
On the log side, two wraps is about right. You might be able to get away with a single wrap, but with two, there’s more grip, and the chain is unlikely to slide much. The hook latches onto a convenient chain link, and the other end of the chain goes to something capable of putting an awful lot of pull on it.

Say, an old tractor! I looped the chain around my tines, because that’s what I had attached to the tractor. Also, I used the tines to move the chains. Logging chain is heavy. If you’re about to use an old tractor to pull something, make sure you are connected low on the tractor. Dragging the ground is about perfect. If you’re connected high, and the object you’re pulling doesn’t want to move, physics works it out such that the tractor rears up in a hurry. Have you seen Cars? The whole “tractors rearing up” thing is a very real risk on something like this, and I have a very, very strong preference for this tractor not to kill me. The tractor, on the other hand, is an awful lot more ambivalent. You screw up, a 75 year old tractor will happily kill you for your mistake. It has a way of focusing your senses… I’m just saying, I don’t listen to music while on this tractor.

In any case, first gear and ag tires provided plenty of force to drag this log out of the pile. With log chains, not only can you drag it sideways, you can drag it longways as well!

I spent a while dragging logs out, and eventually ended up with a bunch of large logs, clear of the pile, ready to be cut into pieces. They’re absolutely filthy with dirt, which is really hard on chainsaw chains. Fortunately, I have enough hoses that I was able to hook stuff together and hose them down to get most of the dirt off. A few hours, several chainsaw chains worth of sharpening, a few tanks of chainsaw gas, and these should be in pieces, in the back of my truck, ready to be carted up the hill and split for winter heat!

A bit of chainsaw time later, and I had all these pieces. They’re usefully sized for the woodstove up the hill.

An awful lot of tossing later, and I had a pickup bed full of wood. This is the manyth of many pickup beds of wood I’ve hauled up the hill in exchange for the stuff that comes down the hill…

Repairing the FAN
In previous posts, I’ve mentioned that I’ve got this fan that moves an insane amount of air. I’ve also discovered that, from years of sitting in the sun, the insulation on the cord is… well, not in good shape.
Plugging it in one day to air out the shipping container, I noticed that there was a good bit more bare wire exposed than I think reasonable for a cord. The ground wire is exposed, but so are the other wires - and check out that cracking. Probably not good.

The good news about fans like this is that replacing the wiring is very easy. Pull the cover off, pull the old wire (inspecting the bare metal from cracked insulation), and replace it.

I’m actually really impressed that this didn’t short out in operation and blow a breaker. It had to have been close, but as long as the wires are running parallel to each other, a few mm of air is more than enough insulation for typical wall voltages. I mean, not a good idea, but empirically, this fan has quite a few hours on this cord and I didn’t notice any issues.

So, with a bit of work later, and a bit of creativity in finding a new donor cord, I’ve got a shiny new cord installed that should last a long, long while!

A Ural: With Rocks
At one point in recent history, I found myself needing to haul a bucket of rocks. The problem was that the sidecar of the Ural was full of other stuff - mostly, my kitchen. I had my stand mixer, a skillet, and a lot of other stuff already loaded in the sidecar. How do you carry a bucket of rocks?
WWID?
What Would Ivan Do?
Ivan would just strap the bucket to the back seat. I mean, who rides back there, really?
It works. I hauled the rocks, quite successfully, strapped to the back seat.
Not only do I hang out with people who can remove this from the Ural successfully, they’re nice enough to load it back up once they’ve emptied it!

New Tools
I’ve… got this thing now. A DeWalt 12” Sliding Mitre Saw. On a rolling stand. It’s awesome. This will be most useful for future projects.

Trash Trailer Modifications
In the land of “failures,” I was rather wrong about the trash trailer. I assumed my major problem was keeping the trash from falling out. I didn’t consider keeping the mice out. The reality, after 6 months of trash, is that the mice were very much in - and very much made a mess of things.
In general, the trash trailer is still working very well. I’m quite happy with it, and throwing trash in the trailer instead of paying over $200/yr for “haul the trashcan up the hill” service is very much worth it. I’m still running 2-3 loads a year, though having found a place for recycling somewhat locally that accepts more than just metals, I think I can drop that to two a year, and hopefully lower long term.

The problem, near as I can tell, is that the front end of the trailer, with the various frame bits, isn’t mouse-proof. It’s got open areas, which I tried to block off with 2x4s, but those aren’t mouse-proof. Openings like this, even with a 2x4 screwed over it, just don’t block mice.

The solution? More foam! The mice will eat the foam if they’re in, but I’m hoping they won’t eat the foam to get in.

Since I had a full can of Great Stuff, I decided to foam more. Lots of foam. Foam everywhere!

I even foamed the tailgate gap. Is it large enough to let a mouse in? I’m not sure. Could it be? Yes, probably. I want to deter mice, so… foam it is.
Will this work? No clue! But I’ll probably cover that in a year.
Smoke Alarms: Photovoltaic vs Ionization
I’ll probably do more writing on this at some point later, but, for now, if your house has First Alert 9120B smoke alarms (ionization type), I can now confirm that a BRK 7010B (apparently the professional line?) photoelectric smoke detector is a dead-simple swap - you don’t even need to replace the baseplate or interconnect. Just remove the old detector, install the new one.
Why might you want to do this? Nuisance alarms from cooking are a good one (photoelectric types alarm on smoke, not ionized products from an oven cooking off a spill), but another one is that they respond, far faster, to the sort of slow starting, smoldering fires that get people killed at night. I’ll let you do your own research on that for now, but it’s not even close between the two unit types.
Final Thoughts
Fun with property. Endless projects.
I’m slowly making progress, though. Next year? Massive solar. ;)
Comments
Comments are handled on my Discourse forum - you'll need to create an account there to post comments.If you've found this post useful, insightful, or informative, why not support me on Ko-fi? And if you'd like to be notified of new posts (I post every two weeks), you can follow my blog via email! Of course, if you like RSS, I support that too.


