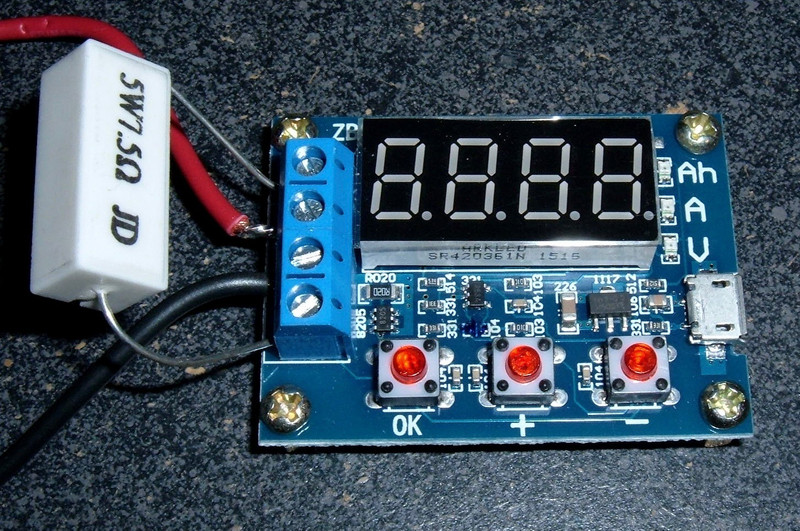

I’ve got another battery tester to play with! This tester is a ZB2L3 v2.0 by ZHIYU. It’s rated for a max of 15v, 3A, and 9999AH - so you can test your 12v lead acid batteries with it, if you care.
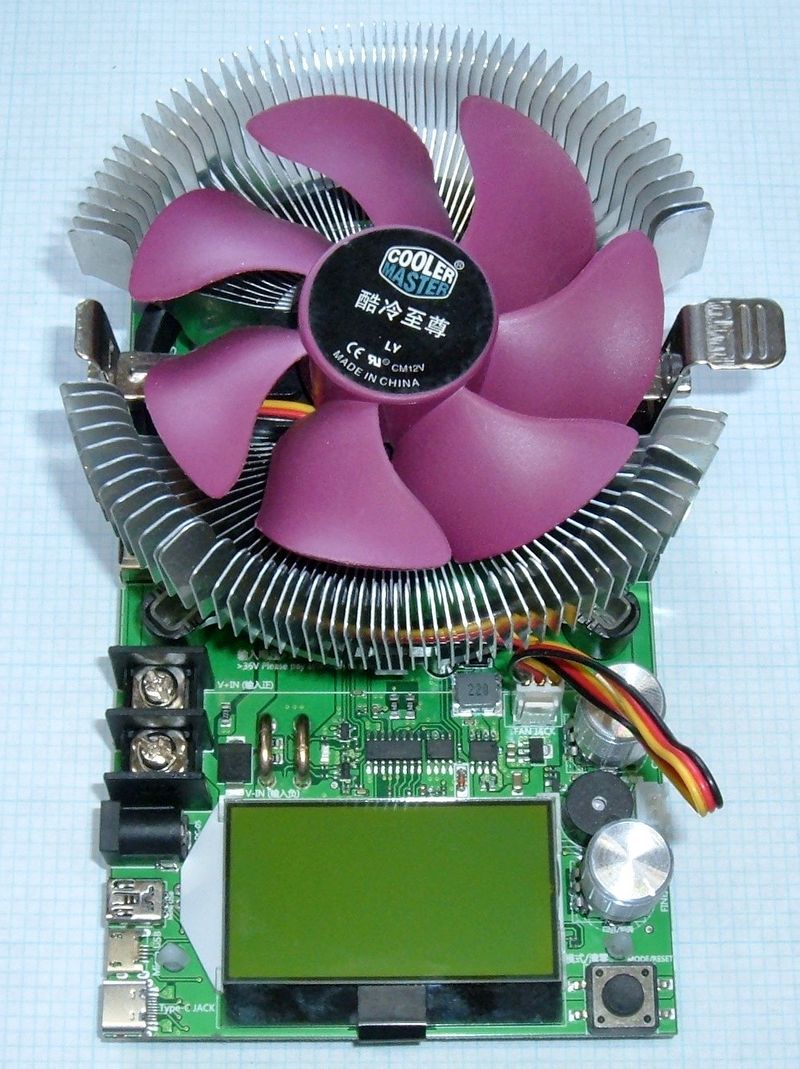
It looks something like this:


Mine came from eBay as a 1.5v~12v Battery Capacity Meter discharge Tester 18650 li-ion lithium lead-acid. $7.98 shipped - not half bad!
The manual for this board is surprisingly readable. It includes error messages, and also has a calibration mode (of which I don’t have sufficiently precise hardware to actually use right now).
Manual Translation
1.5v-12v Battery Capacity Tester External Load Discharge Capacity Test 18650 (yes, this is keyword spam).
Operating Parameters
Power supply voltage: DC 4.5-6V (micro USB)
Working current: Less than 70mA (I assume this means for the micro USB interface)
Discharge voltage: 1.00-15.00V, resolution 0.01V
Termination voltage range: 0.5V-11V (precision 0.1V)
Current range: Max 3.000A, resolution 0.001A
Maximum voltage error: 1%+0.3V
Maximum current error: 2%+/- 0.010A
The board will show the battery capacity up to 9999Ah. The decimal shifts to indicate proper units.
Note: This circuit is designed with a DC bias to improve voltage measurement accuracy. When the terminals are not connected, the unit will display a small voltage (0.06v on mine). This does not affect the actual measurement. If you short the input terminals, the unit will display 0v (mine does). To understand this principle, consult the superposition theorem in electrical engineering.
Method of Use
- Fully charge the battery you’re testing.
- Connect the battery under test to the input terminals (center terminals) in the proper manner. This device may be damaged by reverse polarity. Connect the load to the proper (outer) terminals, and connect the micro USB power (do not use a desktop or laptop - use a standalone cell phone charger). The battery voltage will be displayed.
- To start the test with the automatically determined termination voltage, press the “OK” button. The display will flash the termination voltage 3 times and begin testing. If you wish to set the termination voltage yourself, press “+” or “-“ to modify the termination voltage as desired, then press “OK” to start the test.
- The tester connects the battery to the load, and displays the capacity (Ah), discharge current (A), and battery voltage (V), cycling the display through each. When the battery voltage reaches the specified termination voltage, the battery is disconnected, and the display shows the capacity (Ah) with a rapid blinking to indicate the test is done. Press “OK” to solidly illuminate the display with the capacity, then press “OK” again to reset the unit for another test.
Error Codes
Err1: Battery voltage greater than 15v.
Err2: The battery voltage is lower than the specified termination voltage.
Err3: The battery is unable to withstand the discharge current (too much sag?)
Err4: The discharge current is >3.1A.
Calibration Operation
(I have not attempted calibration. This is my best attempt to translate the instructions.)
To enter calibration mode, press all three keys when the tester is powered on.
The unit will display 0u0A. Short the input positive and negative terminals and press OK.
The unit will display J10u. Apply 10.00V to the positive and negative inputs and press OK.
The unit will display J2.0A. Apply a constant 2.0A DC current across the unit (short the load, perhaps? I’m not sure how to hook this up) and press OK.
The unit will sanity check the calibration data. If it likes it, it will show 4 calibration numbers after existing, otherwise it will discard it.
Syonyk’s Quick Operation Guide
Connect a battery and a load. Plug it in. Press “+” and “-“ to adjust the auto-detected cutoff voltage (which usually will be close to what you want). Press “OK.”
It cycles through Ah, A, and V while running. Caution: Your resistors will get hot.
Wait until it’s done and flashing to see the final capacity. It’s really, really straightforward to use.
Analysis
This is a very simple testing unit, and it’s reasonably flexible. It has an connection for a battery, and a connection for a load. What you do with these is up to you, as long as you stay within the 15V/3A limits. This allows for a great amount of flexibility in testing, assuming you’re willing to change the loads around or create your own custom load banks for the unit (though be aware of the 3A limit - you can’t put too much load on a battery through this unit).
It doesn’t do anything fancy - it pretty much just counts coulombs and displays voltage. Which, sometimes, is just what you need. Nicely, you can use this with a +5v PSU (so a USB power bank), or a 12v battery, or pretty much whatever you want - just set the cutoff voltage properly before you start.
Unlike another tester, this one doesn’t pulse the battery or anything unexpected - it just sits there, drawing current, until the battery hits the cutoff voltage. This is a very good thing. :) The downside is that using a resistive load means the amperage drops over the discharge (Ohm’s Law and all), but the flexibility of being able to use “pretty much anything” as a load is worth a lot!
Voltage
It’s pretty good. It reads a bit high when unloaded, but this is noted in the documentation and it seems to drop down to reflect reality when loaded. As it’s not doing anything fancy except cutoff voltage, it’s fine. I have no real complaints here.


Testing Results
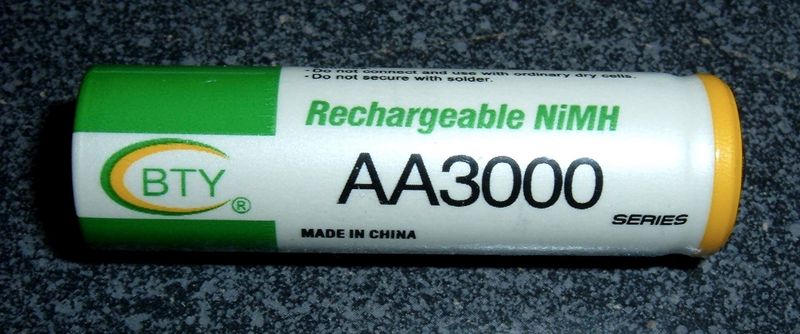
I’ve run my 18650s through this, as I have with other devices. Amperage drops over the test as the voltage drops, as is expected for a simple ohm’s law device. But, I’m just looking for something sane-ish out of the values.
7.5 Ohm Resistor (0.54A-0.41A)
Battery A: Discharge: 2695mAh. Recharge: 2689mAh.
Battery B: Discharge: 2708mAh. Recharge: 2620mAh.
3.75 Ohm Resistor (2x 7.5 ohm in parallel) (1.06A-0.81A)
Battery A: Discharge: 2633mAh. Recharge: 2621mAh.
Battery B: Discharge: 2661mAh. Recharge: 2702mAh.
This tester reasonably shows slightly less capacity at a 1A discharge vs at a 0.5A discharge, so that’s good.
Conclusions
This is a pretty handy tester to have around. Not only does it handle individual cells, it will handle packs and 12v batteries and such - keep it below 3A, and you’re good! You will want to grab some different resistors, if you’re testing higher voltage batteries, but a decent set of resistors and this will handle an awful lot of your needs.
And it’s, like, $8. :)
That said, you can do better if individual cell testing is your goal. This would be a nice pack tester, and a handy tool, but I wouldn’t suggest it for individual cell work.
Comments
Comments are handled on my Discourse forum - you'll need to create an account there to post comments.If you've found this post useful, insightful, or informative, why not support me on Ko-fi? And if you'd like to be notified of new posts (I post every two weeks), you can follow my blog via email! Of course, if you like RSS, I support that too.

