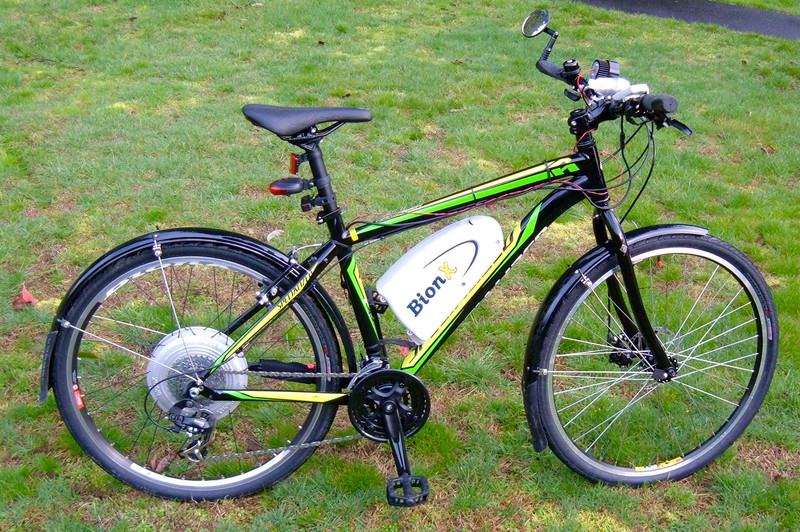

I’ve wanted to do a BionX based build for a while now, and finally got it done! I built this as a “daily commuter” class bike for the Seattle area, tried a few things I wanted to try, and added a few touches of my own!

This build started with an older BionX PL350 36v kit that found it’s way to me. Only 230 miles on the clock, but the battery was stone dead (this is related to how it found it’s way to me). I rebuilt the battery, as I often do, with brand new cells. It’s now a 13.5Ah battery instead of the stock 9.6Ah battery, so this kit has about 35% more range than it did right from the factory!
I’ve also successfully demonstrated that one can do pack powered lighting with a BionX conversion - both headlights are powered directly from the main battery!

As always, keep reading for a lot more details & photos.
Basic Build Details
The bike for this build is a 2015 model Specialized frame I got on closeout. It’s a medium frame mountain bike with 26” wheels. At the request of the eventual buyer, I swapped the original front suspension fork out for a solid fork, and added a disc brake to the front wheel.
It has my usual “commuter” touches as well - a bar end mirror, a bell, tightly fitted fenders that extend fairly far down (it does rain in Seattle, oddly enough), and heavily armored tires. At this point, I consider those mandatory for anything that’s going to be ridden regularly. Fair weather bikes, ridden on separate trails, are boring! And they’re often carried to the trail on a bike rack, which is a silly way to transport a functioning bike.

One of the really nice things about the downtube battery BionX kits is that the weight of the bike is more balanced. There’s still the rear hub motor, but the battery pack is forward. Contrast this to my commuter and you can see how the weight is better spread along the bike.

Brakes & Tires
I’d originally decided to try a rim brake build, because this kit has regenerative braking available from the motor. Unfortunately, this didn’t work out as well as I’d hoped. The hills are just too much out here in Seattle.
As a result, it has a cable operated front disc brake now. The rear brakes are still rim brakes, but the motor adds significant braking to the rear, and this arrangement seems to work out well enough.

The tires are Specialized Nimbus tires, with their Flak Jacket Puncture Protection. They’re 26x1.5, which is a narrower, road focused tire that’s still capable of dealing with mud and trails in limited amounts.
Inside the tires, the tubes are a thicker, thorn resistant type, and are filled with a latex sealant that should seal any punctures that do happen.
This is basically the same setup I use on my commuter, and I’ve brought home a pretty good nail in that tire, so I know this layering works.

Pack Powered Front Lighting
Up until now, this has (mostly) resembled a standard, by-the-book BionX build.
You didn’t really think I’d just stick with that, did you?
One of the reasons I did this build is to experiment with pack powered lighting on the older BionX systems. I suspected it was possible, but I wanted to prove it.
There are two cables running to the motor from the battery pack. The first is a small, multi-pin control cable. The second is a large, two pin cable that looks like the type of thing that carries power. Which, in fact, it does. Pack voltage, even!
When the bike is turned off, the pack is disconnected from the motor power cable. But, when the system turns on, full pack voltages is available on these pins (so about 42v fully charged with the 36v battery packs).
This connector, at least on the older systems, is an SAE 2 pin connector. You can find plenty of extension cables and the connectors on eBay for not much money at all.
I ordered one, built myself an extension cable with a tap for pack voltage, and then got so excited to install it that I forgot to take pictures.
It’s remarkably difficult to get this to fit - the cable lengths are matched, and I went and stuck another few inches of power cable in there. You can see the “S” curve that I made to take up the slack. The red & black twisted conductors carry pack voltage up to the front of the bike for the lights.

The lights are a pair of “ebike headlights” I got from (surprise!) eBay. I ordered a bunch of different types, and these are the best I found so far.
The advantage of “ebike headlights” or “scooter headlights” is that they take a wide range of voltages. Other bike lights I’ve reviewed were quite picky about their voltage, and wouldn’t handle anything outside their designed voltage without letting out the magic smoke. With a slightly more complex voltage regulator circuit, this variety of headlight can handle anything from 12v to 80v as the input voltage (so it will work on almost anything out there).
I kept the front reflector installed, but moved it to the other side. I don’t need the space for anything else, and while the lights are on any time the bike is powered on, the battery can go dead, so it keeps a reflector.
That said, I’m not actually worried about the battery going dead. This bike has regenerative braking that can be turned on at any time, so a light level of regen acts as a wheel dyno that will power the lights. Unless you want the lights to go out, you can keep them on.

The mounts aren’t fancy. They’re just some metal clamps and hex head screws.
But, you know what? This is about $30 of headlights, and they’re pretty damned good. I’ve got over $200 worth of lighting on the front of my commuter (a $160 Cycle Lumenator, $50 of random LED lights, and a pair of DC-DC converters to power the lower voltage lights), and there’s really no difference in the end result.
Power comes up from the twisted pair of wires, and is split to feed both lights. There’s a set of connectors under the waterproofing tape, in case the bars need to come off.

This provides a good idea of how the lights look at night. The center core of illumination is overexposed compared to what it actually looks like, but this shows roughly how it looks from the biker’s perspective, and about how far you can see. It’s really quite good, especially considering the cost, and more than adequate for the speeds this bike will do at night - even on a pitch black trail.
I’ve ridden my commuter and this bike on the same trail at night, and this set of headlights is just as good as my commuter set, for a fraction the cost.

Rear Lighting
The rear lighting is a lot less exciting. I’m using one of the “Laser 5 LED Bike Lights” I reviewed a few weeks back, a random USB chargeable light bar, and the stock reflector. I’ve been trying to find a good tail light solution for electric bikes that works over a wide voltage range, and haven’t found a reasonably priced one yet. Grin makes a really nice 8 LED tail light that works at almost any voltage, but it’s $60, and I think that’s a bit excessive (so, of course, my commuter has it).
In any case, there’s plenty of rear lighting on this bike for what it’s going to be doing.

Brake Lever & Regen Control
Because this bike has integrated brake levers and shifters, I can’t just replace the brake lever with a BionX compatible one. I need to use the magnetic pickup and provided magnet, which I’ve done. This photo is looking at the right shifter/brake unit from the underside. The cylinder held on with the zip tie and 3M molding tape, and the magnet is also held on with 3M molding tape. That stuff is really, really useful - I end up using it somewhere on almost all my builds.
The magnet and pickup are set so that a small movement of the brake lever triggers the regenerative braking. I adjusted the rear brakes a bit loose, so the first stage of lever travel is just motor regen, and it works nicely.

Riding & Hill Climbing
This bike is just nice to ride. Turn it on, set the assist level, and go. The BionX system gets out of the way entirely when riding, but there’s a smooth assist rising up to help when you need it. It is, by far, the nicest system I’ve ridden. You pedal, it assists, the console does things to show you what it’s doing, but you can safely ignore that and just ride the bike like it wants to be ridden.
The bike is happy cruising along at 17-19mph with a low level of assist, and seems to use remarkably little energy getting around (as is to be expected with a pedal assist). The upgraded pack capacity helps, but I’d expect 20-25 miles of “level 4 assist” with some energy left over for lights, and if you turn the assist down, it’ll go as far as you care to ride.
It climbs hills far better than I expected of a 350W system - to the point where I began to wonder if it’s pushing more than 350W through the motor. According to NYCEWheels, the newer 350W kits will peak around 700W, and I would believe it. I didn’t have time to attach a wattmeter to this bike, but it chewed up my muddy pipeline trail test (a long, insanely steep hill filled with mud and gravel) far better than I’d expected. While it puts out noticeably less power than my 1000W bike, it’ll still manage 8-10mph up my “commute hill,” and that’s a radical improvement over no motor.
The only real downside I’ve noticed is that it will thermally throttle if you abuse it too much (say, a long, slow climb up that muddy trail). At some point, it decides things are getting too warm and it cuts the power output significantly. This is a bit annoying at the end of a hill, but it really does beat frying the motor or controller.
I was excited by the throttle option initially (since I’m used to a throttle based bike), but it turns out I almost never used it. The pedal assist is a better way to ride this bike.
Regenerative Braking on Bicycles
The PL350 has a regenerative braking mode. It’s activated by the either brake lever sensor or the console buttons, and one can control the strength of the braking regeneration in the settings menu (code 2002, values from 1-64). Since this bike has rear rim brakes, I turned it all the way up, interested in how much dynamic braking power I could get.
I’ve long thought that regenerative braking on bicycles is a bit silly. Yes, you can recover a tiny bit of energy, but the light weight and awful aerodynamics of a typical bicycle make it hard to recover much of what you’ve put in - rolling downhill, air drag takes most of the energy.
After riding this bike, with regenerative braking available? Well, I still feel about the same. It’s a nice feature, but I wouldn’t go with a direct drive motor just for this. The amount of energy that can be recovered is minimal, and if you live on a hill and start out with a full pack, the regenerative braking is quite limited - there’s nowhere for the energy to go. So you use your brakes anyway.
If I had a heavy cargo bike and normally charged the battery pack to 90% for longevity reasons, regen might be a useful feature. But for a single passenger bike, it’s just not that important. It saves your brakes a tiny bit, and that’s about all it’s worth.
My commuter bike is heavier, a bit faster, and has a geared hub motor - so no regenerative braking at all. I live on top of a rather impressive hill, with a steep 220’ vertical descent in the morning, and the same climb on the way home. Despite this, I can get 8-12 months of daily commuting from a set of Koolstop Electric Bike Pads before I need to replace them.
If the kit you’re looking at for other reasons offers regenerative braking, you may as well use it. But I don’t think it’s worth seeking out a specific kit just for this feature, unless you’re on a cargo bike.
Conclusions
This was a fun build! I enjoyed getting to work with the BionX system, and to ride one on roads I’m familiar with (I put 30 or 40 miles on in testing before selling it).
Coming from a 1000W geared hub motor, I thought I’d be underwhelmed by the power delivery - but I wasn’t! It’s noticeably less power than my commuter, but the smoother pedal assist really makes up for it. I work a bit harder on this bike, but on “level 4 assist” it’s not much more effort than my commuter build, and I really don’t notice the difference. The exercise is probably good for me anyway.
It climbs hills well, it rides nicely, and BionX has clearly done their homework when it comes to smooth operation.
It may be old, but the PL350 is still a great system!
If you have one that you’d like the pack rebuilt on, let me know with the contact form on the right. Or, if you have a dead system you’re getting rid of, let me know as well!
Comments
Comments are handled on my Discourse forum - you'll need to create an account there to post comments.If you've found this post useful, insightful, or informative, why not support me on Ko-fi? And if you'd like to be notified of new posts (I post every two weeks), you can follow my blog via email! Of course, if you like RSS, I support that too.


