
I’m a bit ashamed to admit that I didn’t have a good compost bin for my property up until fairly recently. I built a barrel composter some time ago, and… well, it doesn’t work for what we’re doing. I can’t feed it bulk material, and it doesn’t do a good job with our kitchen waste either.
So I built something better.

This is, according to Organic Life, the “Ultimate Compost Bin.” Why would you build anything less?
The Ultimate Compost Bin
Building compost bins is one of those things that I’ve wanted to do for a while, and I’ve been trapped in the depressingly common (for me) state of “Analysis Paralysis.” There are so many options, so many things to consider, that what ended up happening was a big, fat nothing. However, I’m aware of this problem with me (do not ask me to go buy toothpaste or I’ll be gone for several hours, considering if I want tooth whitening, cavity fighting, smile brightening, the one pack, the two pack, the 5 gallon value jug…) (I wish 5 gallon jugs of toothpaste existed because it would solve the problem for years). I decided after enough of this that I was just going to find a design online and build it.
And I found “How To Build The Ultimate Compost Bin” floating around. Promising! And, unlike a lot of other articles, it was actual plans and material lists, not just a set of general suggestions or links to YouTube videos. So I set out to build it. The teaser image looks good, if a bit “Did the HOA make you take this down after you took the picture?”

Initial Steps
The first step for anything like this is to get the materials. The plans call for cedar, so I went to a local lumber yard and priced out cedar. And… wow. $500. Redwood and cedar have both gone up dramatically in price recently. So, I decided to do an experiment with pine, boiled linseed oil, and Douglas fir. I’ll see how well this works, and ask me in 5-10 years how they’re holding up. Cedar would probably be better, but for $200 vs $500, I’ll spend a bit of time on protecting wood. Though I did fail to realize just how much time it would take. Oh well!

The instructions do a really nice job of breaking down the lumber needed and how to cut it, so get your circular saw and earplugs out, get your favorite measuring stick (I personally am a huge fan of a 4’ aluminum one I found at Home Depot), your square, and have a blast! Cut to length, stack the wood up, and realize just how many square feet you have to protect…

On Using Boiled Linseed Oil
Boiled linseed oil is a cheap enough way to protect exposed wood. A gallon is $30 or so, and it’s fairly straightforward to apply. Paint it on, let it sit for a while, rub it off with a cloth (or paper towel). It’s moderately high effort to get a good coating, but, hey, I’m not building a grand piano here.
Actually, I’m pretty sure that during the wood protection stage of this, I would have been accused of such, by my grandfather, were he still around. A general contractor by trade, I repeatedly heard his advice in my head during this phase: “For God’s sake, Rusty, you’re not building a grand piano!” Yup. I went by Rusty growing up.
You know the advice that you shouldn’t leave oil soaked rags lying around? Boiled linseed oil is one of the worst offenders there. It cures by oxidizing, and it releases a good bit of heat during the process. This isn’t a problem when there’s a thin layer on a large block of wood, but it has the potential to be very much a problem if you have rags soaked in it, balled up, in the corner. Because I insist I’m not building a piano, I used paper towel, but I still had some very oil-soaked paper towels at the end of each phase of coating the wood. I really would rather not burn down my shipping container, trash trailer (it was on fire before I got it and once is enough), or anything else around the property, so I decided that the best approach to oil-soaked paper towels would be to burn them in a controlled manner when I was done with them.
I could just toss them on the ground and light them on fire - but what’s the fun in that? I’ve got some cinder blocks laying around (I try to keep 10-15 around the property for random utility use), so I built myself a very basic rocket stove to dispose of the oily waste. It’s not perfect, but it did work very well to dispose of waste. One side flowing feed chamber into a vertical combustion chamber, and the other blocks around to direct the combustion flow.

For a quick toss-together item, it works surprisingly well, and, importantly, accomplishes my goal of burning this stuff hot, without much smoke (I hate seeing random smoke in the area, so try to avoid it in deliberate burns). Not bad! Toss the day’s waste in it, let it burn, and there’s no risk of having it spontaneously combust later! I wouldn’t roast marshmallows over this, though - it does tend to stink of volatile organics when fueled with boiled linseed oil soaked paper towels.

My process was pretty straightforward. Paint hunk of wood on a pair of cinderblocks, set against the side of my shipping container, wipe down with a paper towel later. The disposable latex gloves are awesome for doing stuff like this - no concerns with soaking one’s hands in oil soaking through the paper towel. I know paper towel isn’t ideal for something like this, but, hey, compost bin.

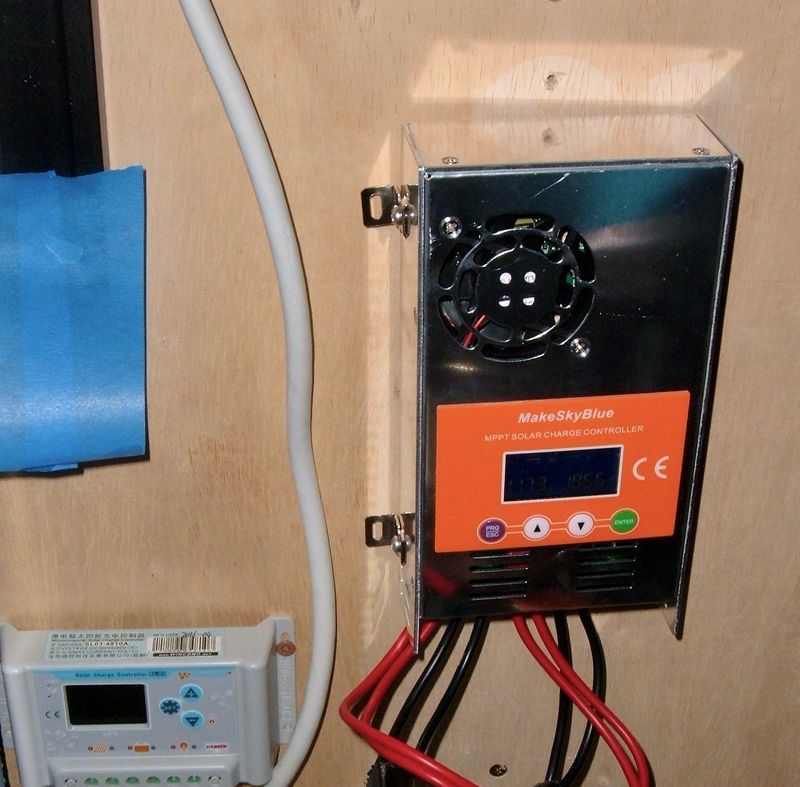
Boiled linseed oil takes a day or so to fully dry - unless you don’t wipe it off, at which point it will stay tacky far longer. Wipe it off, let it sit a few days, repaint the other side. The biggest delay in this project was letting this stuff dry. A shipping container is great for this sort of stuff, but it stinks to high heaven when you open it again. Vent it out somehow - I have a fan I’ve previously discussed that does an amazing job of venting the container out, and also tossing grit inside. It will literally suck grit off the ground and toss it in if I’m not careful.
Why, yes, we do use our shipping container for random storage? Why do you ask?

Building the End Plates
Once you have all the wood treated, it’s time to start building! You’ll need a few boxes of screws - both 2” and 2 1/2” screws. The small buckets of them are not enough - so buy a big container.
Screws are one of those things that are far cheaper to buy in large quantities. I’m a fan of the GRK Fastener brand, and the Lowes version is Power Pro. They’re almost identical, and while you can tell the difference side by side, it’s hard. You could also use regular deck screws.
Whatever you use, get the Torx head stuff. It drives so much better!
This description of the process assumes you’ve read the actual instructions, so you might want to take some time and glance over those first, if you haven’t. I’ll cover the general outline and where I’ve found things that work better if you do them differently, but please be familiar with those - at least, if you want to actually build this.
Some people on the Ars forums were right: Battery powered tools are awesome. As might not be surprising given my DeWalt 20V Max 3.0Ah teardown, the 20V Max 6.0Ah teardown, and the successful frying of an egg with the 6Ah pack, I’ve got some DeWalt 20V Max tools. Specifically, a drill (three speed) and an impact driver. I’m yet to be convinced of the true value of an impact driver beyond “something to drive screws with when I have a drill bit in the drill,” but I got them used for a decent price. They’re brushed, not brushless, but most of the contractors I know use the brushed ones as well, so I’m not that concerned.
For this project, I’m doing a lot of predrilling. Almost all the screws are going in right at the end of one board or another, and drilling a small hole beforehand really helps prevent splitting. A tip: When putting the drill bit in the chuck, figure out how deep to set it by referencing the wood you’ll be drilling. Here, I’m making sure that drilling into a 1x6 and a 2x4, I don’t go through the other side. I can jam the drill into the wood and not go through. Setting things up like this makes it a lot easier to punch holes rapidly.

The end plates start as a big rectangle. Line up the side boards (the long 1x6s) with the edge of the upright 2x4s, and put one screw into each corner. You’ll put more screws in eventually, but, for now, just one is perfect.

With all four corners tacked in place, square things up. It’s a lot easier to do with everything attached than for each individual joint. I put mine up against the inside wall of my shipping container, squared them, and then drilled two more holes and drove two more screws on each corner - so each joint has three screws. You could probably get away with two, but screws are (fairly) cheap.
For any joint involving connecting a 1x to a 2x, you’re going to use the 2” screws. The 2.5” screws come in later for the larger boards screwing into each other.

Am I worried about drilling into the shipping container wall? Not at all! I adjusted the bit depth earlier! Since I’m drilling a lot of holes, having that properly adjusted saved me quite a bit of time. For shallower stuff, I’ll use a wrap of masking tape on the bit at the proper depth, but if it’s close to the bit length, just use the drill to set the length. You might get a bit of a mark around the hole, but it’s barely larger than a screw head, so it doesn’t show.

Once you have the rectangle set up, add another board in the center. I found that a hair over a 9” gap was perfect (between the edge of the top or bottom board and the edge of the center board), but measure the first few and figure it out for your setup. It’s not a piano, but precision is easy at this stage, so you may as well!

With the center board in place, you should have something that looks a lot like this.

Now it’s time to add the end 2x6! The instructions suggest using another 1x board under it to help with the alignment, and I agree - this helps quite a bit. I’d go so far as to say that, for maximum precision, you should put a 1x under each end, so the setup is flat, otherwise you might be off by a tiny bit from the angles. If, say, you were building a grand piano and not a compost bin, you might care about that. And probably wouldn’t be building it on the floor of a shipping container.

I used 5 screws per end board, going into the 2x4. It’s probably overkill. I did run low on screws later in the project, so take that into account when you decide how many screws to use. Buy a bulk box. Really, buy a bulk box.

Next, install the bottom rail. Just like the end rails, line this up and screw it in. One challenge here is that, while the ends are easy to hit 2x material, the center screws require lining up on 1x. And then not splitting it. Or you can skip that - I don’t see a real downside to skipping it, but if you’ve got the experience to spear the 1x, add a few in the center. It’ll help keep things from wobbling later.
Up through this step, the end pieces are symmetrical. You can use them on either side. The next step, where you add the guides for the removable boards, makes them directional. Think it through before you build two identical sides.

Adding the Removable Board Guides
To hold the removable boards, this project uses some 1x2 and creates a channel for the removable boards.
However, this project doesn’t think things through quite right, and ends up with boards that will trivially flop out, if you don’t add a bit more wood. I added it later, but I’ll show you the problem so you can fix it while you’re building things instead of having to hack it in later.
Grab a random 1x board laying around, press it against the end piece, and set the 1x2 against it. However, you don’t want to put the guide tightly against the 1x board, because wood swells when wet. And a compost bin tends to be a wet place! So, leave a bit of extra room. How much should you leave? “Enough.” It’s up to you and your environment, but 1/8” or a bit more is probably fine. You just need to make sure the boards don’t bind up if things get wet and swell.

Since this guide lines up more or less exactly with the existing screw holes, I marked the “free” spots where I could drill and screw without hitting another screw. Do that relative to the screws holding the side slats in, and you can safely line things up, drill, and screw the guide in without hitting other screws. It beats boring out a hole with a screw pressed into the head of another screw, which is absolutely something you can do if you hit another screw.

Now, here’s the problem. See the 1x6 side slat on the left? The bottom removable board goes up against that. No problems at all. See that huge gap above it? The next board will line up with that gap.
That gap is enough that, if the board slides over into it, the other end will flop free and come out. This is not at all idea, and this is a glaring omission in the original plans! It’s my only real design complaint about this unit.

I fixed it during late stage assembly by cutting some scrap down and wedging it in the gap, then screwing it in. But this is a problem on every single piece, so you should solve at this point in the assembly, not later on. Cut some scrap 1x6 down and fit it in the gap so that all the boards will ride properly and not fall out if they get rattled around.
A single slice will work for the gap, but you’re better off ripping the board (if you have the tools) and filling the full gap. While the stock design only has 4 removable boards per bin, I’d suggest filling the top gap as well so you can add more boards - at least, if you’re planning to fill things full to get maximum hot composting benefit.

But, once you have the guide board in (and, ideally, the extra material to fill in behind where there are no side slats), you’ve finished an end piece!

Then build another. Make sure that the guide for the removable plates is on the opposite end, or you’ll be reworking this later in assembly while you’re scratching your head! It’s only the last step, adding the guide rail, where the two sides differ from each other.

Building the Center Pieces
The two center pieces start out just like the end pieces - three side boards screwed into the upright 2x4s. But then, you turn it over and do it again! Radical. Magical. World changing.

It’s not likely that you’ll clash screws between the sides, but just in case, offset the screws a tiny bit to one side or the other (if you offset them right on both sides, you’ll clear the other side). Point to point, though, you have to hit dead on for it to be a problem. Otherwise they’ll just lock against each other, which is perfectly fine.

The end 2x6s screw on, but instead of lining them up on the edge, you center them. Or, as I did, “almost center them.” Not my best alignment. Fortunately, this is a compost bin.
Even though I probably don’t need to drill pilot holes for this sort of setup, I still did. Habit and all. But, really, screwing from the center of a 2x6 into the side of a 2x4, you probably don’t need pilot holes.

How good are you at bullseyeing womprats in a shuttlecraft? That’s what you’ve got here, with two 1x6 boards on either side that you might want to screw into while putting the bottoms on. It’s difficult, but doable, if you line up properly.
My approach is to just use my fingers, feel under the bottom board for the side slat, and make some pencil marks that way. It really is a 3/4” wide target to hit (admittedly blind) from 1.5” away, so it’s not that difficult.
Install the bottom board like you did the bottom board on the side pieces, screwing it in and attaching it to the side slats if you feel like it.

By now, you’re good at figuring out these removable panel guides, so do one on each side. Again, you probably want to put those filler pieces in at this point, not later on. You could just screw them in with the guide rail, if you wanted. Since the guides go on both sides, it doesn’t matter which end you pick. Just make sure the two guides are on the same end.

And, two middle pieces, done and ready to install!

Running Out of Screws
I’d (unwisely) picked up small boxes of screws for this project. You need more than this to finish the project. I started with 125x 2” screws, and 80 2.5” screws. I ran out of both, and had to fall back to some 3” deck screws to finish.

Pro tip: If you’re working on a few acres, and are buying screws in less quantity than this, you’re paying too much for screws. I’ve got a storage shed now, which means I can bulk purchase screws, and I’m seriously considering buying some of the common sizes in multiple 5lb containers so I have them on hand. It’s not that expensive to get a lot of common size screws, and the cost per screw is far lower.

Final Assembly
For final assembly, go out to where you plan to install this monster. You’ll want a flat(ish) spot, ideally cleared of assorted organic material, but take what you can get. It’s not like a bunch of grass under a compost pile will survive.
When you’re putting the whole thing together, only use one screw per board/side piece. You will have to adjust it - and that’s a ton easier with one screw per intersection than more. Add more later, not at the beginning. Trust me. Especially if your ground is a bit uneven (which, of course, mine is), you’ll be tweaking. Plan for it.
The first step is to put the end pieces together, with your long back boards between them. One at the top, one in the middle (lined up with the middle board), one at the bottom. I chose to set the rear board at the bottom of the upright, not aligned with the actual bottom foot of the side pieces. This is partly because my ground isn’t terribly even, and partly because I expect the “feet” will take the most abuse from moisture, and there’s a good chance that I’ll be replacing them before the rest of the structure. Since I’m not using cedar for everything, I don’t know how long everything will last, but I’ll see. If only one or two parts are rotted out, I’ll just replace those instead of rebuilding the whole thing. Unless I decide this is a piece of junk and want to build something different.

With the end pieces in place, shove the middle pieces in, and secure them. I’m going to say that a single screw, in the center board, is probably enough for now. Again, I’ve got rough terrain, but I had to adjust an awful lot after setting this down, and I put a lot of screws in that I had to remove. At most, one screw per rear crossmember. They won’t be aligned properly.

Flip the whole thing down (carefully!), and start figuring out how you want it to set on the ground. You’ll likely need to do some digging unless you’re putting the whole thing on a pre-leveled surface, which I lack.

Before you get too excited, get your 12 removable panels and put them in. The spacing of the rear doesn’t matter that much. The spacing of the front absolutely does. Put the panels in, and pay attention to where they wedge. You may need to make some adjustments to the rear of the panels to make them vertical, and to tweak the angles so the front boards don’t bind up. This is another reason to set the guide rail tolerances on the sloppy side - it will deal with minor angle alignment issues better.
If you, say, put three screws per connection in the rear, you’ll be removing a lot. Just one screw per joint on the back until you have this worked out and everything lined up reasonably!

How bad is it if you don’t put the extra spacers in for the front boards? Pretty bad. This is the problem - the second board up, if all the way to one side, is nowhere close to being held by the guide rail on the other side. It just doesn’t come close. This is not mentioned in the original instructions at all, and it’s something that I think is worth fixing. There’s enough scrap from the various 1x6 cuts to solve it, and it prevents a lot of frustration down the road as boards don’t stay put.

A single block per side is sufficient, but you can do more if you want. It only impacts the second board, if you’re sticking with the stock 4 removable boards.
I would strongly suggest screwing these in, and then doing the same thing for the upper gap. I don’t think 4 front boards is quite enough if you’re going for a hot compost bin, and I’ll be building myself some more of them. It’s a lot easier to put the board in now than to put it in later, after you’ve got the chicken wire in.

Front Stakes
Compost is a rough process. There’s a lot of flipping, tossing, digging, piles of material, and otherwise messing with things that would tend to move the various pieces around if not secured.
This plan, wisely, includes a solution for this - fence stakes! I’m mildly annoyed that I recycled some old ones that I pulled out of the ground shortly after moving, or I’d have reused them. But, in any case, fence posts are cheap. Line them up in front of your pit, figuring out where they need to be. I’d suggest centering them on each 2x6, since that gives you the most adjustment when they inevitably go in slightly sideways.

Pull the whole assembly back a foot or so, and then get to work with your sledgehammer, engineer’s hammer, or fence post driving gizmo (if you happen to have one). A dedicated fence post driver is, by far, the best approach here, but a sledgehammer works well enough. I used a fiberglass handle 8lb sledge, because that’s what I have laying around, and I felt a smaller engineer’s hammer (which I use for splitting rock) wouldn’t be any easier.
You may find value in putting a scrap hunk of 2x4 on top of the post to drive it in, if you’re not particularly good at driving squarely. The top of the posts will bend easily if you miss too often, and the posts like to vibrate wildly back and forth after each hit. But drive them in using your preferred method.

Once you’ve gotten the posts driven, pull the compost bin back forward and screw the posts into the uprights! You’ll want to use 2” screws here to avoid poking through the 2x6.
Before you screw this in, make sure everything is vertical and lined up.

It’s wise to put the front boards in while you’re doing this - this will help ensure that things line up right. Adjust the rear of the unit if needed to make everything line up. You can see I’ve had to adjust the left side slightly to get everything to work smoothly, and I had to remove a lot of screws to do that.
Once you’ve screwed in the front and adjusted the rear, now you can add more screws to the back joints and secure them in place.

It’s All Over but the Kachunking!
I was really looking forward to this step. It’s quite simple, per the plan:
Staple wire netting to the insides of each bin.
Hah. I’d not worked with chicken wire at this scale before, and the agony of dealing with chicken wire far, far exceeds the joy of working with a staple gun.

My advice? Staple the top of a length of chicken wire first, going around the top of each bin. Then, cut the other end. Once you have the top done, go around the rest of it and stable the center, then the bottom. It’s going to suck, it’s going to jab you repeatedly (this is a good time to be wearing a long sleeve shirt, gloves, long pants, boots, etc), but that’s the least-awful way I’ve found to do it. Use a lot of staples.

It’s just a massive snarl while you’re working on it. If you have any advice for working with chicken wire, I’d love to hear it in the comments!

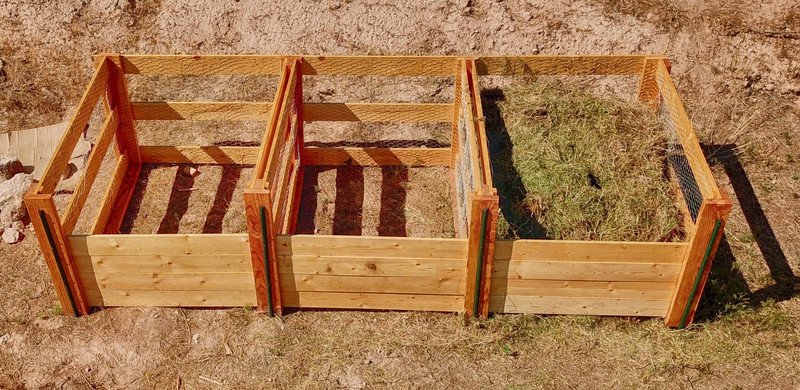
But, in any case, once you finish, you’ll have something that’s well isolated and ready for compost!

Almost. Add the front slats. Fill one of the bins with material, and you get something looking like this!

Thoughts on the Design & Intended Uses
Overall, this seems like a pretty good design for a compost bin. You definitely need the extra blocks to keep the front slats from sliding out, but otherwise, it’s fairly easy to build, quite massive, and should do the job. Total cost was around $250, plus or minus a bit.
What job? My goal for this bin is doing “hot composting.” My feedstock is almost entirely seed-heavy (cheatgrass, tumbleweed, and greens from the lawn/around the house, often with seeds), so I need the high temperatures in order to kill the seeds. If I can’t get high temperatures from the compost bin, I need to come up with something else to process feedstock into something useful and without seeds. I’d rather not spread seeds with my compost, but if it doesn’t get hot enough, that’s exactly what will happen.
My main concern with it, right now, is that it has too much vented surface area for my environment. I live in a very dry climate that tends windy, and the bin is drying out in a hurry. I may end up shoving some stuff in to block the airflow a bit and help keep things more moist. I have a few ideas, but I’ll see what I end up needing. Expect future updates. Hopefully, even updates that include having made compost instead of just a pile of torn up cheatgrass and lawn grass sitting in a bin!

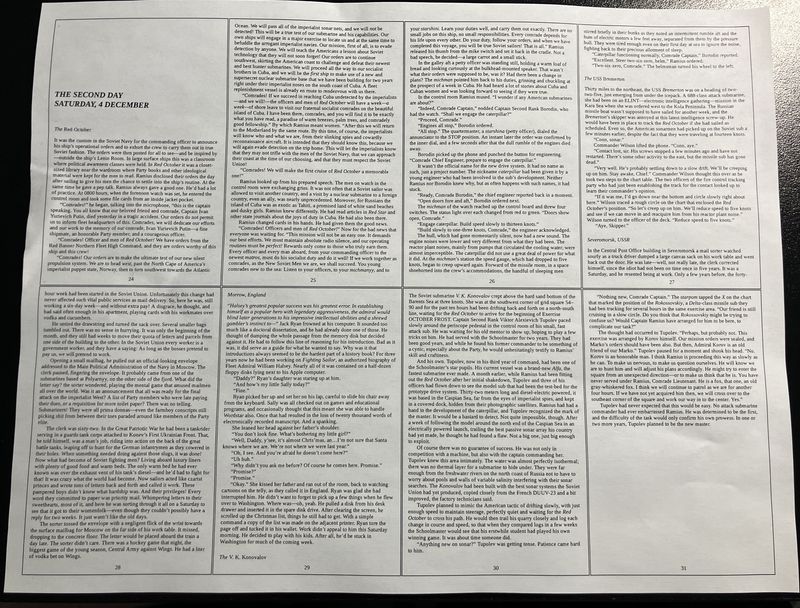
The Best Aviation Story I’ve Read This Year
Finally, because I spent a good hunk of this evening reading this instead of writing, I want to share an awesome aviation story. I’m a pilot, and I have a thing for good aviation storytelling. I’m sure this is true of other areas as well (I’d expect sailors enjoy a good sea story), but, hey, my blog, and I like aviation stories.
What happens if, say, it’s late 1941, and you’re the captain of a Pan Am Clipper, headed to Australia? And, say, the Japanese show up and bomb Pearl Harbor and make the Pacific a war zone?
You might get a communication that says something like this:
Normal return route cancelled. Proceed as follows:
Strip all company markings, registration numbers, and identifiable insignia from exterior surfaces. Proceed westbound soonest your discretion to avoid hostilities and deliver NC18602 to Marine Terminal LaGuardia Field New York.
Good Luck
Other than not having maps going west from Australia to New York, not knowing where you can get fuel, only having the spare parts you carry with you, and flying through war zones… a pretty typical month flying, right?
John Bull has done an awesome job of telling this story - in three parts. And you should read them.
Part 1: This Plane Accidentally Flew Around the World
Part 2: The Long Way Round: Ice Cold in Auckland
Part 3: The Long Way Round: Getting Home
They gave me goosebumps. For aviation reading, that’s rare. Bull isn’t quite Gann - yet. But he has massive promise, and I’m excited to see what he writes next! John, if you need a proofreader, the contact form is on the right.
Also, on a personal note, publishing may be a bit erratic the next few weeks. My wife is due with #2 any day now, and this is lower priority than a lot of other things related to a new kid. So, if I miss a week or two… you’ll know why!
Comments
Comments are handled on my Discourse forum - you'll need to create an account there to post comments.If you've found this post useful, insightful, or informative, why not support me on Ko-fi? And if you'd like to be notified of new posts (I post every two weeks), you can follow my blog via email! Of course, if you like RSS, I support that too.

