
Early delivery days rock! I wasn’t supposed to have this delivered until Monday, but it showed up this morning, and I’m very, very excited.
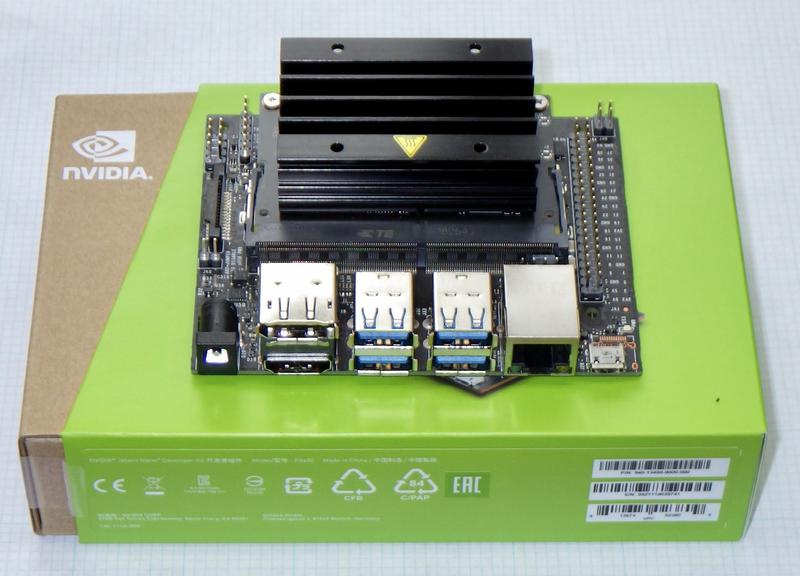
If you keep up with little ARM boards, as some people do, you may also be properly excited about the nVidia Jetson Nano. I’ve been excited about it for a few weeks now - and I’ve got one right here on my desk. As you might expect, I’m about to run it through it’s paces and see what makes it tick (after tearing it apart for science).

Since the system is a big GPU with some ARM cores bolted on, most of the early reviews so far have focused on the GPU - and the sort of AI, Machine Learning style stuff the board seems to be designed for. I haven’t seen a good review with more standard benchmark results (and especially storage and browser benchmarks) - so I did them myself!
I know I promised some solar related posts, and they’re coming - but this little gizmo is way more interesting, and is one of the few times you’ll see me reviewing a brand new bit of hardware that just came out.
Interested in what a modern little quad core ARM dev board can do? Keep reading!
The nVidia Jetson Nano: Quad Core, 4GB RAM, and a GPU!
For $99, the Jetson Nano dev board gets you the following:
- 128-core Maxwell GPU (for display and compute)
- Quad-core ARM A57 @ 1.43 GHz (main CPU)
- 4 GB LPDDR4 (rated at 25.6 GB/s)
- Gigabit Ethernet
- 4x USB 3.0, USB 2.0 Micro-B (the MicroUSB port doubles as a serial port for debugging)
- HDMI 2.0 & eDP 1.4 (supporting 4k monitors)
You can power the unit either from the MicroUSB port on the right, or from the big barrel plug on the left. If you have a lot of USB peripherals hanging off it, the barrel plug is a good idea, because MicroUSB (µUSB?) struggles badly past about 7W (as I’ve documented when poking with the Raspberry Pi 3B+).

The Nano does not come with wireless (though it has some suspicious looking pads) - and it doesn’t have any onboard storage. You stick your MicroSD card in, and boot from there, just like a Pi.
Unlike the Pis, it comes with a great big heatsink that has no trouble keeping the unit cool. Michael Larabel over at Phoronix has done some testing on thermals, and even without a fan, it’s just fine.
Another interesting quirk of this board is that it has two power management settings: 5W, and 10W. If you’ve got the GPU cores lit up, this certainly will make a difference. But will it make a difference for something closer to desktop use? It absolutely does, and I’ll be testing it under both modes.
The developer kit costs $99, and you can find it directly from nVidia, on eBay, or at various other sites. As of the time of this posting, they appear to be out of stock most places.
Unboxing the Nano
I miss the old days of unboxing posts. Everything these days is a video, and if I had a lawn, I’d be waving my cane at the kids on it (actually, probably a walking stick, and the kids are mine, so… they’re quite welcome to be there). But there’s something fun about seeing how manufacturers package things. Apple’s packaging has been amazing over the years (back in the Titanium days, the packaging was as much art as the laptop). nVidia’s is a bit more sparse, but, hey, $99 board, not a $3000 laptop.
The box is plain, cardboard, and easily recycled - which I like.

The back has the product specs, in case you were walking down the aisle at your local big box store and picked one up to see what it was. I don’t have any idea who would be ordering one without knowing more or less what’s in it, but… you’re covered!
They advertise on the box that it’s got 4K capable video output - which does set it apart from the Pi. There’s a UART header for debugging, the gigabit ports, and a nice 40 pin expansion header.
The pinout on the header is substantially similar to the Raspberry Pi - the ground pins, 3.3V pins, and 5V pins are all identical, and quite a few of the data pins line up closely. It’s clearly designed to be compatible, though they don’t advertise this at all. I’ll do a bit more comparison on that point next week.

The box slides open after you cut the tape, and there’s a very nice black bag in a cardboard square inside!

With whatever’s in the bag out of the way, you find a quick start guide - download the nVidia website onto a microSD card and plug it in. Attach your keyboard/monitor/mouse, and… something about a surprised face with a flat top haircut, a lightening storm, and a USB port. Power!

There’s also a neat little stand you can fold together. Since the bottom of the dev board has exposed parts, it’s a good idea to keep things insulated.

Finally, in the black bag, the Nano! The most obvious part is the heatsink - it’s got a seriously massive heatsink for a 10W board, but it’s designed (presumably) for industrial use, and high temperature environments. What it means for me, practically, is that I’ll never have thermal issues with the board.
On the left, there’s a camera port that’s compatible with Raspberry Pi cameras, on the right is the 40 pin GPIO that’s also compatible with Raspberry Pi hats (for a good first order approximation). I’m really glad to see nVidia bucking the trend of USB only for power with their big barrel plug on the left. And, of course, the rest of the IO.
Take a look at the footprint for the MicroUSB port - there’s space for something else. Something larger…

The underside answers that question and quite a few others. If you look in the lower left, you’ll see that the USB section is pinned for both uUSB (yay! I promise I proposed µUSB before seeing it on the bottom) and USB-C! Excellent. USB-C doesn’t suck, unlike uUSB. The pins are well labeled for the various IO ports, and the board has the usual set of symbols telling you that it’s probably safe to lick.
On the top, there’s a spot for a battery. That would be useful for a realtime clock that keeps system time when powered down, and I assume it’s wired through, but I haven’t messed with it.
This board is a good example of a dev board, or a breakout board. The little card on top contains all the smarts, and this board is a bunch of IO interfaces run to the pins on the card. It’s just about everything you could want for development, and a production system would have a custom designed carrier.
You may be reminded (rightly so) of the Raspberry Pi Compute Module.
I’m going to wager that the diodes on the USB 3 ports were added quite late in production to fix some problem or other. They’re running between a physical mounting pin and a signal pin, and look hand soldered to me. If you happen to know the story there, the comment section is below…

Speaking of Raspberry Pis, the whole board is actually smaller than I had realized. That’s a Pi 3 next to it.

Tearing it Down Further
If I hadn’t gone any further in, you would have every right to be disappointed in me. This blog doesn’t stop because there are a few screws in the way!
A pair of small Phillips screws comes out and the actual module comes out feeling very much like a stick of RAM from a laptop.
Under the module, there’s a M.2 slot for wireless cards. Sadly, this doesn’t appear to support SSDs - it’s keyed wrong for them.

A close inspection of the socket reveals why. They’re just using the SODIMM form factor for the board. This is definitely not a stick of RAM!

The card, alone, is much smaller than the whole dev board. The heatsink dominates even more when compared with the card - it’s very likely entirely overkill, but it means that developers won’t hit throttling temperatures unexpectedly. The Raspberry Pi really fails hard here - it’s sold without a heatsink, the stock cases for it don’t have heatsinks, and the 3 and 3B+ both throttle catastrophically if you don’t add a heatsink. They’re fine when idle, and choke back badly when you ask them to run hard.

Flipping it over, a set of T6 Torx bolts holds the heatsink on. You can see the SD card slot, and what is perhaps the eMMC storage footprint next to it. The “real” version of the card includes 16GB of eMMC flash instead of the SD card, and I’d bet on the boards being the same, with the hardware populated being the difference.

Pulling the heatsink off, I’m happy to see they used thermal compound - and a reasonable amount of it. No giant globs squirting all over like some laptop manufacturers have struggled with over the years. Above the main SOC, a pair of DRAM chips provide memory. The lower right is power supply hardware (some surface mount inductors and capacitors), and… there’s that unpopulated area in the upper right.
I’ve seen that sort of “big solder dash outline” before - and it’s for a metal shield that goes over RF hardware. Good money says that’s a spot on the board for either a wireless chipset or a cellular chipset. I don’t know which, but I’d guess WiFi. So, just because it doesn’t have some form of wireless now doesn’t mean it’s not an option!

Cleaning off the thermal compound (don’t worry, I replaced it with Arctic Silver 5), we’ve got an nVidia TM660M-A2. The 660M is a perfectly valid laptop GPU, but it’s Kepler, not Maxwell, so… I’m not sure why they’ve got a 660M part number buried in here.

Finally, we’ve got the heatsink. The carved out area clears the power supply, and it just bolts down. I’ve said it before, but I’ll say it again - this is an insanely big heatsink for the power used.
You can see the remains of the machining markings in the left cavity. There’s no reason to make it particularly smooth there, so they haven’t. If this were a desktop CPU heatsink, I’d grumble a bit about the ridges left on the thermal contact area, but it just doesn’t seem to matter here.

Initial Setup
Follow nVidia’s directions. If you’ve set up a Raspberry Pi, the process is very similar. Download the image (it’s a 6GB download that expands to a 13GB image currently), flash it onto the SD card, boot. It’s pretty straightforward, and the directions are solid. This process takes a while, depending on your internet connection speed and the speed of your SD card interface.
The dev guide says the Nano doesn’t work with a USB to DVI adapter, though at least one of my DVI monitors (with a HDMI KVM switch) doesn’t seem to care. Consider it a warning, but… it hasn’t bothered me yet. I’ll report back next week if I run into this as a problem with other monitors.
My trackball didn’t get recognized during setup, but behaved fine once the OS was booted - and a mouse I plugged in worked fine. USB is weird sometimes.
You’ll go through a pretty standard Ubuntu install sequence - keyboard, timezone, etc. Unlike Raspbian, which shoves a default username and password into the OS (pi:raspberry), this asks you to create your own. This is a really, really good idea, and the stock Raspbian password is probably responsible for quite a few security issues on quite a few networks around the world. I’d love to see them change that in a new release, but it would probably break someone’s workflow.

Finish this, and you find yourself at a desktop with a “nVidia Green Neuron” wallpaper, and a mostly bog standard Ubuntu 18.04 install! There’s a custom kernel, some custom software for managing the system, and the CUDA libraries all pre-installed, but underneath, you’ve got Ubuntu 18.04 LTS, on ARM. Pretty slick!

It goes about installing updates automatically, so just let it run (if it has a network connection) until top calms down with the various things installing updates. You might consider upgrading everything after that’s done (I’m honestly not sure what unattended-upgrades touches, but clearly not everything).
sudo apt update
sudo apt -y dist-upgrade
sudo apt -y autoremove
My initial impression of the desktop is that it’s Teh Snappy. It’s quick. Even with the SD card getting hammered with IO from the updates, the system is quick to respond. Showing promise, so far!
Limitations of the Raspberry Pi 3: RAM and IO
Throughout this review, I’m going to be comparing it to the Raspberry Pi 3B+ (with a good heatsink on it). For a variety of reasons, I’ve been pulling the string of “Cheap ARM desktops” lately, and the 3B+ is my current benchmark system. I’ve made one into a pretty good desktop, but it’s still fundamentally very limited. It only has 1GB of RAM, and that USB 2 bus gives you roughly 30MB/s of IO - split it between USB disk and network however you want, but the whole system is quite choked. On the other hand, my build totally solves the thermal issues, so all the benchmarks are against the Pi running at 1.4Ghz. It’s about the best case for Pi performance out there. If you don’t have good thermal management, your Pi3 (even the 3B+) will be a good bit slower than mine.

The Jetson Nano? It has 4GB of RAM, and USB 3.
I openly admit I’m a FireWire guy. It started out far better than USB for just about everything, stayed ahead for quite a while, and then USB 3 came out. USB 3 is very, very good. Good enough that I don’t even care it’s not FireWire, because it’s properly fast, and it pretty much just works. Plus, the backwards compatibility is just better than on FireWire. I don’t need any goofy adapters for nearly any device to work with nearly any port.
But is the Nano actually any good? Into the benchmarks!
SD Card Benchmarks
One of the main limits with the Raspberry Pi is that the SD card interface is glacially slow at times. It uses an old 3.3V interface to the card (which isn’t compatible with UHS transfer protocols), and the whole setup simply won’t exceed 20MB/s in practical use. Yes, you can overclock it some, but it doesn’t help that much, and I’m pretty hesitant to push the limits on something storing my data. The ext4 filesystem is good, but I still don’t want to abuse it quite that much.
I couldn’t find the details on the SD card interface for the Nano, so I got myself a fairly nice SD card for the OS and went about benchmarking to see if it’s faster than the Pi.

I’m comparing the Nano to the Pi 3B+ with a reasonably generic SD card in it, but, remember, the SD card can’t exceed about 20-25MB/s on the Pi’s interface.
I’m using iozone for my benchmarks here, because it’s a good cross platform tool that gives pretty solid results. I’m testing with 4k block sizes (because this is a reasonably common OS behavior) and 1M block sizes (this gets total throughput). I used a command line like this:
iozone -e -I -a -s 100M -r 4k -r 1M -i 0 -i 1 -i 2
Which returns results like this:

First, it’s clear that the Jetson Nano is using one of the UHS modes for the MicroSD card - nearly 70MB/s in read speed vs the 22MB/s on the Pi. This performance stands up on the large random reads, but the SD card is the limiting factor for random 4k reads. They’re just not built for that kind of use.
Look, I know everything boots operating systems from SD cards these days, but can we just admit that SD cards suck for OS use? They’re awful, and a “good SD card” is still insanely slow. I’m sure there’s no technical reason you couldn’t build a MicroSD card that was good for OSes, but it would be quite expensive, and the interface still isn’t great for that sort of use.
USB3 SSD Benchmarks
Here’s the thing, though: you don’t need to run an OS on the SD card! You could, for instance, run it on a USB SSD - and have radically faster disk IO. Yes, SSDs and SD cards both store data, but that’s about where the similarities end. The SD card is designed for storing streaming media data - pictures, video, etc. One stream, large blocks, very little random access. The SSD is built to take the absolute horror show of disk IO that a modern OS feeds it and make it really, really fast. Multiple threads of random IO, mixed reads and writes, the works. That’s why a 256GB SSD costs an awful lot more than a 256GB SD card - the controller and the performance of the flash.
USB thumb drives are far closer to an SD card than to an SSD, for the common variety. They’re still designed for one thread of access, large block sizes, and bulk file storage, not OS use.
Even on the Raspberry Pi 3, going to a USB SSD helps a ton over the SD card. But that only has USB 2 ports (and they’re shared with the network interface).
With a proper USB 3 interface, the Nano should be able to flog an SSD, and just thrash the Pi in disk IO. Can it?
Well… sort of? The big block reads are way, way faster (around 300MB/s), as one might expect on USB3 - but the 4k IO just sort of sits right about the same as the Raspberry Pi - even though the Pi is only using USB2.

USB3 Analysis
My first thought (on seeing the 4k rates) was to guess that the Nano was somehow using USB2. I also wanted to see if the board was using the UAS (USB Attached SCSI) driver, because that’s a good bit nicer than the block device driver, in theory. It lets you trim the device (discard unused blocks properly), and generally is the right mode to be using a USB SSD in. The Raspberry Pi doesn’t support UAS (scatter-gather support is missing, go bug the developers), but the Nano does. Running lsusb, it’s clear that the SSD is both using UAS and is on the USB3 bus (5G vs 480M transfer rates).

I know this SSD should be faster, by a good margin - so I took it up to the house, plugged it into my Linux desktop up there (a modern Intel Coffee Lake system), and ran the same set of tests.
Yup. The SSD is a lot faster than the Nano can drive it. In random write, especially, the Nano just can’t drive the SSD like the desktop can. I don’t know enough about USB3 controllers and drivers to have a properly informed opinion here, but it turns out that USB3 isn’t USB3, when it comes to disk performance. The Intel desktop just thrashes the Nano here.

So, for disk IO, the Nano is a good bit better than the Pi with the USB SSD - at least if you’re doing large reads and writes. The 4k IO is about the same, at least out of the box - it’s just not any faster, even though the disk can handle it. I expect this to help with OS performance some, but it’s not as big a jump as I was hoping for.
Jetson Nano Power Limits: 5W vs 10W
For the following benchmarks, I’m going to be running them in two modes: 5W and 10W (or MAXN). The Nano supports limiting power on the card to 5W, which reduces performance rather significantly.
The nVidia docs cover details if you’re a developer, but the summary chart covers most of it. The CPU cores run slower in 5W mode, only half of them are online, and the GPU is pretty heavily underclocked.

To set (or check) the power state, you’ll use the nvpmodel binary in /usr/sbin. The -m argument sets power (0 is high power, 1 is lower power), and -q returns the state. The change is instant, and if you have top running, you can watch the CPUs disappear and reappear as they’re hotplugged. It’s quite seamless.
sudo /usr/sbin/nvpmodel -m 0
sudo /usr/sbin/nvpmodel -q

NV Power Mode: MAXN

0
Memory Bandwidth
Memory bandwidth is an interesting area to play with on boards. I don’t expect desktop grade performance here, but it should be a good bit faster than the Pi - is it?
These results are from mbw - a “dumb” memory copy benchmark tool that isn’t hand-optimized for the architecture, but just tries to copy memory around like a typical program will. How do they compare? The Nano is very definitely a good bit faster (up to 6GB/s), but there’s a somewhat significant drop in memory bandwidth (in userland programs) when dropping to the 5W mode - even though the memory frequency doesn’t change. I’d expect it to be related to the CPU performance drop, but it’s a 35% drop in the MCBLOCK method (from 6.3 GB/s to 4.1 GB/s). Still, far faster than the Pi!

I haven’t put the numbers in the charts here, but my house desktop (an i7-8700K) manages 13253 MB/s for the MCBLOCK copy method - so the Nano is half as fast as my very much modern desktop in shuffling memory around from a single thread.
7Zip Benchmark
Another handy, cross platform multithreaded benchmark is 7Zip - it includes a benchmark mode that gets you compression and decompression stats (and estimated MIPS - Millions of Instructions Per Second executed). Results are somewhat confusing, because the Nano comes up with similar estimated MIPS values for compression and decompression, while the Pi3 comes up with radically different results. I’m just using the results from the “size 24” (16MB) dictionary size, as it’s a peak on both systems.
The Raspberry Pi 3B+ is clearly a decompression monster, based on these results. It’s actually faster during decompression than the Nano (61.3 vs 59.6 MB/s), but is about half as fast during compression, as more or less expected. I’ve got no idea why, but the results are repeatable. The 5W mode on the Nano really shows the hit here. Not only are the cores running slower, only two are online, and it’s significantly slower than the Pi in both cases.

Browser Benchmarking
Another interesting way to compare the systems is with browser benchmarks. I do tend to use my “light desktops” for a lot of browsing, and the Raspberry Pi definitely struggles with any complex pages in the browser. Is the Nano any better?
I’ve run a set of three browser benchmarks - SunSpider, Octane, and MotionMark. Yes, some are old, but I got tired of waiting for the current ones to run on the Raspberry Pi, and it crashed the tab trying to complete the JetStream benchmark. These are normalized to the Pi 3B+ performance - and, remember, it’s with my good heatsink. It’s a best case for the Pi here.
All of these are with a recent Chromium - so similar browsers on both devices.
SunSpider and Octane both test Javascript performance. They’re compute heavy benchmarks, and they’re not heavily multithreaded. The Pi 3 takes a hair under 2000 ms for the benchmarks, with the Nano coming in around 970ms. My desktop, for comparison, comes in around 171ms - so around 5.5x faster than the Nano.
MotionMark, as the name implies, tests motion in the browser - and the Nano’s powerful GPU stands out here. But, overall, the Nano is about twice as fast as the Pi for browser benchmarks when executing in the fully powered mode, and a tiny bit faster when choked back to 5W. Experimentally, 1080p YouTube videos run just fine. I’d tell you something about how I streamed a native 4k video to a 4k monitor… but I simply don’t have the internet connection to stream 4k content. Sorry!

Final Thoughts, Week 1: The Jetson Nano
I’ve been watching the reviews for this unit since I heard about it (since some people had early access to units from a developer conference). Most of them, understandably, focus purely on the GPU compute and machine learning/AI side of the performance. They weren’t digging into general performance for light desktop use - so I did.
In general, it’s about twice as fast as a Raspberry Pi 3B+ running at peak performance - at least on the CPU side. The memory performance is 2-3x better, and, of course, it has 4x more RAM. Disk IO on the SD card is better for bulk transfers, and the USB3 interface allows for better transfer to a SSD - again, for bulk transfer. Not for 4k IO, for some reason.
With the exception of the poor USB performance for random IO, this is about what I expected from what I read. It’s nice to verify it, and I’m happy to see the performance matching expectations. I’ve got a good baseline feel for performance, and it’s good enough to continue playing with.
But I’m not done. The whole point of this project is to evaluate the Jetson Nano as a light desktop replacement - or, ideally, as a medium desktop replacement. Everything so far looks good, but it doesn’t have the zswap kernel module I want (and, since zswap has undergone some significant changes from the supported 4.9 kernel to the current 4.20 kernel, it doesn’t even have the right source for what I want).
Next week, if all goes well, I’ll be talking about how to turn the Jetson Nano into a proper desktop. We’ll cover how to build new kernels, probably some kernel patching, and moving the OS over to the SSD to give that sweet, sweet USB3 disk performance.
Plus, probably more. I honestly don’t know where I’ll end up, because I haven’t gotten there yet.
And, yes, there will be a post next week. My other Saturday activity is shifting schedules, and I’m going to just shift my blog posts to match. I’ve got two weeks of posting, then resume every other week. This seems like a good project for the transition!
Comments
Comments are handled on my Discourse forum - you'll need to create an account there to post comments.If you've found this post useful, insightful, or informative, why not support me on Ko-fi? And if you'd like to be notified of new posts (I post every two weeks), you can follow my blog via email! Of course, if you like RSS, I support that too.


