
Last week, I unboxed the Jetson Nano, set it up, and did some basic benchmarking on it. This week continues the Jetson Nano analysis. I’m making it into a desktop, I’m measuring power use, and I’m poking at various other places I find interesting or useful.
The result? After some tweaking and playing around (and the normal-for-me kernel build), it’s a very solid little desktop that can handle an awful lot!

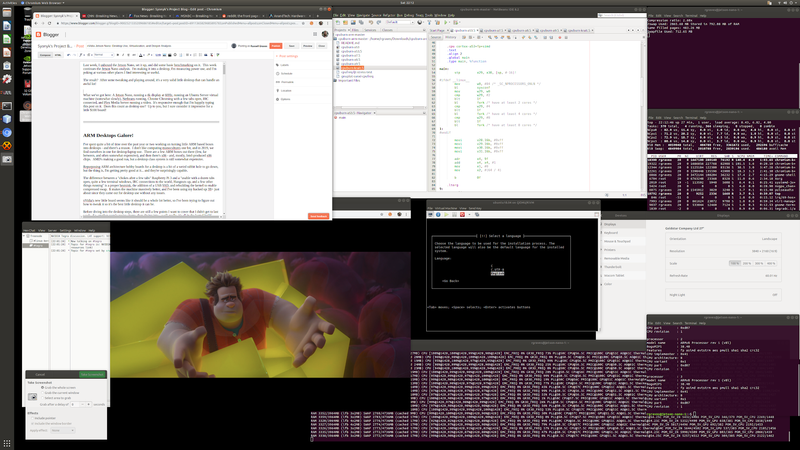
What we’ve got here: A Jetson Nano, running a 4k display at 60Hz, running an Ubuntu Server virtual machine (somewhat slowly - still working on virtualization), Netbeans running, Chrome Chroming with a few fairly heavy tabs open, IRC connected, and Plex Media Server running a video. Plus the usual terminals. It’s responsive enough that I’m happily typing this post on it. Does this count as desktop use? Up to you, but I sure consider it impressive for a little $100 board!
If you haven’t read last week’s post, go do so. I’m building on it this week.
ARM Desktops Galore!
I’ve spent quite a bit of time over the past year or two working on turning little ARM based boxes into desktops - and there’s a reason. I don’t like computing monocultures one bit, and in 2019, we find ourselves in one for desktop/laptop use. There are a few ARM desktops out there (few, far between, and often somewhat expensive), and then there’s x86 - and, mostly, Intel-produced x86 chips. AMD’s making a good run, but a desktop class system is still somewhat expensive.
Repurposing ARM architecture hobby boards for a desktop is a bit of a weird rabbit hole to go down, but the thing is, I’m getting pretty good at it - and they’re surprisingly capable.
The difference between a “chokes after a few tabs” Raspberry Pi 3 and a “usable with a dozen tabs open, quite a few terminal windows, IRC connections to the world, Hangouts up, and a few other things running” is a proper heatsink, the addition of a USB SSD, and rebuilding the kernel to enable compressed swap. It makes the machine massively better, and I’ve been using my hacked up 3B+ since they came out for desktop use without any issues.
nVidia’s new little board seems like it should be a whole lot better, so I’ve been trying to figure out how to tweak it so it’s the best little desktop I can make it.
Before diving into the desktop steps, there are still a few points I want to cover that I didn’t get to last week. So, another couple review items, then diving into… well, really, it’s all in the kernel build.
Network: Yes, it’s True Gigabit
Last week, I didn’t cover the network interface because I ran out of time. The Nano has a gigabit interface - but so is the Raspberry Pi 3B+. The 3B+ can’t push more than about 280Mbit over the link, because it’s hung off the USB2 interface.
This one? No such problem. I set up an iPerf3 server on my office iMac and saw nearly 940Mbit (TCP) between the two systems. I’ll call that proper gigabit! I’m sure I could do better if I tweaked things (or had something other than a dirt cheap switch out there), but the interface isn’t limited like on the Pi.

If you’re curious, the NIC is on the PCI Express bus (not USB - so it’s not sharing USB bandwidth), and reports out (lspci) as a Realtek RTL8111/8168/8411 PCI Express Gigabit Ethernet Controller (rev 15). The kernel driver in use is the r8168 driver.
GPIO Layout: Raspberry Pi Compatible
I said last week that the pinout was quite similar to the Raspberry Pi. On further investigation, it’s pretty much identical. If you find differences, please, comment and let me know.
This is the Nano’s pin layout (looking down from the top).

From the Raspberry Pi site, this is the Pi’s 40 pin layout. The voltage and ground pins are all identical, and while the numbers are different, nVidia is labeling the pin ID, and the Raspberry Pi’s chart is labeled with the actual chip GPIO number at each point. It’s easy to translate between them.

What about the special purpose pins? Some of the pins have multiple uses - hardware serial pins, I2C communication, talking to an EEPROM on the board…
The back of the Nano has the pinout with more detail, and everything still matches. Pinout.xyz has the Pi pinout in great detail, and it all lines up (from what’s labeled). Unless you’re doing something truly weird, any Raspberry Pi accessory should work just fine (once you port the software and drivers, of course - though they both run Linux, and are both ARM devices, so it shouldn’t be hard). I’m sure you could find something that wasn’t happy, but you’d be off in some weeds.

Raspberry Pi Compatible POE Pins!
If you look right in the corner of the board, there are some POE pins - Power Over Ethernet. With the right adapter, you should be able to power this directly from the network port!
And if I’m not mistaken, the goofy position of the POE pins in the corner is because the arrangement is exactly the same as on the 3B+. I don’t have a POE hat for my Raspberry Pi, but as near as I can tell, if you were to try the Raspberry Pi POE Hat on the Nano, it would work just fine!
The Raspberry Pi hats will hang out over the side of the Jetson Nano dev board, but that’s fine - it’s the right orientation so they don’t interfere with the rest of the board.

If you happen to have a Nano and a Pi POE hat, could you test this out and let me know in the comments?
But, seriously. The thing is clearly designed to be entirely compatible with the Raspberry Pi board ecosystem, which is totally awesome! It probably means it’ll be cancelled soon as well, just because I really like it.
Serial Port
If you’re debugging the device at all, or (say) screwing around with kernels, a serial interface is most useful. The dev board breaks out the serial port for you. It’s regular TTL serial, and while I’m not sure what voltage it runs at, I’d run the adapter 3.3V to be safe. This isn’t a 5V board. If all you’re doing is watching the output, of course, it doesn’t matter.
You’ll hook up your handy dandy TTL serial adapter (say, some FTDI232 boards I reworked a while back) properly, configure it to 115200 8N1, and be on your way! The pinout is clearly labeled on the board, so it’s not hard to get it connected.

I could use the terminal to collect the logs… or I could just use the Arduino serial monitor. The Arduino serial monitor is perfect for this sort of thing.

If you want the full serial messages on boot (up to when the Linux kernel kicks in), I’ve got a copy over on my GitHub page for the intensely curious.
Displays: 4k/60Hz, HDMI to DVI-D Adapters Work
nVidia claims that the Nano doesn’t work with HDMI to DVI adapters for some reason. I claim it does.
My guess is that there are two issues here. The Nano appears to support HDCP in some modes, which means that certain content won’t play properly unless the computer thinks that it’s talking to a “secure” display. HDCP is totally broken (cryptographically as well as the master key floating around the internet), and is more of a nuisance than an actual protection at this point, but it could still pose an issue.
The other issue is that DVI supports carrying an analog signal. I don’t believe the Nano can emit an analog signal at all, so a DVI adapter to an older display that required an analog signal wouldn’t work.
However, if you have DVI-D compatible displays, an HDMI to DVI cable or adapter seems to work just fine.
I was able to run 4k/30Hz over HDMI to a monitor. I’m not sure if the limit there was the monitor or my cable, but 30Hz is painful.
However, using the DisplayPort on both, I got a comfortable 4k/60Hz, which is just sweet. If you’re looking for a powerhouse media box that uses nearly no power, take a good look at the Nano.

Power Use Numbers
I did some analysis of the Nano power use with my MingHe DPS6015A. With the USB3 SSD attached (worth about 0.5W), I found that the 10W mode obeyed the limit fairly well (the max I saw was 10.5W, and if you subtract the SSD, it’s right at 10W), but the 5W mode definitely exceeded 5W by a good bit every now and then. I’d guess the 5W limit is for the card only, and the board explains the extra power draw, but if you really need to cap it to 5W, be careful.
These numbers are at 5.25V at the head end of the USB cable. I was getting brownouts with 5V, and didn’t feel like building a barrel adapter. But, seriously, if you’ve got anything significant hanging off the USB ports, use the barrel plug.
Interestingly, for the massive hit in CPU performance, the 5W mode really doesn’t save much power when running benchmarks. Idle draw is 3.5W or so (so 3W without my SSD). I ran cpuburn-a53 for the CPU power numbers (I couldn’t find an a57 specific version, so the CPU might draw a bit more in the worst case), a CUDA reduction sample for the GPU power use, and then for an attempt at maximum power, ran both together. I saw 10.5W in the 10W mode, and about 7.5W in the 5W mode.
Even if you pull the SSD power use out, the 5W mode is of questionable value on this board. It slaughters performance for remarkably little power savings. It’s a neat trick, but it just doesn’t seem to be worth it.

Desktoping the Nano
My Raspberry Pi desktop builds should give you an idea of what’s coming.
You need a SSD in a USB3 to SSD adapter to improve IO, and then you’ll have to rebuild the kernel if you want to put your root filesystem on the SSD. For the Raspberry Pi, the kernel build is optional. For the Nano, it’s not - and I’ll explain why.
The other thing that isn’t included in the stock kernel is zswap. This is an amazing bit of code that does compressed swap “properly” - it compresses swapped out pages in RAM, but unlike the zram feature, it will evict old pages out to disk, it will reject pages that compress poorly (so they head straight to disk), and if you have a new enough kernel, it will compress “same filled pages” down to zero storage beyond a basic “Hey, it’s filled with this value…” note. It’s common to have pages that are entirely zeros swapped out, so this saves space and time compared to compressing them. I really, really like zswap, and it’s a critical part of making a Raspberry Pi work as a desktop. It helps out a ton here too.
After some (light) stress testing, here’s what my zswap stats looked like. I had 550MB of data swapped out. It fit in 256MB of RAM (so better than 2x compression), with nearly 70MB of zero filled pages (or any repeating value, really). Despite all this, not even 3MB of swap file on the disk was in use. This does a great job of keeping swap traffic away from the disk, while still allowing massive memory savings. It’s genuinely good, and it’s worth the hassle of a kernel build.

So, go over to eBay and pick up a mSATA SSD, and a USB3 mSATA adapter that supports UASP. Plus, if you don’t have one, a Jetson Nano.
Let’s get started!
Initial Setup: Flash the SD Card
nVidia’s initial setup steps are really well written. Follow them. You’ll go through the normal Ubuntu setup process. The initial boot takes quite a while, so if your screen is flickering on and off, just let it run. This process is a multiple cup of coffee sort of thing.
Follow the system configuration wizard for a while - it’s pretty standard for Ubuntu.
When the system finishes booting and is at the desktop, go ahead and update things (on the SD card). It’ll take a bit to run some high priority updates, then you can update it the rest of the way yourself. Open up a terminal window, then:
sudo apt-get update
sudo apt-get dist-upgrade -y
reboot
You should find yourself back at the desktop after you log in.
If you’ve set the system to require a password to log in, you can select between the two stock window managers if you click the little gear icon at the login screen. There’s Unity, and Ubuntu. The Nano will run either one, but I prefer the old Gnome based one - Ubuntu. If you really want the speed, set up LXDE and the desktop will fly!
Building the Kernel for Fun and Profit
I promised last week some fun with the kernel - and this week, we’re going to have it!
The kernel build here isn’t optional if you want to use the USB SSD as your root filesystem. The stock kernel simply won’t do it, so we have to tweak things. That means a kernel build (and maybe some tweaking of the code, if you’re up for it). It’s not that intimidating, I promise!
Why can’t we just toss the root filesystem on the USB device and go? USB firmware.
The USB3 hardware requires the kernel to load a bit of firmware into it on boot before it will work. This is standard enough on embedded devices, but it means that the USB devices don’t work until this firmware is loaded.
Where is the firmware normally stored? On the root filesystem. Which… we want to mount via USB.
Fortunately, the Linux kernel doesn’t leave you hanging in this situation - it supports embedding the firmware in the kernel image so that you can load the firmware before trying to mount the USB device! The stock kernel doesn’t do this (annoyingly), but it’s a pretty simple set of steps to add it.
While we’re in there, we’ll add zswap support. Because the 4.9 kernel doesn’t include same filled page merging, this requires a bit of patching and then modifying a line or so of code so it builds against the kernel sources. It’s not that hard, I promise!
All of this means that booting straight from USB3 fails spectacularly, if you’re curious. You need the SD card.
What’s the difference between a microcontroller and a computer? The computer can build a kernel and then boot from it. Cross compiling is great for new platform development, but the Nano is a computer - so we’ll be doing this all on the Nano.
So, assuming you have an updated Jetson Nano booted and at the desktop, let’s get kernel building!
Downloading the Kernel Sources
Unfortunately, the Nano doesn’t run the stock Linux kernel. It runs a modified variant of it. We need those sources, and nVidia provides them.
Head over to the L4T download page and pull down the “BSP Sources” link on the Jetson Nano side. You should end up with a file called “Jetson-Nano-public_sources.tbz2” in your Downloads directory.
Pull up a terminal, and we’ll extract the kernel sources. They’re compressed inside the public_sources folder, and we’ll extract the kernel sources to the home directory.
cd Downloads
tar -xf Jetson-Nano-public\_sources.tbz2
cd ~
tar -xf ~/Downloads/public\_sources/kernel\_src.tbz2
cd ~/kernel/kernel-4.9
You’re now in the kernel directory!
We’ll start out with the current kernel configuration. Normally you can find this in /boot, but it’s not here on the Nano install, so we’ll just ask the kernel what the configuration is and extract it (this feature is optional, but present).
zcat /proc/config.gz > .config
Changing the Kernel Configs
Next, we need to copy the firmware file from the root filesystem into the kernel directory so it can get built into the kernel.
cp /lib/firmware/tegra21x\_xusb\_firmware ./firmware/
There are a few ways to change the kernel configs, but menuconfig is the most fun if you have a desktop environment - which we do. It needs a few extra libraries.
sudo apt-get install libncurses5-dev
make menuconfig
Explore around in here to your heart’s content (it’s a fascinating place), but we need to make some changes. Press space to select the various features. You want a “*” - not a “M”. This means it’s built in, not a module.
in Kernel Features:
Select: Enable frontswap to cache swap pages if tmem is present
Select: Compressed cache for swap pages (EXPERIMENTAL) (NEW)
Select: Low (Up to 2x) density storage for compressed pages
The 3x allocator (z3fold) isn’t reliable before mid-4.20 kernel versions, and in practice, with same filled page merging, the results are about the same as the zbud 2x allocator.
Exit out, and go to Device Drivers -> Generic Driver Options
Tap down to “External firmware blobs to build into the kernel binary,” hit enter, and enter “tegra21x_xusb_firmware” in the field.
Exit out, and save the new config.
Before we build the new kernel, we’ll update the zswap source.
Updating ZSwap: Patch the Kernel
I talked earlier about same filled page compression. The 4.9 kernel doesn’t have it yet.
But we can backport it from a newer kernel without too much trouble.
Linus keeps a copy of the kernel on Github, which is pretty easy to explore. Navigate to mm/zswap.c, then click the “History” button to see the commits.
“zswap: same-filled pages handling” is a good commit to patch in. Click that, and you’ll see the changes - but they’re not useful if we want to apply them to the file.
However, a hidden feature on GitHub is that if you append “.patch” to the URL (before the # target indicator), you can download the patch file for that commit.
Do that, and you’ll find the following patch file: a85f878b443f8d2b91ba76f09da21ac0af22e07f.patch
Right click the background, save-as, and put it in your downloads directory.
Now, back in the terminal, we’ll apply the patch.
cd ~/kernel/kernel-4.9
patch -p1 < ~/Downloads/a85f878b443f8d2b91ba76f09da21ac0af22e07f.patch
You’ll see where the hunks succeeded, and that things are slightly offset. That’s fine. We could apply the intermediate patches, but it’s not critical in this case. Congratulations, you’ve patched your first kernel file (if you’ve never done this before).
But we’re not done. There’s a call in there that relies on a kernel feature that doesn’t yet exist in 4.9. A memset_l call, which is an optimized memset. No problem - we can replace it with the regular memset. You can make the edit in vim, or use the handy one-liner here to swap it for a functionally identical memset.
You’re replacing this:
memset\_l(page, value, PAGE\_SIZE / sizeof(unsigned long));
With this:
memset(page, value, PAGE\_SIZE);
And this command will do it:
sed -i 's/memset\_l(page, value, PAGE\_SIZE \\/ sizeof(unsigned long));/memset(page, value, PAGE\_SIZE);/g' mm/zswap.c
Build and Install
Now, time to build the kernel with these changes. After it’s built (assuming no errors), we’ll install the modules, and put the kernel image in place in /boot after backing up the original kernel.
The -j parameter tells make to use multiple build threads. The Nano has 4 cores, so we build with 5 threads (this means the CPU remains busy when the thread is reading from the disk or similar).
Kernel builds take a while. Kernel builds on little ARM boxes take a long time. Go get coffee.
cd ~/kernel/kernel-4.9
make -j5
sudo make modules\_install
sudo cp /boot/Image /boot/Image.dist
sudo cp arch/arm64/boot/Image /boot
Now… do you feel bold? Reboot!
If everything comes up again, congratulations! You’re running your new kernel!
If you run ‘uname -r’, you should see ‘4.9.140’. The stock kernel is ‘4.9.140-tegra’ - so the new version string means it’s your freshly built kernel!
Pivoting Root to USB
Now, plug your USB SSD in. We’re going to create a filesystem on it, copy the whole root filesystem over, do a bit of fixup, and try to boot from it!
It’s almost certainly going to be /dev/sda - there are no other USB volumes attached, and the SD card is /dev/mmcblk0.
So, we’ll wipe the partition table (just in case), create some partitions, format them, and get ready to copy things!
sudo dd if=/dev/zero of=/dev/sda bs=1M count=1
sudo cfdisk /dev/sda
Create a GPT partition table, then create a new volume. Size it a few gigabytes less than your volume, because we’re leaving space for a swap partition. You could use a swapfile instead, if you wanted, but I prefer a dedicated partition. Since I’ve got a 32GB SSD (28.9GB by powers of 2), I’m creating a 25GB root partition, and using 3.9GB for swap. You’ll never use that much disk with zswap enabled, but it won’t ever swap out more than the swap partition will hold. Having 4GB of swap for 4GB of RAM is reasonable, though if you had a really large SSD, bigger would be fine.
After you’ve made the first partition, use the arrow keys to make another one in the free space. Then, arrow over to “Type” and select “Linux swap” for that second partition.
Go over to “Write,” type “yes” when prompted, then quit.
Now, make an ext4 volume and a swap partition, mount it, and copy the root filesystem over!
sudo mkfs.ext4 /dev/sda1
sudo mkswap /dev/sda2
sudo mkdir /mnt/root
sudo mount /dev/sda1 /mnt/root
sudo mkdir /mnt/root/proc
sudo apt -y install rsync
sudo rsync -axHAWX --numeric-ids --info=progress2 --exclude=/proc / /mnt/root
Go get coffee again. This takes a while.
Finally, edit /boot/extlinux/extlinux.conf to point the kernel at /dev/sda1 instead of /dev/mmcblk0p1 and enable zswap. The defaults are fine, and fstab uses /dev/root, which will find the proper root filesystem on boot.
sudo sed -i 's/mmcblk0p1/sda1/' /boot/extlinux/extlinux.conf
sudo sed -i 's/rootwait/rootwait zswap.enabled=1/' /boot/extlinux/extlinux.conf
Reboot again, and if all has gone well, you’ll be running from the USB SSD!
Tweaking Swap
Just a few things left to do - enable swap, and pull down a zswap reporting script.
echo "/dev/sda2            none                  swap           \\
defaults                                     0 1" | sudo tee -a /etc/fstab
cd ~
wget https://raw.githubusercontent.com/Syonyk/raspberry\_pi\_scripts/master/zswap.sh
Reboot, and you should have everything working!
Remember, your “real” /boot is on the SD card. So if you change things in the kernel, and nothing works, make sure you’ve put it there. You should find it in the /media subdirectory, or you can mount it somewhere reasonable.
Using the Nano as a Desktop
So, with all that done: How is it? Is it better than a Raspberry Pi? Can you throw out your big heavy Intel desktop?
It’s pretty darn good. I’ve been beating on it for a week, and while it’s clearly not a modern x86 desktop, it handles quite a lot, including chewing through some websites that just strangle the Pi I have.
You can attach a 4k display with no trouble, and it handles it perfectly. With zswap and the SSD, I can throw an absolutely ton of tasks at it without it choking. The extra 3GB of RAM over the Pi make a huge, huge difference.
Will it replace an Intel desktop? That depends on what you do with your desktop. If it’s a light to moderate use system, and you don’t do much in the way of gaming - yeah, it probably can. It won’t be quite as fast, but it’s far, far more capable than a Pi. I wouldn’t mind using one as a daily driver desktop, even for light development. If there were remote servers for testing, and/or the project was fairly light? Yeah, you could use it.
Should you? Up to you. I think they’re interesting, and this is going to replace my Pi 3B+ for my always-on desktop in my office, with the 3B+ rotating out to a different utility system that’s currently a Pi 3. The Nano is roughly twice the cost (you don’t need a case to keep it from throttling), roughly twice the performance, 4x the RAM, and uses the same power as a Pi 3B+. That’s a win, in my book!
Final Thoughts
Sorry about the late post tonight. I spent the evening building a D2-5 line tracking car with my daughter. It’s a fun little electronics kit that results in a car that chases a black line. Lots of fun to play with, and lots of fun to put together. A 4 year old isn’t going to be doing the soldering, but she can certainly put the parts through the board and trim the wires off after I’ve soldered them! We had a bit of a problem with one of the output transistors, but I had a compatible one laying around in my office.
I’m really, really impressed with the Jetson Nano. Yeah, you can use it for machine learning - but you can also build a properly good desktop-class machine out of it. For those on a tight power budget, this thing is awesome. For those who want something that isn’t x86 - give this a shot. And, if you like the Raspberry Pi but just need more performance? The dev kit is your ticket to twice the performance and an awful lot more memory!
If you’ve found this post useful, the donate button is over on the right side. I use blog income to buy gizmos for the blog. Or, just use one of my eBay links if you’re buying something. eBay will toss a few coins my way, and not charge you any more money in the process. Either they pay out affiliate links, or they keep the money.
In two weeks, I’ll be making my 200th post on this blog - which surprise me easily as much as it might surprise you. It’s been 4 years, and over half a million words so far.
But, really. Buy a Nano. They really are that good!
Comments
Comments are handled on my Discourse forum - you'll need to create an account there to post comments.If you've found this post useful, insightful, or informative, why not support me on Ko-fi? And if you'd like to be notified of new posts (I post every two weeks), you can follow my blog via email! Of course, if you like RSS, I support that too.


