
You can never have too many shelves. A while back, I built some shelves for the end of my shipping container. Recently, I’ve built hanging shelves for the side of my shipping container - and then built some for our church’s shipping container as well!
They aren’t designed for handling insane amounts of weight (I’d put 300lb on them without worrying about it), but they’ll support lighter boxes without any trouble. If you’ve got a shipping container and want more storage, you may find these insanely useful!

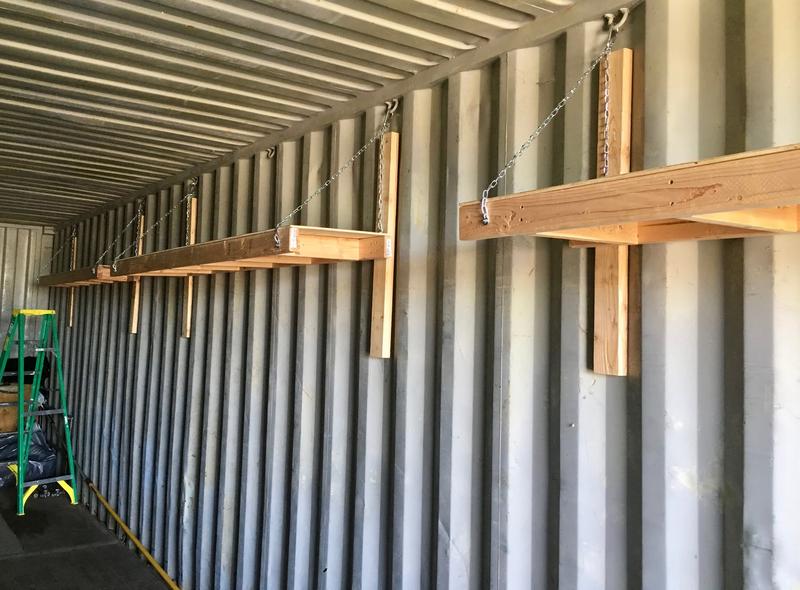
Like my other shelves, these don’t require any penetrations through the wall. They’re entirely supported by the chains run to the hooks along the top corner.
Plus, for fun, I added some additional shelves to help organize my recycling better.

If you’ve got a shipping container, you’ll almost certainly want to build hanging shelves for it!
Shipping Containers (Are Awesome)
I still very, very much like my shipping container. I’ve got a 40’ “high top” container - so 9.5’ high instead of the normal 8’ high. This extra headroom means I can put shelves up high and not interfere with useful space. With a normal container, a 7’ shelf has less than 1’ of room for boxes. In mine, a 7’ shelf has over 2’ for storage, which means I can put a good bit more up there.
Shipping containers typically have hooks welded across the top. These are intended as tiedowns for whatever cargo happens to be in them, but they’re large, metal, strong, and perfectly suited to hanging shelves as well. What they aren’t is standardized - so don’t assume that because one container has certain dimensions and hook placement, another will be identical.
I use my shipping container as a workshop and for moderate-term storage. It’s currently storing quite a few solar panels, some old single pane church windows, plenty of lumber, my recycling, and a bunch of other stuff. I can’t say enough good things about them for storage, beyond “You have to build up” to make good use of the space - and build up I shall!
Hanging Shelves: Chain and Lumber
One of my goals for anything I build in the shipping container is that it shouldn’t require punching holes in the walls. No good comes of putting holes in a perfectly good shipping container wall. Even if you have the sealing washers, they’ll leak (eventually). Plus, actually getting something to bite into the metal is difficult (though hardened self tapping metal screws will eventually do it, at least for the corner pillars).
Since I have all these hooks, I may as well use them. Chain sounded promising, so I diagrammed out something that looked plausible and went at it.
The concept: A long 2x4 sitting in the grooves on the wall, a chain supporting that, a shelf hanging from the 2x4, and another chain to the front of the shelf. Here’s the result. You can see the shelf, the vertical supports, and the chains. With the hardware I used, they’re conservatively good for 300lb a shelf - if it’s evenly distributed. They’re only 2x4 front and rear rails, and I’m just not up for doing the statics analysis to figure out the details. I won’t put a ton of weight on them, and they’ll be fine.

I’ve designed around efficient use of plywood (the stuff has gotten quite expensive). All the shelves are 8’ long, and I can either build 4x 12” deep shelves, or 2x 18” deep and 1x 12” deep shelf out of a single sheet. If I buy 8’ 2x4s, it all works out pretty well with remarkably little waste, though a couple 12’ 2x4s for the vertical supports are more efficient.
Building the Shelves
Some while ago, a friend of mine offered a bit of advice on buying a miter saw. He said that once you bought one, you’d basically never use a circular saw again - and it turns out, he was right. My circular saw has gone from an “everything, poorly” saw to a “ripping plywood” saw. Anything else, I use the miter saw. If I had a large table saw, I’d probably use the circular saw even less, but I only have access to a small one.
With 8’ 2x4s, the front and rear supports are done - you just have to cut the center pieces and the back support. For no particularly good reason beyond “it seems right,” the back supports are 3’ long. The center pieces are calculated normally - shelf depth minus 3” for the 2x4s. I like to cut them a hair long, but as long as one side of the plywood is flush (so you can mount the back supports), it doesn’t matter that much.
Cut (mostly) to size, I’ve got the 8’ 2x4s on the right, the center pieces in the middle, and some longer ones I’ll cut down for the back pieces later. The DeWalt impact driver is awesome. I’ve pulled apart a few DeWalt 20V Max packs and they’re very well built.

I’ve found that for building shelves, running screws part of the way in first helps. Pre-drill the ends - or, better, use tighter spacing. Even with pre-drilling, the ends on mine have cracked a bit over time.

For my second revision shelves, I just went further inboard to avoid end cracking. With 6 cross members and 8’ shelves, you can do 8”, 16”, 16”, 16”, 16”, 16”, 8” spacing. Depending on your container hook spacing, this may work even with the vertical support alignment. With 18” deep shelves, you can cut 6 15” cross members out of an 8’ 2x4 and still have a bit of scrap left.

I’ll typically use a few flat boards as a base to build the shelf supports. Again, this is Rev 1, I used 6 cross members (spaced closer) for Rev 2.

If you haven’t ripped plywood into proper width pieces, now is a good time to do so. You might also want to urethane them. People who are concerned about my lack of urethaning recently - fear not. I’ve urethaned some plywood for Rev 2 of the shelves for the church container. My shipping container is increasingly full, despite being filled with shelves. I’ve got property fuel along the right, spare lumber in the back, shelves… I’m making good use of the space.

Screw the plywood on, and you’ve got a shelf module complete! I use shorter screws for this - 1 1/2” is more than enough for securing the plywood on top.

Hanging the Shelves
Once the shelves are built, it’s time to hang them. This requires the rear supports, the chain, and some hooks or latches.
Figure out the hanging height. I’ve been using 16-18” of wood above the shelf, which gives me about 19-21” from the ceiling. The hook at the top of the chain adds a bit of length, and if you look, the shipping container loop is about 1.5-2” below the ceiling. Figure all this out if you need exact spacing, otherwise just use 16” on the vertical 2x4 and you’ll be fine. I’m not sure what the weight rating on the loops is, but they’re designed to secure things for oceanic transport, so I’m not worried about a few hundred pounds on them.

Figure out your intended spacing on the vertical 2x4, mark them, then work out the chain length. I like to have half a loop of this style (rated about 150lb - so with 4 of them, nearly 600 lb) hanging over the top. Be consistent, because if this isn’t consistent, the shelves will hang crooked.

For Rev 1 of the shelves, I used some deck screws I had laying around. For Rev 2, I used some 1/4” bolts, washers, and nuts. Use the bolts - they’re better. However, deck screws, wedged in firmly, do seem to hold fairly well. The loads are vertical, and as long as you’re not putting tons of weight on the shelves, this should hold just fine. The deck screws are in my shipping container, proper bolts and washers are in the church’s container, for whatever that’s worth.

Figure out the shelf positioning you want, then work out the positions for the uprights. On my home shipping container, things aren’t evenly spaced because of where I wanted the shelves. For the church container, the hook spacing is a lot more regular, so I was able to make all the shelves identically. This final spacing is something you should do with the specific shipping container you’re installing in - container hooks aren’t standardized, and I wouldn’t bet on the corrugation spacing being identical either.

You can hang the shelves from a single chain during installation.
On the second set of shelves, I worked out a way to make alignment easier. Secure the upright from the back with a single screw in the center. This is enough to hold the empty shelves - but it allows the uprights to rotate in position slightly to line up with the corrugations. Hang the shelves, align the uprights, and then put the remainder of the screws (two should be fine, four is suitably overkill) from the front. For joining 2x4s like this, you’ll want some 2.5” long screws - they’re perfect since they don’t quite go all the way through, even if you over-countersink them a bit.

Once the shelves are hanging, connect the chain for the front support. Run it over the front, figure out where you want to drive the bolt, and drive the bolt through. The front chain is far easier to figure out once the shelves are hanging. Set it up so it’s “tight” but not fully supporting the shelf. The reality is that if you’re off by a quarter of an inch, the shelves have enough flex to resolve this once loaded. If the shelves are slightly warped and one upright isn’t firmly sitting against the back wall, the same thing is true - load them up, they’ll settle in nicely.
Another option you might consider (for light duty shelves) is replacing the chain with a bunch of stacked 2x4s to provide support. I did this on a 1’ deep shelf of mine, and I store light weight things up there. I… may have run out of chain by the time I got to the front chains on this shelf. So far, it’s working, but I wouldn’t do this on a 18” deep shelf, and I wouldn’t do it on anything that’s going to be supporting a lot of weight. This shelf is holding some motorcycle seats, an old helmet I’m keeping for a spare, and a half empty box of oil.

Recycling Shelves: More Free Standing Shelves
I just can’t build enough shelves to keep up with storage demand out here - so I built yet another set in the shipping container recently to help organize my recycling. It’s a flexible use, free standing, two shelf setup that’s just hacked together from random buts and pieces of lumber. I try to buy extra lumber whenever I go make a run. If I have ideas and want to hack something together in an afternoon, I usually have the supplies to do it now - and it’s far cheaper to buy extra on every run I make than to make extra runs, given how diesel hungry my truck is.
This is a set of 18” deep shelves (well sized to the boxes I use) that isn’t designed for massive weight either. My recycling just doesn’t get to more than a few hundred pounds before I haul it. The lower shelf is using 2x6 front/rear rails, and the upper shelf is using 2x4s, since I’m less likely to toss a ton of weight up there.

Like all my shelves, I build the basic frame on the ground. You can see my response to the cracking ends on the other shelves here - my cross-members are further inboard, and I’m using the 8”/16” spacing I mentioned previously. Random boards work very well for supporting the shelving while you’re screwing pieces together. I’m getting somewhat close to a “There, I Fixed It!” post here at times… but if you’re out towards the middle of nowhere, it’s quicker than waiting for someone to show up and help you out. Most of these projects are completed while my wife and kids are have headed into town for a few hours.

For the front support, putting a single screw into each joint, assembling it, and straightening things up works very well. I like my squares. Of course, add more screws once it’s together and lined up. The rear 2x4s are sitting on the metal edge of the corrugations, the front 2x6s (flat to reduce the amount of aisle space lost, and because I didn’t have joist hangers around) sit on the floor. The whole thing can be removed if needed to clean or replace the tarp.

Clamps are handy for holding things together when assembling a shelf solo. They also help prevent gaps between the wood. If some of the wood is a bit warped, clamp it tightly before screwing things together. Some screws will pull pieces together, most won’t (or, at least, not with enough force to be useful). Like the hanging shelves, weight on the shelves resolves any little alignment issues in a hurry.

Attach the upper shelf, add boxes, figure out recycling!
Recycling, Waste, and Trash Trailers
If you have recycling of the “Throw everything that sort of feels recyclable into one big container and take it to the curb to be shipped to ~China~ ~somewhere else~ the landfill” variety, my setup here probably looks a bit absurd - and, at some level, it might be.
But what it is, to me, is part of a waste disposal system that actually makes me money on an annual basis. It doesn’t make me much money, but it’s cashflow positive, which is a massive improvement over paying a couple hundred dollars a year for trash service that doesn’t even come down the driveway. “Free” is better than spending money, and at the $222/yr I was spending for trash service, this stuff pays off in a big hurry.
The core of our waste disposal system is the trash trailer - a pickup bed trailer and topper I refurbished a few years ago. I use the trash trailer for things that go to the landfill. Originally, I was hauling it every 4 months or so (mostly because I hadn’t found good recycling options), but after doing some more searching, I haul it every year or so because I can divert the bulk of our waste off to recycling. Even every year is probably more often than it really needs to go these days, but I don’t want to have to deal with it in the middle of winter. Late fall is a good time to haul it - a cold morning keeps any smells down while I’m emptying it out by hand.

I realized when dealing with my trash twice (once going into the trash trailer, once emptying it out) that a lot of our waste is recyclable - and that the recyclable material was making up a ton of bulk. Crumpled up waste paper in the kitchen trash was obvious when you empty a bunch of bags at once, and it seemed like I could improve things, even if I never hauled them to recycling. A box full of flat stacked paper is far denser than crumped paper mixed in with other stuff.
My recycling splits things out into a variety of categories (based around the places that take most of it): Newsprint, magazines, office paper and chipboard, corrugated cardboard, #1 plastic, #2 plastic, aluminum cans, and mixed scrap metal. I haul boxes when they get full, and I can combine the recycling runs with trips to Home Depot or Lowes - it’s on the way. One place pays for mixed metal and aluminum cans, another place pays (not much, but a bit) for newsprint and corrugated cardboard, and takes the remainder of the materials. One thing I can’t recycle out here is glass - there’s just nowhere that takes it within a sane driving distance. I’ve considered using it for my own property purposes, crushing it and mixing it with concrete or something, but right now it goes to the dump.
Even if our plastic doesn’t actually get recycled, it’s just a small part of our waste stream. We try to use reusable packaging for things from the store (washable mesh bags for bulk goods/fruits/vegetables), and I prefer drinks in aluminum over glass, if I’m buying something, because I can recycle it more easily.
We’re far from zero waste, but I’m pretty happy with our waste streams right now. I’m at least at zero annual cost for waste, and our volumes are quite reasonable.
Final Thoughts: Add Shelves!
I know there’s the whole minimalism thing that’s popular every now and then - and I’m not opposed to it. I just think it’s best applied to the house, not the whole property. If you’ve got a storage building like a shipping container, put a ton of shelves in, because keeping things around is very, very useful!
Even if your waste goes through a normal trash service, it’s still worth thinking through. Things like styrofoam packaging (for tools, ceiling fans, etc) drive me nuts now - because they’re a month’s worth of waste volume, in one package! I try to find ways to avoid that now.
The Zero Waste movement has a ton of good resources - even if you’re not interested in going for zero. And shelves? Shelves are just awesome.
Comments
Comments are handled on my Discourse forum - you'll need to create an account there to post comments.If you've found this post useful, insightful, or informative, why not support me on Ko-fi? And if you'd like to be notified of new posts (I post every two weeks), you can follow my blog via email! Of course, if you like RSS, I support that too.


)