
It’s been at least a year since I’ve posted about an “old trailer” build - so, of course, it’s time for another one! Last time I worked with an old trailer, I built myself a trash trailer for hauling trash to the dump. It works wonderfully - but it’s not very useful for hauling stuff to the property. In 2019, I expect to need to haul many yards of gravel, probably some compost, and an awful lot of long material that won’t fit easily in my truck. All of this most easily done with an open top trailer - the gravel and compost can be loaded with a bucket loader, assuming they can reach over the sides. But, you also can’t just put a pile of gravel on a flatbed trailer and expect it to stay in place.
I have access to an older flatbed trailer (that could use some new tires) that would be perfect - if it had sides. It used to have a set of sides, but they haven’t been around in years, so if I want to use it for all my hauling needs, I need to build new sides. Which, of course, I did!

What goes into building trailer sides that should last a long time? Well, an awful lot of urethane, really. And since the slots aren’t quite right for 2x4s, fun with a small table saw, some hand saws, and more urethane. Keep reading for the details!
It All Starts With The Plywood
Most of my projects as of late involve plywood. Sometimes it’s nice plywood, sometimes it’s cheap plywood. This project? I’m all about the cheap plywood. For no particularly reason than “It seemed about right,” I went with some 1/2” stuff that’s got plenty of knot holes and cracks. I could have gone with nicer plywood, but it costs a good bit more, and… seriously, I just don’t care. It’s going to be well protected with my normal plywood protection methods, and the sides will spend at least a good part of the year in a storage shed of some sort or another.

For reasons of convenience, I decreed that the sides shall be 2’ tall. This, very conveniently, is exactly half a sheet of plywood cut longways. The trailer dimensions lend themselves well to working with half sheets of plywood, trimmed slightly. If you’re doing long cuts in plywood, running the cord along the top, to one side of the cut, prevents you from having to sort out the cord snagging mid-cut. Yes, that’s a Diablo blade on the saw - I quite like them (eBay), though I hope to be using my circular saw an awful lot less here in the near future since I’ve got a new miter saw.

Fitting the Sides
If all the sides of the trailer were flat, this wouldn’t be hard at all. But, the trailer has the wheel wells coming up - and since it was hand built (and has been bent back to square at least once), it’s not at all safe to assume all the angles match perfectly. They’re very, very close, but not identical.
I’ve been diverting cardboard into the shed for a while now, so finding a suitable box to turn into templates wasn’t a problem at all. I just hauled some scissors up to the trailer with the cardboard and hacked with scissors until I was happy.

Cutting the Plywood to Fit
I apparently picked the hottest day of the year to spend a few hours outside working in smokey air, cutting plywood to fit. Why? I can’t come up with any reason beyond stupidity, actually. I had some free time, I decided to do it, and it was hot, smokey, and entirely unpleasant outside.
Fitting the plywood to the trailer involved marking the cardboard-established angles, then fine tuning the angles with a circular saw. I figured that I was going to build these sides once, so it’s worth the time to get them right.

If you’re OK with a tiny bit of overcut, you can do some fairly precise work with circular saws. This little cut clears some metal edging and lets the side sit down firmly on the wood - better for keeping dirt and gravel in. I want to be able to haul “just about anything,” so the precision is worth the time. Dropping a load of sand or gravel on the highway on the way home is just a waste of money!

Urethane All the Plywoods
If my life were a reality show, I’d be the guy who suggests that all problems need some urethaned plywood. Kitchen? Urethaned plywood. Bathroom? Urethaned plywood. Trash trailer? Yup. Urethaned plywood. This would go on for a few seasons, and other cast members would express occasional wonder at how quickly I was able to create sheets of urethaned plywood for whatever task was at hand, but never bother to figure it out. After a while of this, I’d show the camera crew my Urethaned Plywood Warehouse - a storage unit containing hundreds of sheets of plywood, of various thicknesses and quality, all beautifully pre-urethaned. Somehow. Seriously, don’t make a reality TV show about me. I’d be dreadfully boring. Think “James May on a hillside of rock in Idaho.”
Meanwhile, in my world, I don’t have access to this magical warehouse of plywood - I have to urethane my own plywood, and I typically do it on a project basis - it is, by far, the longest part of any project, but the results are so, so awesome!
If you’re not familiar with urethane finishes (I typically use Minwax Helmsman Spar Urethane, conveniently available at your local Lowes for too darn much money), they’re a hard plastic finish for wood. I use spar urethane because it’s designed for outdoor use - there’s more of the “stuff” in it that protects wood from the sun/rain/etc, though you get a slight yellow tint to the wood. It doesn’t bother me one bit, but I might not use outdoor urethane for indoor projects. Personally, I think it makes plywood look great.
My process is slightly different from what I used for the trash trailer. I still use some waterproof wood glue to seal the edges, but I apply the wood glue first. I’m using TiteBond III, which is more or less waterproof, and bonds to the wood nicely. What I learned with the trash trailer is that while urethane can go over the wood glue, the wood glue won’t go over the urethane. So, I seal the edges first, and then apply urethane to the surfaces, as well as the edges (it goes over the wood glue just fine). The result is a very well sealed piece of plywood that should be substantially weather resistant for many, many years to come.
Sand, clean, brush. Repeat. I’ve got two coats on each side, plus at least two coats on the edges. I don’t always sand between coats, though, since I really don’t care that much about the details of the finish. Yes, I could do a hand-rubbed amazing finish on my gravel trailer, but it’s not worth the time. There may be a few drip marks along the edges as well - again, I’m not building a grand piano here.

You can do two coats a day if you do one in the morning and one in the evening. For short term brush storage like this, simply wrapping it in saran wrap works nicely (and cover the container of urethane). For somewhat longer term storage (say, a week), rinsing out the brush in paint thinner and keeping the bristles wet with paint thinner seems to work fairly well to prevent the brush from becoming a solid hunk of plastic. When you clean the brush, clean it well with paint thinner, many times, then wash it out in a sink, with soap, many times. Eventually you’ll learn how to avoid turning former urethane brushes into solid plastic bricks… it’s taken me a few brushes to work out the details.

The Uprights
Normally, uprights for trailer sides aren’t a problem - you’d just use 2x4s, cut to length, and they slip into the pockets. On this trailer, hand-built as it was, the pockets aren’t quite the right size - they’re a bit thin, so you need about a 1.8x4 to slide in. As that’s not a common size for lumber, I had to cut some 2x4s down to size. The pockets are welded on L angle from what was, apparently, quite the impressive pile of scrap iron out in the middle of roughly nowhere. At some point, I may sandblast and paint the trailer, but that’s an awful lot of work for little gain.

Fortunately, one of the many handy things up the hill is a small table saw. It’s not amazing, but it’s perfect for many things - and this task is one of the many things it’s perfect for.

A bit of experimenting later, I had the depth and guide set properly to make a cut across the 2x4s at the proper depth - this sets the depth they slide into the pocket, and serves as the end of some other cuts that will trim off the edge. I could have attacked the 2x4s with a chisel and accomplished the same thing, but this is more precise - and, really, an excuse to experiment with table saws to accomplish my goals.

With that cut made, I turned my attention to cutting off the end sliver. A circular saw blade is obviously circular, which means that I can’t easily lop off the end all the way through. I don’t mind a bit of extra cut, but I (initially) tried to avoid it. Interestingly, you can see the “inverted V” cut that a circular saw blade makes here on the short cut - it’s not usually nearly this evident.

How does one easily extend a cut like this all the way through to cut the end off? Hand saws! I have some older ones laying around from… well, I don’t know where they came from, actually. But I have them. If these used to be yours and they’ve gone missing, sorry about that - let me know and I’ll send them back your way.

A bit of cutting and I had the wood thinned down very nicely, with a smooth surface that will slide easily into the pocket!

Some test fitting demonstrated that, yes, they worked just fine. You can see my tractor drawbar here - a bunch of various sized trailer hitch balls on something that mounts in the three point, with a bit of scrap steel shackled to the drawbar arm so it doesn’t rotate. It’s a most useful thing to have around - I’ve covered it before.

Did I actually use a hand saw to cut the bulk of the uprights? No. I did not. I decided that I didn’t care about the cuts extending a bit beyond the top of the pocket, and just ran the circular saw down both sides. I used the hand saw to separate them if they didn’t come free easily, but I decided that aiming for perfection on trailer sides was a waste of perfectly good time.
Urethaning the Uprights
I can’t be done with urethane yet! I have more wood left! At this point, I was getting tired of waiting for urethane to dry before flipping stuff over, so I rigged up a cardboard cradle - use some 2x4s to hold the box flaps up, and I could urethane both sides of the 2x4s without having them stick to the cardboard. They only touched on the very corners, which works great for this sort of thing. Again, benefits to keeping a shelf of cardboard - I’m not lacking for boxes I can tear apart. I make heavy use of the random cardboard boxes I have laying around.

The ends get special attention, as that’s where weather will hit the most. Urethaned wood looks good - it emphasizes the grain nicely!

Installing the Sides
Putting the sides on was fairly straightforward, and involved (like many of my projects) carriage bolts. If you’re not familiar, this style of bolt has a round head (which you can’t grip), and a square neck. When you sink the neck into wood, it prevents the bolt from spinning, so you can tighten it from one side. Also, the low domed head makes it harder to catch on things, but I mostly use them for the one sided tightening. They’re great!

The process is simple: Clamp the uprights and plywood together, drill holes, bolt things together.

After a while, you start getting good at figuring out the bolt-wood-washer-locknut-nut stack height - here, I’m pretty sure I’ve got 2.5” long bolts. The 2x4 is 1.5” thick, the 1/2” plywood makes it 2”, and then you need a bit for the nut/washer stack. Do it right, and you clamp down with all the threads on the nut engaged, with barely any extra threads sticking out! If you’ve got something that won’t thread on, you can always use the flat washer and the nut to pull the bolt through a bit so you can get the lock washer on.

One downside to the augers I use for this sort of work is that they rip out the back of the plywood. It’s not a big deal, and it’s easily solved if you clamp some scrap wood behind the plywood, but I didn’t have an easy way to do that here.

Do this a bunch and I’ve got most of the sides on! I’m using two bolts per upright, which holds everything nicely in position. If the trailer looks like it isn’t quite straight… it’s only because it isn’t. My understanding is that someone tried to load about 15 tons of excavator into a 5 ton trailer and gave it a permanent loading ramp in the back (which was then bent out). I don’t plan to put more than about 2 tons of anything on it, so I should be fine. I think…
The gaps in the center will be solved later.

Cat! And the Ends.
Around this time, our property cat came wandering past, and decided the trailer looked worth exploring. She’s fluffing up for winter nicely after a summer of being quite a bit less fluffy. We might be feeding her a bit much - the mousekill has gone down dramatically lately. Spending all day asleep in my office doesn’t help on that front either.

The ends are just more of the same. Secure nicely urethaned plywood to the uprights and go. Interestingly, one of the ends has full size pockets that fit a 2x4 without any modification - I’m not sure why.

It’s starting to look like something you might actually transport gravel in!
All the sides are marked (in pencil, under the urethane) as to which corner they go on, so I can assemble the sides without having to figure out what fits where.

Final Steps
The only remaining sides are the center boards. These just bolt to the existing plywood with some bolts and wingnuts. I drilled both sides together in an attempt to make the sides interchangeable, but I’m not sure I’ve actually accomplished this (I’ll find out in the spring when I put the sides back on).

Why should you clamp scrap wood behind your plywood for drilling? The left hole was drilled with the back “open” - nothing behind. The right hole was drilled with a piece of scrap wood left over from my compost bins build clamped in. There’s a major difference!

These are held on with wingnuts - I may rethink this if I have trouble with them staying in place. I didn’t end up with enough bolt length for a lock nut, but replacing the bolts with longer bolts is an easy fix if this proves to be a problem.

A bit of drilling later, and the gap fillers are in place!

The corners don’t fit perfectly together, so I added some latches to keep them closed. I expect this will get re-engineered come early spring, because they aren’t nearly as sturdy as I hoped. I’ll probably drill out some L brackets and use bolts in them, like I’ve done other places.

Also, there are some new tires for this trailer laying around. One of the tires had a leak during the summer and got replaced with something laying around that… well, I don’t think this is quite road legal. It’s not so much a case of “measuring the tread with Lincoln’s head on a penny” as “What tread?” I think this is a retread that lost it’s tread at some point (based on the balloon like shape of the tire), but I’m honestly not sure. In any case, new (or, at least, used-and-serviceable) tires, in the spring. The used tire shops out here confuse many visitors, but used tires are perfect for trailers that won’t be seeing many miles!

The Result
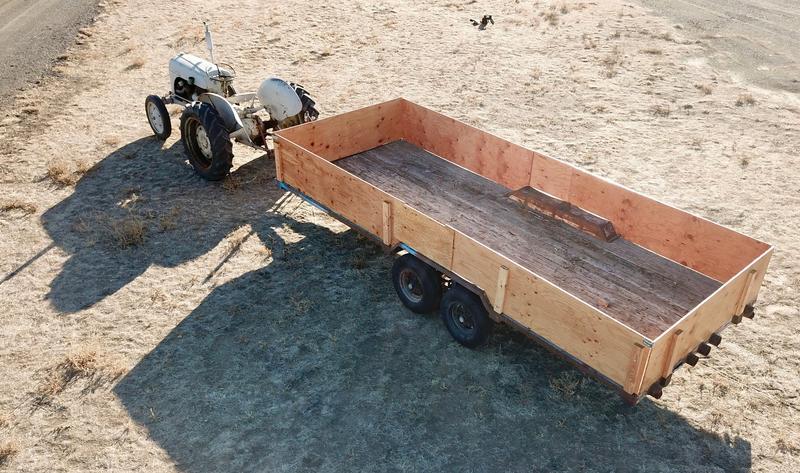
A very nice looking set of sides for a very nice old trailer! They’re low enough that a bucket can easily get over the sides to put stuff in, and I can remove a side or rear gate to shovel stuff out, while not having to stand under a truck bed canopy. I’ll be making very good use of this next year.

The wood on the bottom isn’t in great shape, so I may replace that at some point, but it should hold up for many, many year still.

Plus, I really like how evening shadow photography turns out from above. And my old tractor is still awesome.

This hasn’t been one of my faster projects. I started it (based on some receipts I found) back in April, and finished it in November. Since I didn’t need the trailer for anything this year, but plan to make good use of it next year, it was a “crack filler” project that fit in between other stuff - and it’s always good to have some of those.
Next year? I’m going to be hauling an awful lot of gravel, a bunch of solar panel mounting rail, a few pallets of solar panels, over a ton of batteries… this trailer is going to get a workout!
Comments
Comments are handled on my Discourse forum - you'll need to create an account there to post comments.If you've found this post useful, insightful, or informative, why not support me on Ko-fi? And if you'd like to be notified of new posts (I post every two weeks), you can follow my blog via email! Of course, if you like RSS, I support that too.


