
I admit to an odd enjoyment of making old, slow hardware (or new, slow hardware) into something useful. I’ve been making very good progress on the front of “Making usable desktops out of things people think are too slow.” Raspberry Pi 3s, Jetson Nanos, ancient netbooks…
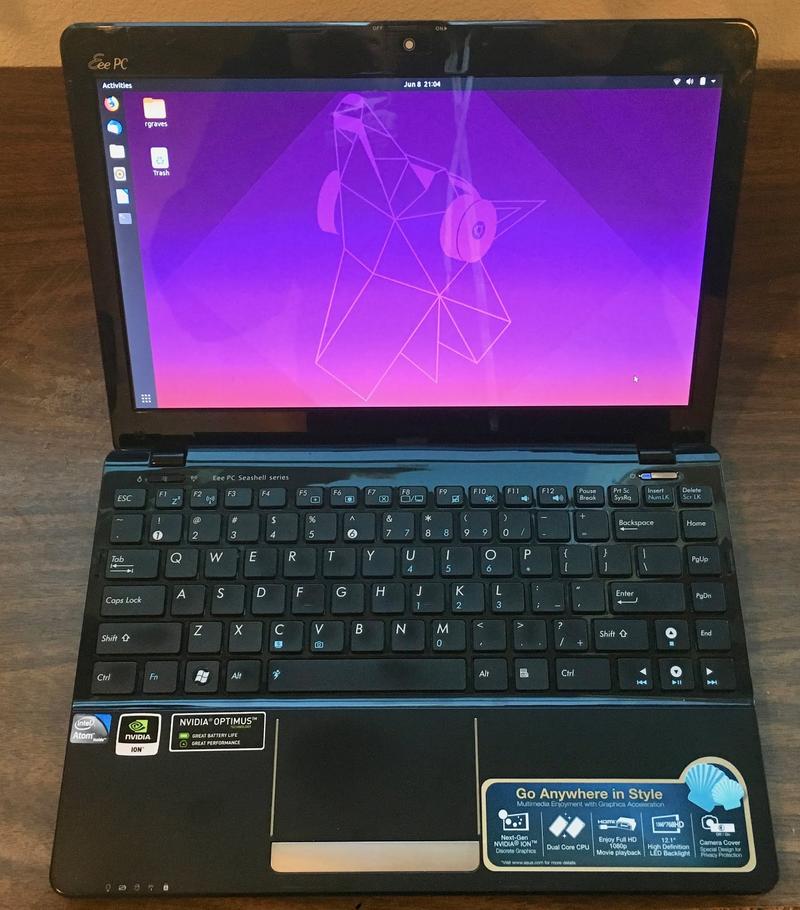
This week, I’m talking about Clank: An old Asus 1215N I found at a local pawn shop for nearly nothing. The battery was stone dead, the hard drive was shot, it had 2GB of RAM, and was covered in dust - but it powered on to the BIOS, and showed promise. So, away we go!

What’s it take to restore something this old to being useful? Is it useful? Join me for the journey!
The Asus 1215N
I’ve named this machine “Clank.” It’s old. It’s slow. I swear you can hear the pistons pounding away as it chews through a modern web browser. The screen is not great (and almost certainly not worth the effort to replace). The processor is not fast.
But it has quite a few redeeming features that I find very handy to have around. First and foremost, it’s small enough to use on an airplane - and not just “wedge in place and watch a movie,” but actually use, type, develop, compile… legitimate computer use. I don’t fly first class (or even business class), so I don’t get enough space to use a larger laptop. This one isn’t perfect, but it’s big enough to be useful, and small enough that I can legitimately use it on an airplane for long flights. The battery life (if configured properly) is pretty good for an old machine as well - I get an honest 4-5 hours of use on a charge, and that’s good enough for me. Beyond that, I’ll either sleep or watch a movie.
Windows 10 isn’t officially supported - but you can shoehorn an install on, which makes it a useful little box for running Windows-based utilities and network admin tools. Of course, it’s fully supported by Linux (though there’s a range of kernels that don’t report battery stats properly).
If you’re paranoid about computer security, this machine is oddly perfect - it has a hardware wireless toggle! It’s not a physical disconnect switch like some (even more paranoid) machines have, but press a button and the hardware turns the wireless off. There’s even a handy status LED to let you know the state of the wireless card. Ubuntu, at least, will tell you that the wireless card is hardware disabled, and attempting to re-enable it from software doesn’t seem to work (it tells you to use the hardware switch to re-enable it). Mine, at least, doesn’t have Bluetooth at all.

There’s also a little slider to physically block the webcam. This is a feature I really wish other manufacturers would bring back. It doesn’t cost much, it looks better than the standard piece of tape, and far, far too many laptops have “in use” notification LEDs that can be bypassed by software.

If you’ve kept up with what Linus calls “yet another speculative hardware engineering trainwreck” when he’s being overly kind, this machine has that covered as well. It’s running an old Atom D525 chip, which is a genuinely odd little Intel processor. It doesn’t have speculative execution, it doesn’t run micro-ops like the mainline Intel chips, but it does have 64-bit support - and hyperthreading. It’s an odd little dead end chip, as far as I can tell, but it seems immune to just about all the nonsense that Intel has been up to lately. Even Linux says it doesn’t have bugs! Of course, it doesn’t have power management either…

But if that’s not weird enough for you, the 1215N uses nVidia Optimus. Before Intel shipped a halfway decent GPU, OEMs and GPU vendors came up with all sorts of odd ways to combine the power efficiency of an integrated GPU with the actual graphics performance of a discrete GPU. Optimus solves this problem by hanging an nVidia GPU on the PCI bus - and then not hooking it up to the internal display. If you want to use the GPU, it happily renders frames. Then, the software copies the frames into the integrated GPU’s framebuffer, and the integrated GPU pushes the image out to the display. It works, except that software support ended with Windows 7, and Linux “kind of” supports it. For my uses, I don’t care - the integrated graphics are good enough, and I’d rather have the battery life with the GPU disabled anyway.
The 1215N also has a headphone jack, a microphone jack, three USB ports (not USB 3.0, near as I can tell, though plenty of reviews claim it has USB 3 ports), a VGA port, a HDMI port, an SD card slot, and, to top it off, an ethernet port. I’m not actually sure if the HDMI and VGA ports work with the discrete GPU disabled - but I also don’t particularly care.
Hardware Updates
This is a “useless gutless wonder” of a machine, as I found it. Some dead spinning rust drive (that’s a royal pain to replace), 2GB of RAM, a dead battery, and that little dual core Atom (running at a furious 1.8GHz - all the time, since there’s no SpeedStep in this generation). Most people would just throw it out at this point - and someone clearly did. Fortunately, I’m downstream.
So I fixed it. If you’re working with old machines, eBay is awesome for finding cheap hardware. I grabbed a 256GB SATA SSD, 8GB of RAM (2x4GB), a replacement battery, and went to town installing everything. The RAM is easy, the SSD is a pain, and you can find other guides, because I didn’t bother documenting the install. It started out seeming easy, then… well, anyway, it’s done. If I’d known it came with a 2.4 only wireless card, I would have replaced that too, but I have no real desire to open it up again.
Updating the BIOS: Small (64MB) FAT USB Drive
It’s always a good idea to update random machines to the latest BIOS, because nobody really bothers updating them, and there are often useful fixes. Updating the BIOS on this is a bit of a pain in 2019 - the BIOS doesn’t appear to properly handle FAT32, and it doesn’t handle large drives, either. Several attempts to update the BIOS with a 2GB USB stick failed entirely. The trick: create (in your preferred OS) a small (64MB seemed to work fine) FAT16 (“FAT” on Windows - not “FAT32”) partition - and then copy the BIOS image over, name it 1215N.ROM, boot with the Alt-F2 combo, and see what happens. It should update to 0902. I still can’t believe this thing recognizes 8GB of RAM!

While you’re in the BIOS, if you want to find some hidden options, try Ctrl-F1. It opens up a few more settings on the Advanced tab. You can select the front side bus speed and CPU voltage! Does it work? I actually don’t know. The setting about charging while turned off doesn’t seem to do anything, so I’m not sure the others make any difference either.

Dual Booting: Windows 10 and Ubuntu 19.04
For me, laptops like this are “utility beater” boxes. They’re the sort of thing I toss in my backpack if I’m going to do some network installation up at a church camp, and I just want them to be able to do everything. I’m too old to care about operating system holy wars these days, so, yes, I’ll put Windows on a machine like this. I prefer Linux for general operation, but Windows is useful for things like updating firmware on random devices. Can you do it in Wine? Maybe. Is it worth the hassle? No.
With a freshly zeroed SSD (blkdiscard from a Linux LiveUSB environment is the quick and easy way to do this), Windows 10 goes on first. Do I have a legitimate Windows 10 license for it? Well… actually, yes. There’s a (barely) legible Windows 7 Home license on the bottom of the system. Microsoft decided that Windows 7 & Windows 8 licenses were good enough for Windows 10, so I’ll use it!
Half of the SSD goes to Windows, half of it goes to Linux. Create a bootable Windows 10 64-bit USB installer, split the drive down the middle, and install. When it asks for a license key, put the Windows 7 license key in, and it should accept it and activate. Sure, you’ll get Windows 10 Home, but that runs random firmware updaters just as well as anything else.
Use an offline account, put in gibberish for the security questions (Microsoft should know better), and decline just about everything, for whatever difference it makes. You should (eventually) get to the desktop, with an activated Windows 10 Home 64-bit install. Sweet! Let it sit and thrash for a while as it finishes post-install work and some updates.
You’ll want the nVidia 306.97 drivers for 64-bit Windows. They’re about the only set that still supports this hardware on Windows 10. Install the drivers, restart, and then probably let Windows run a bunch of updates. As near as I can tell, they properly power the GPU down - though I haven’t dug very hard to verify this, since I rarely use Windows. I don’t think they give you working Optimus support, but at least they seem like they shut the GPU down.
Power Use: Kill the GPU!
This laptop has one of two battery life values: 3 hours, or 5 hours. If you successfully turn the nVidia GPU off, it’s a 5 hour laptop. If you don’t, it’s a 3 hour laptop. There are a variety of ways to tell, but the simplest one is almost always right: Put your hand on the left side with the system idle. If it’s blowing hot air when the computer is idle, the discrete GPU is running. If not, the GPU is idle.
Installing Ubuntu 19.04
If you like 18.04… well, you’ll have trouble. The kernels it ships with doesn’t properly handle the battery ACPI fields, so you end up with zero battery state information. The 5.x kernel in 19.04 handles the hardware properly, so, 19.04 it is. I’m sure it’s possible to run 18.04 with a 5.x kernel, but that’s more effort than I’m willing to put in. Since 19.04 runs fine, I’ll use it.
Install it, boot… and it probably won’t bring up the display properly. This is because there’s ambiguity about the proper GPU to use. Install bbswitch from the command line, and you should get things working properly. Fortunately, this kernel is new enough that you can switch to the command line with the normal keys. There’s plenty of pixels devoted to how to get the framebuffer working properly on this laptop with older kernels that you can entirely ignore!
With 19.04, everything works. Wireless works, the battery reporting works, the Intel GPU “works” (for as much as this era can be called a GPU), bbswitch automatically turns the GPU off for longer battery life, and it properly detects the hardware wireless toggle. It even sleeps and wakes properly (though you have to hit the power button or a keyboard key to wake it - it will sleep when the lid closes, but not wake when the lid opens for some reason)!

Overclocking
If you want to overclock the 1215N in 2019, you can - though I’ve not had great success (50-100MHz isn’t worth the hassle). You could also underclock it, for whatever that gains you (less performance, but probably not better battery life with how much power the chipset draws).
Windows overclocking is well covered, so I won’t cover that in detail. You use the setfsb utility, select the ICS9LPR427AGLF clock generator, and have fun.
On Linux, you’ll need to run a recent version of the lfsb utility, and make some kernel parameter tweaks so you can actually access the clock generator.
Try setting, in your kernel command line, “acpi_enforce_resources=lax clocksource=acpi_pm” - this should allow you to see the SMbus interface for the clock generators.
Run ‘sudo i2cdetect -l’ - and you should see that i2c-0 is a SMBus adapter. If you don’t, make sure you’ve set those kernel parameters above.
Try ‘sudo ./lfsb -f ICS9LPR427’ and go from there if you want to overclock under Linux.
Seriously, though. Don’t bother.
How Does it Work?
With all that done, how does the system actually work? Is it useful?
Within the limitations of the hardware (mostly the rather slow CPU), yes, it is! Don’t expect a modern powerhouse - you’ll be disappointed. But it’s good enough for light use, it’s good enough for some coding (I happily write Arduino code on it), and it’s small enough to use on a plane - with long enough battery life to let me work on a long flight!
The browser situation is a bit interesting on Linux. Chrome is a better browser for most uses, but it just won’t handle video at all. YouTube is a (very slow) slideshow. Meanwhile, Firefox seems a bit slower in general use, but it will handle YouTube properly, and can fullscreen videos (with a bit of tearing, but I don’t care about that enough to bother with it - I ran videos to test, not because I watch videos on this laptop). I can open plenty of tabs, just slowly. For my uses, it’s not worth spending the effort to understand the difference, though I’m sure someone with more time could resolve it.
Compared to my Raspberry Pi desktop, the extra RAM (and radically faster disk) is very noticeable. Compared to my Jetson Nano desktop… well, it’s portable. The Jetson Nano is actually quite a bit faster - both in benchmarks and in subjective feel.
It runs Netbeans just fine, it runs a standard compiler stack just fine, it runs the Arduino IDE, and it makes a halfway nice little writing laptop as well. I’m been playing around with Zettlr, which is quite possibly one of the most resource-intensive text editors I’ve ever met. It looked nice, but it’s an Electron app, which means it runs a browser under the hood, and the CPU use while typing is comically high for a text editor. It looks nice, though!

UI responsiveness isn’t great - there’s a few seconds to load something light from when you click on the icon, but with 8GB of RAM, the good news is that nearly everything loaded from disk once will stay in cache - so it’s not quite as painful as expected.
If I told you it performed like a (well thermally managed) Raspberry Pi 3 with a ton of RAM and really fast disk, you’d get a pretty solid idea of how it feels. Fast? No. Usable? Absolutely!
But here’s the thing: This is a dirt cheap little netbook. I got it for little more than a song and dance, tossed right around $100 of parts into it, and have something quite capable. I wouldn’t use this as a primary machine, but for a light travel machine, or a “toss in the backpack” network troubleshooting box? Totally worth having around!
iPhone Repair: Broken Lens Edition
While I’m repairing old things, I spent a bit of time recently repairing my iPhone 6S - it’s nearly 4 years old now.
Through some obscure mechanism likely related to living on a pile of rocks, the rear lens on my phone broke. I’m not actually sure how it happened, but it appears to have happened during a weekend when I was working with a couple tons of gravel. I’m honestly surprised my phone is as intact as it is - I don’t use a case, because I can’t use it for the Mavic Pro with a case. After a few years, I managed to shatter the rear case lens cover quite completely. The camera still worked, but image quality was poor-to-awful, and the increasing dust infiltration wasn’t helping the image contrast one bit.

In general, the iFixit guide for the iPhone 6 lens repair is a great guide here. The 6S and the 6 are nearly identical internally, and this guide works nicely. Follow that - but I’ll offer a few additional bits of wisdom related to getting the lens out. It’s quite well secured in place.
And a Battery…
If you find yourself opening an older device, spend the couple bucks to replace the battery. I took advantage of Apple’s $29 battery replacement program when it showed up, but whatever they installed wasn’t very good. The cycle count was zero when I got the phone back, but it behaved like an old battery. Capacity was fine (as reported - it felt low to me), but the phone would shut down randomly if it got cool and I tried to do something. I’m not talking about dead of winter - I understand that. But in 45-50F outside temperatures, if I were working and picked my phone up to unlock it, it would shut down (and then offer to nerf performance to keep it from happening again - which I do legitimately appreciate, but a 1 year old battery shouldn’t be having problems).
This time, I went with an iFixit battery. It’s $30 plus shipping, but it comes with an amazingly high quality toolkit. This isn’t the cheap, “one time and stripped” tools you find with a lot of kits. This is flagship iFixit tools - and a lot of them!

Plus, the battery even comes with an iPhone Liberation Kit! That’s a pair of standard Phillips screws to replace the ever-annoying pentalobe screws on the bottom. It’s an amazing deal, and I’m absolutely blown away by how much stuff came in the boxes for $30. I honestly don’t know how they do it. Every time I interact with iFixit, I come away feeling like they promised exactly what I expected - and then radically overdelivered!
Is the new battery any good? It seems to be so far - but, then again, the Apple replacement battery was impressive the first few dozen cycles. I’ll see. I don’t think it can be much worse than what I had.
Apple has done a nice job here with the battery adhesive. They use a stretchy adhesive strip, much like the 3M Command hooks. If you’re careful, the adhesive stretches right out and snaps into a sticky little ball, leaving the battery free to remove. The iFixit kit comes with replacement strips. This is a far better approach to battery adhesive than just gluing the batteries in - prying on lithium batteries is a good way to have a really exciting day, especially with such a long, thin battery.

iPhone Disassembly and Organization
Follow the iFixit guide. If you’ve not been in a recent iPhone, they are an absolute marvel of engineering. I have a few complaints about how hard they are to open, but that’s partly because the newer ones are legitimately waterproof. The 6S isn’t quite waterproof, but it’s significantly water resistant. In the balance of things, a substantially more robust phone that’s a bit more annoying to open is probably the right option.
I feel the same way about laminated display/digitizer combinations. Yes, they’re harder to replace, but they also tend to be harder to break in the first place. Pick your poison.

iPhone screws are tiny. That’s a USB A connection for a size reference!

Keep your stuff organized! Modern devices have so many different varieties of screw that you absolutely have to diagram out the device to get the screws back in the right hole. Putting the wrong screw in a hole tends to break important things, and anyone who works on it later will know you screwed it up. Back when I was working on laptops more frequently, I could tell in minutes if someone else had worked on a machine, because the screws weren’t in the right spots.

Driving Out the Lens
To drive out the rear lens cover, you’ll need some serious force. There’s a metal bracket for the camera that comes out with the lens - but you also don’t want to bend the case.

I used a scrap piece of wood with holes drilled in it (from some project or other - this is a piece of backing scrap I use when drilling plywood), the front part of a pen, and a set of wire crimpers I had laying around. Put the lens over a hole, and start whacking away. You’ll need quite a bit more force than you think - the lens cover doesn’t come out easily.

Eventually, you should break the lens cover free. Notice the ripped metal along the side - it’s somehow welded or soldered to the support inside the phone. You can try to break the other side free if you want.

Or, you can pull the whole contraption out. I wasn’t able to break it free with a reasonable amount of force.

The iFixit lens kit doesn’t come with a replacement camera bracket. You’ll need to find one on eBay. Sadly, they don’t come with the foam. It might be worth trying to reuse this if you’re doing the job - I’m sure the foam helps with something or it wouldn’t be there. My attempts to remove the lens from the bracket just mangled things further.

Putting things back together, you’ll need some superglue. The replacement lens covers don’t secure in place terribly well (they’re just a press fit, not welded to the bracket), so a few tiny drops of superglue should hold it in place. The same goes for the support bracket - even if you reuse the old one, the welds have been broken so you need to secure the pieces in place. Be careful when putting the camera bracket back in that you flip that little grounding strap over. Things like that really do matter in a phone.

Assembly is straightforward. You can either replace the screen adhesive or not - I didn’t, but may go back in at some point and do it, since everything is working. Be very gentle with the connectors or you can damage them. They’re not IDE cables!
The iFixit instructions tell you to do a forced restart of your phone (not a wipe - just a hard reset) after replacing the battery, and it seems to be required. My phone wouldn’t find the cell towers until after I did the hard reset. Power it on, then hold the home button down, and hold the power button until the phone resets. Magically, I found cell towers afterwards!
After my first battery calibration cycle (which took 4 days in low power mode), I checked the capacity with Coconut Battery. That’s 12% more capacity than rated on the iFixit battery - no complaints here so far!

Despite being a bit of a pain, spending some time fixing my phone was definitely cheaper than replacing it. Plus, it’s still supported with iOS 13!
Fix Your Stuff!
I’ve written before about the art of repair and fixing your own stuff. This is just another day of repairing broken things (or restoring old things to a more modern life). It’s a useful way to save money, and it’s a useful way to significantly reduce your energy use. For many devices, the bulk of their energy use is during manufacture. For a recent iPhone, 80% of the lifetime energy use is production. Repairing things takes far, far less energy then replacing them - and that means less money spent as well. With modern phones having sailed past the $1000 mark, yeah, I think spending $30 on a battery and $10 on a new lens is well worth it!

ASUS and Apple have both built very repairable devices here. I’ve got a little netbook from 2010 that supports 8GB of RAM and a modern SSD, and a phone that, while not easy to repair, is relatively straightforward to get parts for. One perk of a commonly used device (or car) is that you can get parts. Nobody ever said, “I can’t find this part for my F150/Civic/Prius.”
On the other hand, finding parts for my Daihatsu Charade? What a nightmare. Anything beyond a very basic part involved taking the old parts to the “old guy” auto parts store, staffed with old, cranky men who had been selling parts far longer than I’d been alive. I’d tell them they weren’t going to find it in the computer, they’d look it up, not find the part, and then go rummage around the back for 20 minutes until they found something that matched. Mostly, it used things broadly compatible with Toyotas.
Fun car, though! I could get an honest 45mpg city if I hypermiled. With a manual steering rack, it didn’t even drive differently when coasting for a mile or so! I was a grad student. This sort of stuff mattered to my wallet.

So, lessons from this week: Fix your hardware, and old stuff still works well enough to be useful!
And if you ever get the urge to build a laptop so thin that you can’t put a normal keyboard in it, and you can’t even replace the (failure prone) keyboard separately from the whole top case? Knock it off. You’re not helping anyone.
Comments
Comments are handled on my Discourse forum - you'll need to create an account there to post comments.If you've found this post useful, insightful, or informative, why not support me on Ko-fi? And if you'd like to be notified of new posts (I post every two weeks), you can follow my blog via email! Of course, if you like RSS, I support that too.


)