

I’m kind of a weird person. I get really, really excited when I get new battery packs in to pull apart.
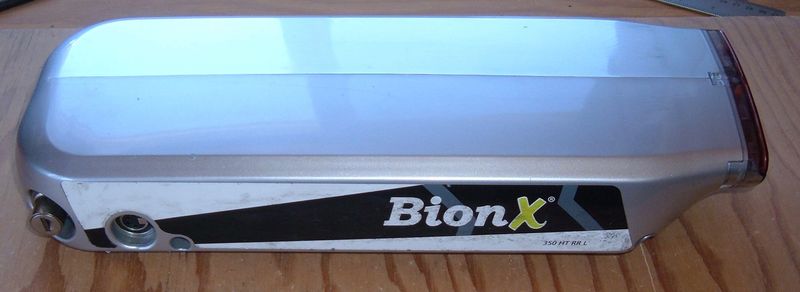
And I’ve got a new pack to tear apart! Today, I’m disassembling a shiny new-to-me 48V BionX 8.8Ah pack! What’s inside? I have no idea, but I’m really excited to find out!

This is the SL 350 HT XL pack - 8.8Ah of fury. This isn’t the biggest pack BionX sells - they’ve got a 11.6Ah 48V pack on the market now, but this is a much more recent pack than most of the ones I see.
Sadly, this is a “warranty bricked” pack. If BionX is replacing a pack under warranty, they just brick the newer packs remotely and ship out a replacement. I get that lithium battery shipping is complicated, but I’m especially annoyed about this policy after pulling the pack apart - and you’ll see why shortly.
So, read on as I dive into this reasonably modern ebike battery!
Labels and Warnings
The outside of the pack has the usual assortment of labels and warnings. I’ve got a fancy “Warranty Void if Removed” sticker (special printed for BionX International Corporation), a label with the pack specs (48V, 8.8Ah, and 423Wh), and what appears to be a bilingual QC PASS sticker. Good to know.

The back of the pack includes the usual warning label. I ranted about RoHS previously when I took apart a 26V BionX battery pack - so if you want to hear why I think it’s a huge load of crap, go read there. Lead-free solder is objectively worse than the stuff with lead in it across a huge range of metrics, and there are so many exceptions to RoHS that it’s basically worthless. You can’t use lead solder (except where you can), but you can have 30 lbs of lead acid battery in a car.
Anyway, I’m going to disassemble it. I might use it with a non-BionX charger on it too. I’m not going to incinerate it unless I really screw up, though.

And this label. Also mocked mercilessly in the 26V pack teardown. I’ve no idea why this is supposed to look like a trash can.

Well, that’s one VOID WARRANTY. I tend to do that to things that are outside warranty. Voiding warranties has served me well in life.

Opening the Pack
Unlike the older generation BionX packs that I’m so familiar with, this pack only has three bolts along the bottom. They’re still 4mm hex heads, though - nothing new there.
With the pack unlocked and the bolts out, things start come apart, then rapidly stop moving. I’ve played with enough BionX packs of various ages that I’ve got a good idea why - adhesive. The newer the pack, the more goop holds it together. However, with the exception of the Trek Valencia Ride+ pack and the Trek Transport+ pack (which are both held together with some nightmarishly sticky black foam), the adhesives are mostly silicone based or similar, and do a great job of keeping the battery in place while not being too awful to open.
So, more force, and, pop! There’s adhesive! On top of a foam pad that’s sticky on both sides. I do sometimes wonder about the engineering that goes into these packs… beautiful electronics, foam pads, and, “Hey, we should put some extra adhesive stuff in. Just kind of squirt it around, it’ll work.”
This pack layout is somewhat different from the older 36V packs I’ve torn apart. The BMS is at the end, instead of under the battery.

And… oh, my! Removable connectors! The older packs are all soldered together. That’s not really a problem, but you can’t easily pull stuff apart without a soldering iron. Look! I’ve removed the charge port power plug without a soldering iron!

The end of the BMS has what look an awful lot like more removable connectors…

With the 4 wire plug on the right removed and the DC input plug on the other end removed, the whole charge connector comes free and that entire case side comes clear of everything!
I can’t explain how much nicer than the older soldered together packs this is. Everything comes loose without a soldering iron! You could replace a single bad part! Oh, never mind, it’s BionX.

BMS Details
This BMS is radically fancier than the older units. First, it’s got plugs for everything. This excites me greatly. Second, it has balance leads, so it can deal with battery chemistries that aren’t self balancing spinel LiMn - which means more energy density with newer battery chemistries!
The big connector pair is for power. The outside plug goes to the 7W2 connector on the outside of the case, and the inside connector goes to the battery. I’m not sure if you can swap them around or not - I wouldn’t, just in case. They’re tight, but come out if you wiggle them a bit.

At the other end is the glorious 20 pin balance cable (presumably doing more than just balancing - I assume the thermal sensor/sensors are connected here as well). It, too, comes out easily.

With the main power connector from the battery and the balance connector removed, the 7W2 connector harness is the only thing still connected to the BMS. One plug for power, one plug for communication. Neat!

With those out of the way, the full BMS is exposed.
On the left side, the lowest connection is for the 7W2 output. Above that, an identical connection goes to the battery pack. The separate connection above the large black connector is the DC input jack, where the ~26V from the charger comes in and gets converted up (why not just use a 48V charger? I have no idea, but I’d guess it relates to voltage limitations for exposed connectors or something).
On the top, the non-power pins for the 7W2 connector plug in.
On the right, the upper connector is for the charge port (touch sensor and LEDs), and the bottom port is for the battery pack as well (presumably voltage and temperature). The other port in the middle is unused - it might be some diagnostic port, though the pack normally interfaces to the world via CanBus over the 7W2 port.
Of note, the whole board has a conformal coating - you can see the somewhat uneven surface in the flash glare at the bottom. This is good - conformal coating a protective layer that keeps water and dust away from board components, and I’m glad BionX is doing this. The very oldest packs I’ve worked with don’t have any sort of coating, but everything newer does. This is better done than some of the boards, as the buzzer isn’t covered - I suspect this is why some BionX packs have a loud beep and others of the same generation have a very quiet beep. In any case, I’m happy to see the coating.

The bottom is more of the same. I’d love to get chip numbers off most of this, but the coating makes it really, really hard to read the chips - so maybe at some point in the future when I have a good microscope.

Into the Battery
Continuing on, it’s time to pull the actual battery apart.
The label is, as usual, quite helpful. This is an official BionX battery pack now, not the BMZ packs they used to use. Well, or it’s a DLG pack. I’ll figure it out in a bit.
This pack is a 13S/4P (4 cells in parallel, 13 of those groups in series) pack, 8.8Ah (which means 2200mAh per cell), with a fully charged voltage of 54.6V (4.2V/cell). Excellent. And I agree with the charging temperature recommendations as well.

DLG and Port Examiner
So, who’s this “DLG” on the pack?
It appears to be DLG Battery (Shanghai) Co., Ltd.
In the land of “Things I didn’t know before” - you can just go look at US Customs data online for imports!
http://portexaminer.com/ lets you do all sorts of interesting searches on shippers and receivers. You can, for instance, search for DLG Power Battery and discover that they supply BionX, Clean Republic (they sell the Hill Topper ebike kit), and K2 Energy Solutions.
One can search by an importer of BionX and discover that they import quite a bit from from Hana Microelectronics and Phase Motion Control.
I’m actually quite surprised how much one can find about relationships with Chinese companies online. In any case, BionX certainly imports a lot from China.
Back to the Battery
Right. The battery. I should stop getting distracted by shiny business relationship searching and go back to the battery teardown that people are actually interested in.
The first thing I noticed about this pack is that the fuse is in the battery wiring - not on the PCB. This is a really good thing. Previously, the pack could dump more or less unlimited energy into the board before it hit the fuse (I’ve seen pictures of the results of this, and it’s not pretty). In the wiring is a better place for a fuse. A 30A fuse on a 48V pack works out to around 1500W, so there’s plenty of spare power, and the fuse seems to be suitably sized for the wiring.

Every generation of BionX pack seems to be better padded and protected, and this is no exception. There’s a layer of double sticky adhesive foam (the left part is slightly thinner where the pack tapers down), and there’s a layer of goop on top of it.

Below that is the normal plastic shrink wrap of the packs. You’ll note that this pack is weirdly shaped, and not the usual rectangular brick of the older designs.

On one end, all the wires come out. They’re nicely protected by a layer of foam and some plastic board.

Balance Lead
The balance lead is the most obvious change from the older packs. Now, the pack can monitor the voltages for everything, and (in theory) have better temperature monitoring as well. You’ll note that some of the wires are two colored - that’s standard when you run out of colors. It’s been a while since I’ve dealt with that (I think the last thing I rewired with multi-color wiring was my old RX-7, for, uh, purposes), but it’s nice that they’re not reusing colors for different things.

What’s really interesting is the blob of shrink wrapped things coming out of the balance connector.

They’re yellow. Hm…

And, once you pull the heat shrink off, you’re left with this.
I’m not 100% certain, but it looks an awful lot like a PTC or polyfuse. This is more or less a solid state self-resetting circuit breaker. Put too much current through it, it blocks the current (mostly) until things cool down. And it’s protecting every single wire here - fancy! This is a nice touch, though it being at the connector side reduces the protection it offers a bit. Were it on the battery side, it would protect more wire against shorts. Still, I haven’t seen this on any other pack I’ve pulled apart.

Around the Edges
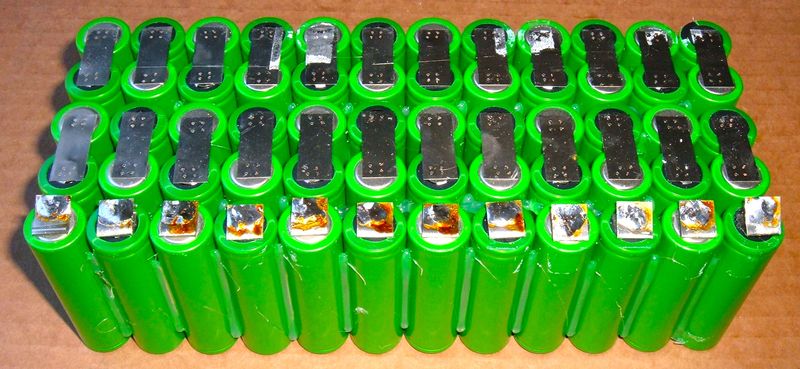
We must go deeper! With the heat shrink removed from the battery, this is what one is left staring at. A somewhat oddly shaped battery bank held together with plastic insulators on the top and what, to my slightly trained eye, appears to be multiple thermal probes in the pack! On the bottom, one sees a rainbow of balance wires snaking around to the various points where they tie in.

Above, I mentioned that I expected 2200mAh cells. The pack delivers! The cells, at least in this pack, are Samsung ICR18650-22P cells. The “22” suffix means a 2200mAh cell in Samsung’s notation.

With some tape out of the way, the top of the pack appears to have four thermal probes going into the pack. I haven’t tested them, but if it’s anything like the older packs, these should be bog standard 10K/25C thermistors. I like the addition of multiple - the BMS can better detect hot spots that might indicate a problem early on. The older packs just had one.

This looks like balance wires to me…
The small wires run to each voltage region of the pack, and allow the BMS to both monitor the per-cell-group voltage, and to balance the pack, charging or discharging each cell group independently to bring all the group voltages to the same level. It’s something one needs with newer battery chemistries. The older LiMn cells BionX used would self balance (quite well, in fact), but that’s not a normal trait for lithium batteries.

One lone balance wire on the other side…

For those curious, the pack voltage (in aggregate) is 46.9V as I received it after sitting for a while. That’s about 3.61V/cell if everything is balanced. Sometimes things are, sometimes you find a horror show at -0.25V/cell. I don’t see any obvious corrosion, though…

The foam end cap comes off to reveal more of the wires and more tape.

The other end is also padded, with a few balance wires going in. This pack is very well mechanically protected from shock and vibration!

Into the Core
It’s time to remove the plastic insulation layer and see how this pack is laid out internally.

The plastic is slightly brittle, and comes off easily enough, revealing the pack guts! The metal layer is the nickel strip that connects the cells together into banks, and then into a full battery pack. The balance wires go into each of these voltage regions to balance the pack.
The layout is certainly interesting, and not what I’d expect. It’s sort of a “cram things in wherever they fit” layout, with plenty of custom cut nickel strip.

The bottom is more of the same, but with temperature probes run through as well.

Exposed!
There are at least 7 different shapes of nickel strip I can count between the top and bottom. Someone likes their custom cut nickel strip.

Here’s a closeup of the strip and the spot welds. Each point is hand welded (there are three welds/6 points per end, but they’re not consistent), and then apparently checked by someone with a marker.
And look at those weird triangle spacers! I’ve never seen those before.

What’s interesting is that the nickel strip, the welding (three hand-blasted spots), and the marker remind me very much of a different pack I tore down - the very first one!
This is the 2011 iZip Ultra battery pack. Same style connectors, same three hand-done welds, and same marker marks. Also, Samsung cells. If it’s not the same company doing the build, there’s a lot of similarity!

Finally, there are those triangle spacers. I’ve never seen them before, but here’s what they are.
They’re spacers for a tightly packed 18650 pack. I have no idea if they serve any other purpose (thermally or electrically), but I guess they’re easier than hot gluing things together.

Technical Notes
If you’re just reading along for fun, you can skip this section. I promise you won’t miss anything. If you’re arms deep in one of these packs, you may find it useful.
Balance wires by voltage region, as well as the measured voltage on my pack. I don’t know why this pack had been marked as failed - the battery voltages look fine to me.
- Negative: Large black
- 1: Brown, 3.60V
- 2: Purple/white, 3.60V
- 3: Orange, 3.60V
- 4: Yellow, 3.60V
- 5: Green, 3.60V
- 6: Blue, 3.60V
- 7: Purple, 3.60V
- 8: Grey, 3.61V
- 9: White, 3.61V
- 10: Grey/White: 3.61V
- 11: Red/White, 3.61V
- 12: Blue/White, 3.61V
- Large red: Positive, 3.61V
Thermistor wiring notes: The “region” refers to which balance wire is feeding that region, or which regions it’s between. See also the teardown pictures.
- Orange/Black and Blue/Black: Thermistor Ground
- Green/Yellow: Grey region thermistor
- Green/Red: Blue region thermistor
- Red/Blue: Yellow-purple/White region thermistor
- Green/white: Blue/white-Purple/White region thermistor
Is this Rebuildable?
Yes - at least the battery pack part. Just not with my current tooling. I’d need a different spot welder with a handheld welding pen, at a minimum. And I really don’t know if the BMS will be happy after changing out the pack - I know it stores a good bit of state, and I don’t know enough about it to have the slightest clue what it would do if it ended up with larger cells. Or even just new cells of the same original capacity.
Do you have one you’d be willing to experiment with? Let me know. I’m interested in trying, but I cannot make any guesses about success at this point. It would have to be a pack that hadn’t been warranty-bricked. I’ll only charge you materials cost for the cells and a welder, and if it doesn’t work after being rebuilt, I’ll give you 50% back. Ideally, you’d be somewhere around the Boise area.
Final Thoughts
I was really excited to see what made up the newer BionX packs. Having seen it, I’m well and truly pissed off at BionX. This is a beautiful, modular, repairable pack - that you can’t repair, because they won’t sell you the parts. Or even sell the certified dealers the parts. You can buy a new pack for $1000, though, if anything fails! They might even offer you a loyalty discount! Twenty whole percent off a brand new pack if one part of your pack fails.
BionX claims they care about “environmental sustainability” - their about page says, “BionX is on a mission to revolutionize the way people move. Our award-winning electric drive systems are answering a growing worldwide demand for alternative transportation solutions that enable environmental sustainability and a higher quality of life.”
Having to throw away an entire pack because one modular component failed and you can’t replace it is a really weird way to implement “environmental sustainability.” And having your customers spending $1000 on a new pack because something failed inside it is a really weird way to implement “higher quality of life.” Higher corporate profits? Sure.
If they intend to treat each pack as a single unit to be thrown away when worn out, why bother with modular connectors? They’re a complete waste of money if the pack will never be repaired. Solder is perfectly good, and the older packs are built like that.
If you do put in nice modular connectors such that you can literally replace each component as a unit, and go to the distance of protecting the balance leads from shorts - why refuse to sell components? I get not selling them to end users, but a bike shop with a tiny bit of training should be able to replace these cells, or the board, or a bad charge connector. I know that a 52 cell pack can be had for less than $1000, because I do this in small volumes, and I charge a lot less.
I suspect the 11.6Ah version of this pack is simply the same thing with 2900mAh cells (2.9 x 4 = 11.6). So, in theory, one could swap the packs around. I have no idea what the BMS would do about this, though.
It just frustrates me that BionX users are left out in the cold if something fails. It’s not environmentally friendly to trash an entire battery system because one part failed, it’s utterly consumer hostile to build a repairable system and then refuse to let it be repaired, and it’s a waste of some very, very nice engineering.
But that’s how BionX has operated from day 1. Their first I2C packs are utterly abandoned, and while the cells can be replaced, if your BMS dies (which happens), you’re up a creek. There are literally no replacements available short of salvaging other systems - and good luck finding those.
Buy accordingly, I guess. They still make great systems to ride, but you’re more or less at their mercy when anything fails, and as you can’t just buy a replacement part, you have to buy a whole new replacement battery pack.
If you do have a working-but-weak 48V pack you’re willing to let me experiment on, I’m interested! Get in touch with me with the contact form on the right.
Comments
Comments are handled on my Discourse forum - you'll need to create an account there to post comments.If you've found this post useful, insightful, or informative, why not support me on Ko-fi? And if you'd like to be notified of new posts (I post every two weeks), you can follow my blog via email! Of course, if you like RSS, I support that too.


