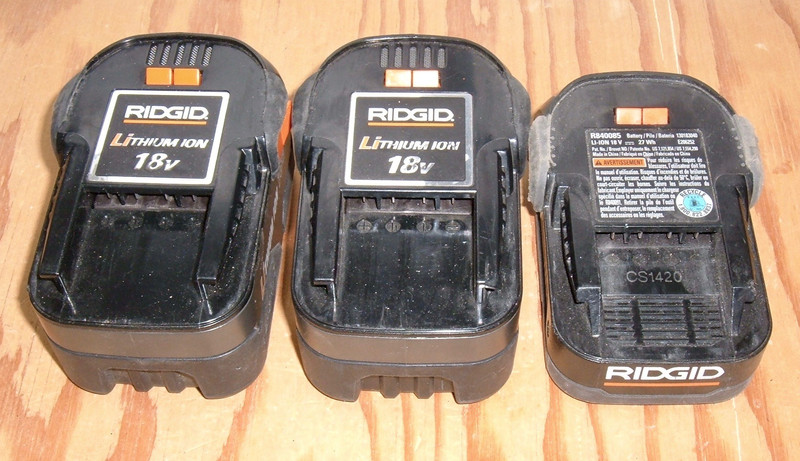

This week, I’m continuing my tool pack teardowns with a pair of Rigid 18V Lithium Ion packs out of Canada - and, in one of them, 18650s produced in Canada!

These are older lithium packs (one is very definitely the oldest I’ve seen), the capacity numbers aren’t that great, but they’re interesting samples, good fun to pull apart, and have some surprises inside!
Read on to see what I’ve found!
Why Tool Packs?
I’ll continue posting about tool packs for the next few weeks. My office has slowly been accumulating a pile of dead packs in a corner (almost entirely for tools I don’t own), and I’m tired of them taking up so much space.
My purpose is mostly documentation and exploration - I’m not going to be rebuilding any of these, even ones that I potentially could, simply because I don’t need them. But, before they get recycled, I’d like to document them well for the reference of the rest of the internet (and, well, because I like taking things apart).
To give you an idea as to what’s coming, here’s my current pile of tool packs. Some of them are NiCd, some are lithium, there are some duplicates, and quite a variety of different tool-side connections.

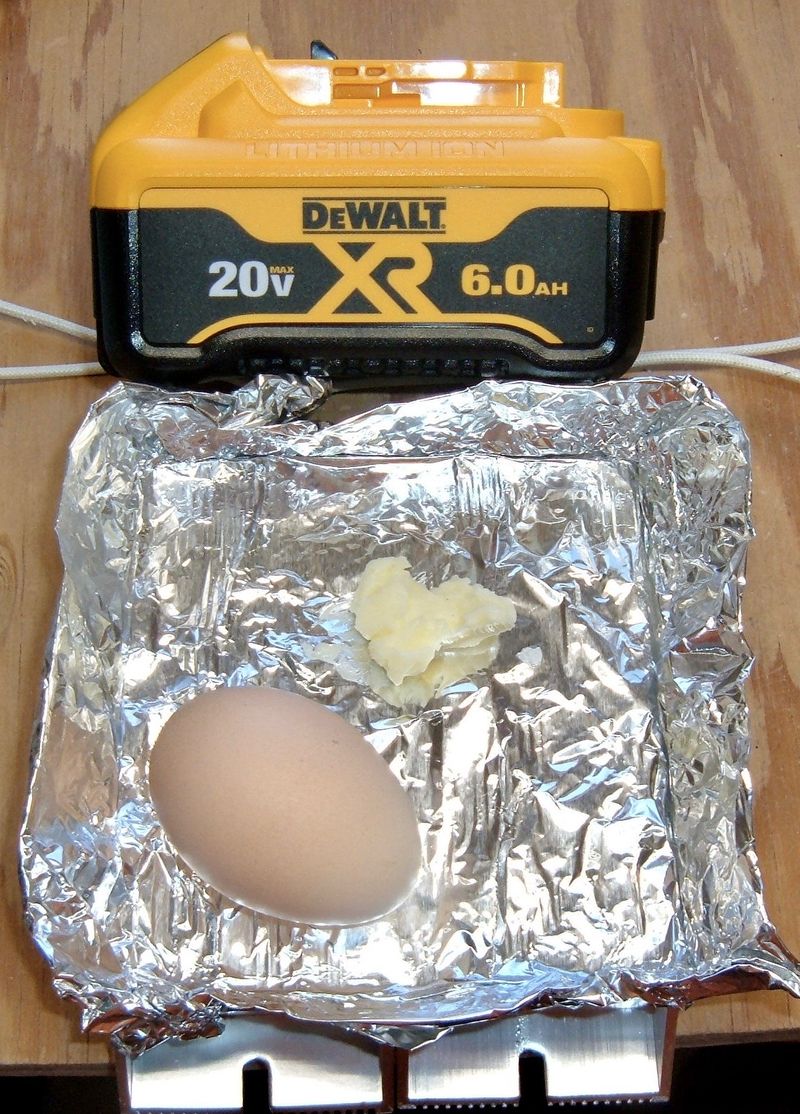
Previously on this blog, I’ve torn apart a DeWalt 20V Max 3.0Ah battery, a brand new DeWalt 20V Max 6.0Ah battery, and proved that you can fry an egg with the 6.0Ah battery.
The Rigid Lithium Ion 18V Battery
My first subject today is the “large” Rigid lithium ion battery. This is a really old design, and represents the first generation of lithium ion tool batteries.
This pack weighs in at 718g (1lb, 9.2oz). A pair of buttons need to be pressed to remove it from the tool (they control their respective side of the split latch).

The terminals are on the top, and consist of +, T1, T2, and -. I spent some time trying to work out the details of how these work and I have no clue. On this pack, at least, the battery is stone dead (so they won’t work at all).

The underside informs me that this is a R84008 18.0V LI-ION battery (that should be recycled, which I will do after I’m done). There’s no warning about disassembly, for once!

Going Inside
This battery is held together with Torx T10 Security Screws (note the post in the center that prevents you from using a regular Torx bit on them). ”Security” screws like this are almost entirely pointless - the vast majority of people have no interest in getting inside a battery, so aren’t a problem, and anyone who actually wants in will have a good set of security drivers anyway.

With the (pointless) security screws removed, the top comes off to reveal what is quite the massive battery management PCB! On the right are the output control transistors (the heatsinking on them is substantial, and the huge traces on the PCB make it obvious what they’re for). In the center are the terminals, and on the left are the control electronics.
The board is has a nice conformal coating on it (a protective layer that helps keep water and dust out of the electronics), which I like to see - but it tends to make reading part numbers somewhere between difficult and impossible, so I have no idea what the control IC is.
On the top left and lower right, the main battery connections come into the board. They look hand soldered to me. The other solder points along the edge are for balancing - this is a proper balancing BMS, which is good to see.

The hole in the board is for the 1N5406 diode - why it requires a hole in the board is slightly beyond me, but there it is.
A quick test of the main battery pins indicates that the pack is entirely stone dead - 0V across the whole pack. There’s no way to safely recharge a lithium cell that has been deeply drained. But it does make the further disassembly a bit safer.

The whole BMS and cells assembly just pulls out of the bottom case. It’s a tight fit, especially with foam degraded by age (quite sticky), but there’s nothing else holding it in. Just pull! Or pry carefully with non-metallic tools.

The cells are not in good condition. I don’t understand why fully discharged lithium cells corrode like this, but they do - quite consistently. I’ve seen it before. I think it may involve being driven slightly reversed as the pack dies unequally, but it’s one of those things I just don’t understand. On this pack, it’s possible that the foam trapped some water as well and contributed.

The interconnects are a pretty standard “H” style for dual row tool packs. The cell layout is standard enough - 2P5S. This means that there are two cells in parallel, and five of those parallel groups in series. Five lithium cells in series is how all the 18V or “20V” packs are built these days. With normal cells, nominal voltage is 18.5V, with a fully charged voltage of 21V (or slight less if the cells aren’t charged all the way for longevity, as DeWalt does).

The remainder of the case bottom has the blue padding foam on the side and a nice rubber cell holder on the bottom. Something like this is a really good idea for tool packs - tool packs see a really rough life and get dropped and beat around quite a bit. Having the extra bit of padding helps keep shocks from damaging the cells. Damaged lithium cells are not something you want to be around when they decide to let go!

The big metal plate on the front of the BMS/cell assembly is the heatsink for the output transistors. This is shielded (slightly) from the battery by the plastic wall in the lower pack case (on the left). The bottom of that well has some small vents, and the top of the case has a vent as well (visible in the lower right). I have no idea how much heat these transistors make in operation, but it’s enough to justify a good sized heatsink and venting - so, likely, a good bit.

The Cells
The cells are Moli IMR-18650E cells - Made in Canada! These are 1400mAh cells rated for 20A - not amazing, but certainly not bad for the age. The IMR prefix means that these are lithium manganese oxide cathodes, which is a solid choice for power focused cells. I enjoy that these are old enough that the label indicates which end is the positive and negative terminals - that’s not a thing on newer cells. It’s assumed people know which end is which.
With these cells, I’d rate the pack at about 52Wh - which is a pretty good rating for a tool pack!
I found a reference for the date code on these cells, which, if believed, indicates the cells were built on the 89th day of 2008 - so March 29, 2008 (leap year). That puts these cells at 9 years old. I would be interested to see how the capacity held up, but I won’t charge stone dead cells. The uneven metal layer under the wrapper indicates corrosion.

BMS Underside
Finally, I removed the BMS and took a look underneath. Just that huge diode, some solder connections for the main terminals, and a something covered in pink (which usually means a thermal pad).

The mystery component is a UP7 motor protector - this seems to be a resistive thermal fuse set for 70C. It’s certainly an odd approach for thermal protection, but it seems like a passive component that could be easily integrated in a mostly analog BMS (as this is).

That’s it for this large 18V pack - time to dive into the smaller and slightly newer one!
The Rigid 18V Hyper Lithium Ion Battery
Next, I have what seems to be a battery pack that is a generation or two newer, but for the same tools.
This is a 470g (1 lb 0.6oz) pack - only 65% the weight of the previous pack, but also a lot less capacity.

I’m not sure what makes this “Hyper” as compared to the previous one - obviously some marketing got involved in the process. The logo is kind of cool - a bit of a callout to the periodic table.

This pack (model R840085) is rated at 27Wh. For a 3.7v nominal voltage, this implies 1460mAh per cell - probably meaning 1500mAh. Physically, there can only be a single row of cells in here.
On this pack, the terminals have some voltage. I see a brief spike of about 17V initially, then the terminal voltage drops to 10.8V across the terminals. It doesn’t look like a direct connection, and if the previous BMS is any guide, there’s some way to handshake with the pack to turn the output on. Not having a matching tool, I have no idea what this handshake looks like.

The underside adds the “Do Not Open” warning that I’m going to ignore. It also comes with a handy guide to charging temperatures - which I agree with. Charging lithium batteries below freezing is a good way to get the permanent capacity loss of lithium plating.

Finally, this pack adds a battery capacity gauge! It shows nothing, which doesn’t surprise me at all.

Diving In
This pack unscrews from the sides with the normal T10 Torx security screws I think are silly. With all the screws removed, the top comes off (just like the previous pack), exposing what is clearly a newer version of the BMS board. Fancy! The board is still mostly analog components, but keeps the pair of power transistors on the right side to switch main power.
Amazingly, this particular pack isn’t stone dead! The cell bank reads 12.8V across the whole set of cells - so about 2.5V/cell. That’s very low and they have no useful energy left, but they’re still safe to charge and use at that voltage.

I don’t know what date this pack was built, but the board has a Dec 30, 2010 date below the main terminal block. Hopefully the engineers weren’t working through Christmas for this…
Like the previous pack, this board is also covered with a conformal coating. There’s just no reason not to use one for anything that will live outside at any point.

Instead of the curved sheet of metal the previous pack used for a heatsink, this pack uses what looks like a proper finned heatsink for the transistors.
In general, this board looks a lot nicer. The large pack BMS was a rough around the edges looking board, and this is refined. This is just one of those things that happens as companies develop revisions of products - the boards look nicer.

The two sides just pull free to expose the cells - the cells fit neatly into the bottom of the pack instead of being a removable brick that can come out. I have no complaints about the protection of the cells here - they’re well protected from shock and movement by the case and the rubber bumpers around the end.
That blue… if I had to guess, these are Samsung cells! They’re the only manufacturer I’ve seen using that particular shade of blue. Unfortunately, with the cells fully covered by the case, I’ll have to be a bit more destructive to find out what they are.
As expected, this is a 1P5S arrangement - just 5 cells in series. If you look at the leftmost interconnect, you can see the thin metal segments that are designed to operate as a fuse if there’s some sort of short circuit.

The Cells
A bit of interconnect snipping and the cells pop out. As I suspected, these are Samsung cells. INR18650-15Ms, to be specific.
This is a 1500mAh power cell rated at 23A, and INR is better known as NMC - nickel manganese cobalt.
Unfortunately, there’s no date code - it should be printed below the SDIEM, and it’s not there (nor is it on the actual can), so I don’t know how old these cells are. They’re visually in excellent shape, though! It’s a bit weird pulling out cells that aren’t a corroded horror show.

BMS Details
The BMS on this pack has moved to a more normal thermistor - something that looks like a 10k/25C thermistor that is the standard for temperature monitoring now.

The back of the board looks much the same as the previous board. There’s that one funky diode on the back. Interestingly, the switching transistor solder connections show some signs of heat stress. They’ve definitely gotten warm in use. I can’t say much about the heatsink beyond, “Yup. That’s a heatsink.” It looks like cheap pot metal.

I tried to power the board on via the main battery terminals to see if the charge meter would work, but all it did was blink all the LEDs at me a few times then go dark. I didn’t have anything on the individual cell connections, so presumably it decided that all the cells had gone bad or something like that.

Testing the Cells
Since the cells were still in good shape voltage-wise, I decided to test a pair of them. I don’t know how old they are, but they are somewhere between 0 and 7 years old, with an unknown number of cycles.
I removed the spot welded terminals and tossed them in my Xtar VP2 to charge. I love this little charger - it’s my “office charger,” since it handles 4.35V cells as well as 4.2V and 3.6V (LiFePO4) cells. I’ve got a four-bay Xtar VC4 for the house - that one handles NiMH as well as lithium, so it’s useful for charging the endless stream of AAs and AAAs that a house with a small child goes through (though I think the keyboards and trackpads go through more than she does).

A bit of testing later on my ZB206+, and I’m impressed! One of the two I tested came out to 1458mAh, and the other to 1466mAh. Not bad at all, and that either means these cells have basically no cycles on them, the pack is reasonably new, or both. I was expecting much worse. In any case, I’ll probably keep these cells around for random use.
Syonyk Sells Cells
Finally, I’d like to take this opportunity to show you my fancy new line of 18650 batteries. No longer do you need to be held back by crappy “9000mAh” cells on eBay that only last half an hour in your vape, and won’t even light up the night till dawn in your blazing LED ravelights.
I’m introducing the XTREEM XP VAP-R 20000 SUPRFYRE cells! These cells imply that they’ve got a whopping 20,000mAh of capacity without ever actually stating it. They’ve got a fancy name that’s missing some letters - and a funky spelling of “Fire.” How could you not want one of these?

They even come with “tester marks.” These marks on the ends of cells indicate that they were heavily tested in high quality equipment before being released for sale to discerning XTREEM XP buyers - you can’t test a high amperage cell without some marks! Speaking of amperage, how much do you want to draw? These will do it. 30A? 50A? 100A? Whatever it is you want to draw, go for it! It usually won’t blow up. Amperage ratings are for conservative companies that don’t understand the needs of modern vapers!

“But wait!” you say. ”How can I possibly roll dank smoke clouds in my sub-ohm mechanical mod to blow dragons with only a mere 20,000mAh of implied capacity?”
Fear not! For a mere $0.37 per cell extra, you can get the XTREEM XP VAPE-R 300000 MEGAFYRE cell! It’s 10,000 more!

Don’t Buy Junk
If you didn’t catch on to the parody above, I have a drawer full of 18650 wrappers and a Sharpie - so I figured I could make my own line of rubbish. A depressingly large number of rebadged cells (so “Anything but Panasonic, Sanyo, Sony, LG, or Samsung” at this point) are literally recycled junk from tool packs, laptops, whatever they can find. You have no idea what you’re getting, and it won’t be consistent from batch to batch. The usual solution to the weld marks is a fake bottom.
ANY 18650 claiming more than about 3600mAh (in 2017) is lying. There are no 5000, 6000, 9000mAh 18650s - they don’t exist. Period. Why waste the money? Buy from a legitimate seller of proper OEM cells. That probably means “Not eBay” and “Not Amazon.” Fakes abound.
Final Thoughts
It’s amazing how far we’ve come in just a decade of battery development.
The 18V Rigid pack from 2008 has 52Wh of energy in 718g. The DeWalt 20V Max 6.0Ah pack has 111Wh in 854g. That’s an 80% energy density jump from 72Wh/kg to 130Wh/kg in 8 years - and that’s not the bare cells. That’s a full pack!
But as far as these particular packs go? They’re useful for the designed tools, and that’s about it. The BMS serves to keep you from doing anything interesting with them unless you learn how to properly tickle it, and I don’t know how to do it. So, if you want to power an ebike or a camp stove, stick to the DeWalt packs.
Comments
Comments are handled on my Discourse forum - you'll need to create an account there to post comments.If you've found this post useful, insightful, or informative, why not support me on Ko-fi? And if you'd like to be notified of new posts (I post every two weeks), you can follow my blog via email! Of course, if you like RSS, I support that too.


