
You know what I always need? More ~cowbell~ shelves! This week, I’m adding shelves to the back of my shipping container - because the back of a shipping container is a good spot for shelves, and I’ve not been making very good use of the vertical space in the shipping container. I’ve got a high top container (9.5’ high), and I’ve been mostly using the floor for storage space, which is quite silly. So I’ve added shelves! This is a fairly simple build that should work for any more or less normal shipping container - it’s completely free standing, just wedged into the corrugations of the container.

How do you build such a thing? Keep reading to find out!
Shipping Containers for Storage
Regular readers of this blog may recognize that I’ve joked about my illegal shipping container before - though it is, finally, legal. I have a floor plan on file with the local building department and everything (hand drawn on a sheet of paper, because, seriously, it’s a shipping container).
Why do I have a shipping container? They make good storage units, good workshops (if a bit loud - sounds echo inside), and are weather protected storage that’s an awful lot cheaper than a wooden shed, if a bit harder to access (they’re long and skinny, without multiple doors unless you cut them). Ours makes the south wall of the carport area, joining our garden shed on the east. I’ve been using it as a bit of a woodshop for most of the projects, and quite a bit as a paint booth (it works very well for heating up and baking the paint in the summer, though I have to air it out afterwards).
However, I’ve been mostly keeping stuff on the floor, which is no good. There’s not that much floor space (enough to require a permit, though), and there’s a lot of vertical space I should make use of - so I did!
Shelves!
This whole project was an “afternoon build” - I took more of the day doing it, but it’s about 4 hours solo, probably less than 2 hours if someone else is around to help out. My wife and kids were in town, and I was babysitting the Roomba as well, so I got to be creative. It took me a bit longer as I was documenting the process - that adds a lot of time to my builds.
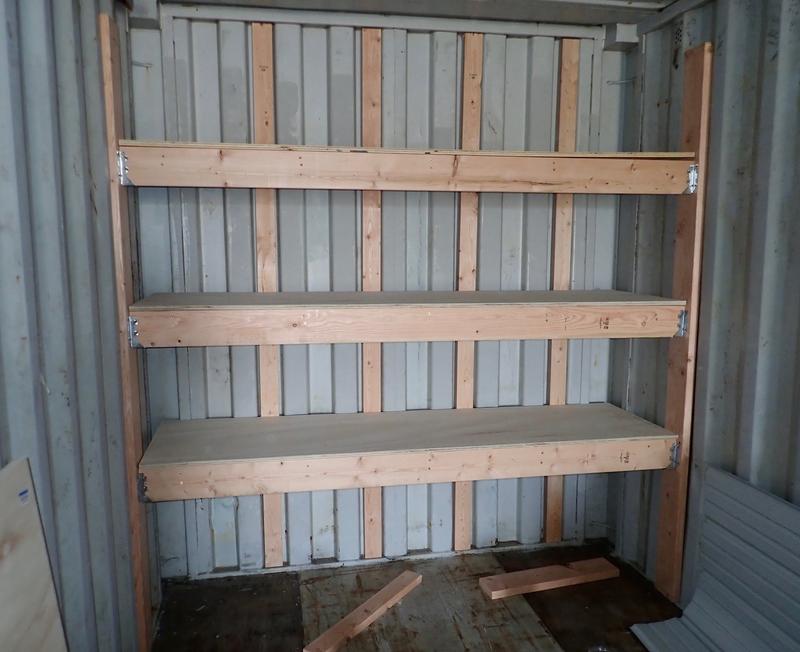
Here’s the canvas: The far end of a shipping container. A blank wall, slightly less than 8’ wide, about 9’ tall. Corrugated on both the end and the sides, though with a different pattern. Ready for shelves!

I considered anchoring the shelves to the container walls, but that requires putting holes in the walls (or adhesive), both of which are a bit more permanent than I’m really looking for. Plus, with the right design, these corrugations are more than enough to hold things in place!
If you look at the base, there’s a metal edge the corrugations are welded to. My design puts the wood on these metal edges, instead of the wood flooring in the container. It’s a stronger base. Wood is quite strong in compression. The 2x6s are good for around 1000 lbs each, the 2x4s should be good for at least 500 lbs per. Combined, the shelving system should be able to support about 2 tons, though I’m not likely to get anywhere near that weight on it. I put heavy things down low, light things up high, and I’d be surprised if I ever see over 1000-1500 lbs, total, on this shelving system. I’d build it stronger if I were putting engines on it.

You can see the basic layout here, with the supports laying against their respective walls. The rear consists of 4x 2x4s, in the grooves. These will be pulled forward to the rear cross members. Why are they not symmetrical? If you look at the bottom of the lower left groove, there’s a dent - so I couldn’t fit a 2x4 in there. The whole thing should still work, though the rear left corner will be slightly weaker than the rear right corner. On the sides, a pair of 2x6s fit into the openings tightly and provide front support via joist hangers.
It’s similar to my shed shelves, but doesn’t have the wall structure I can secure to like I did on those.

If you have a standard size shipping container, you might find that 91” works perfectly for the front crossmembers. I used 92” across the rear, 91” on the front, and 20.5” front-to-rear supports, if I recall properly. You should measure before using these, but somewhere around there will get you started. This works with 2’ deep shelves (I cut mine to 90 3/4” wide), and provides good support across the whole shelf.
I’m using a 2x6 across the front for strength, but using 2x4s for the rest of the shelf frames. In the rear, the crossmember will be screwed into several uprights, so it doesn’t need to be quite as strong.
Like most of my projects, figuring out how to do the work solo was half the challenge - it’s not worth calling in a favor for a project like this, though it would have been far faster with two people.

I recently purchased a good miter saw and stand - which makes things like cutting the front-to-rear pieces go incredibly fast! Set the end guard to the desired length, and just hack up 2x4s until you have enough pieces! I’ve cut the rear supports as well as the crossmembers, and it was properly quick. I’ve heard people say that once you buy a good miter saw, you’ll basically stop using a circular saw, and I understand completely now. I’ll still use a circular saw for ripping plywood, but for cutting dimensional lumber? Nope. I’m done! I have something far better now.

Using a similar design to the shed shelves, I built the rear of the frames on the ground. The long 2x4 goes across the rear, and the crossmembers will be screwed into the 2x6 at the front. I could have put the 2x6 on as well, but it would be harder to wrangle the whole contraption, and wouldn’t really gain me anything but frustration. All the joints are secured with a pair of ~3” screws (I think 3 1/8” is what I had laying around, so I used those).

I screwed the partial shelf frame to the rear uprights, leveled it, and finished securing it across the back (while propping it up with some scrap). Then, I wedged the front 2x6 in, leveled the shelf front to rear, and popped the joist hangers in on either side. Finally, screw the cross members in flush with the top of the 2x6, and a shelf support is done!
There are plenty of ways to do this, but this is mine. The shelves are level, even if the shipping container isn’t perfectly level - so if things look just a tiny bit angled, that would be why. It’s not a big deal for what I store, but I’ll probably jack the container up and level it at some point this year.

Getting the first shelf in was the hardest part, because I had all the side lumber flopping around. With that shelf in place, everything stopped moving, so the remaining two went easily. The top one was a bit of a trick to get in place, because I had to climb between the other two shelves to reach some of the screws.
Spacing-wise, I’ve got shelves at the 2.5’, 4.5’, and 6.5’ mark. I considered going higher, but I wasn’t convinced that I wanted to work with a 7’ top shelf - it’s high enough to work with as-is, and I like leaving large amounts of space for bulky, lightweight boxes up high. Heavy stuff goes on the bottom, and the rest of the shelves support an awful lot. Since I have the 2x6 in front, the two lower shelves only have about an 18” opening for boxes, but large stuff can go on top or on the bottom without any trouble.
Even though the shelves aren’t actually anchored to the container at all, the whole unit doesn’t budge. The front uprights are pressed firmly (not overly hard, but… firmly enough) into the side walls of the container, and the rear uprights aren’t going anywhere either. It’s solid, which was the entire point!

At some point, I really should invest in an air nailer. I still use structural screws instead. They’re strong enough for my purposes, and a DeWalt impact driver makes short work of putting them in place. The screws are quite a bit more expensive than nails, though.
Again, my realistic load is no more than a couple hundred pounds per shelf - maybe 500-700 lbs, tops, for short periods of time, but heavy stuff goes on the floor. I’m confident this will hold up.

Another view of the completed framing. You’ll definitely want to use a level for a build like this - it makes things far easier. However, it also means that what you’re building is level to the earth, not your container. You could use the level for front to rear work and use a tape measure for the side to side height, if you wanted something level to the container floor.

I finished with some plywood shelves. Regular readers may note, with horror, that these are not urethaned. I assure you, I’m quite healthy, and have not lost my mind. It’s simply too cold outside to apply urethane, and while my wife is OK with small painting projects in the house, hauling a few sheets of plywood in for a few days to cover them in urethane is not a reasonable request.
You may notice the top shelf is slightly warped up - this is because I haven’t screwed them down. I do intend to urethane them, just sometime in the spring when it warms up. At some point, I’ll probably buy a kerosene/diesel torpedo heater, but they’re expensive, and I just don’t have enough times one would be useful to justify it. Perhaps when I get greenhouses, one will make sense as backup winter heat. I’ve finally found a place that sells both off-road diesel and kerosene (in a pump, not 5 gallon buckets for $8/gal).
But, that’s it - a quick, simple set of shelves that fits nicely in a shipping container!
A Tidier Space
With some boxes up on the shelves, some stuff moved back, and things organized, I can actually see the floor in here again!
The row of boxes on the left is my recycling center. I haul my own trash in a trailer I built from parts laying around, but the less I put in there, the less frequently I have to haul it - and the less I spend on trash. Plus, no point in throwing out something that can be recycled, right? Late last year, I finally found a recycling center that takes most forms of recycling (except glass). It’s near enough to Home Depot that runs there are functionally free if I haul recycling on a trip I’d make anyway, but they have stuff sorted into quite a few categories, so I have a large number of sorting bins. I’m not to zero waste yet, but I’m getting closer.
On the right, in the rear, you can see my lumber yard. On the left, some large sheets of plywood, foamboard, pegboard, etc. And, not pictured, I’ve got a selection of small plywood scraps inside the door. I save all of this for small (and increasingly mid-sized) projects - I frequently find things that require a bit of wood, and having the materials around saves me a trip into town. I’m finally building up enough spare stuff that I can do quite a few projects without dedicated materials trips, and that saves me both time and money - my truck isn’t cheap to run, and I’ve not found a good way to haul 10’ lumber in a Volt. A lumber run is typically a minimum of 2 hours, between driving and shopping, so it saves quite a bit of time to have materials on hand.

One example of this type of “spare parts project” is another shelf in the garden shed. I realized another shelf would be handy for keeping large screw containers where I could easily see them, so I built one from scrap laying around and a few L braces I had (I tend to buy extras of things like that, because they’re always useful). So, a sheet of plywood, a bit of blocking for the side mounts, and I’ve improved my storage space by a slight bit. What I’ve concluded is that I can stop buying 2.5” screws for a while…

Final Thoughts: Build Shelves!
Shelves are awesome. I now have more of them, which makes things ever so slightly more awesome.
I like simple builds like this - straightforward, fairly quick, and concretely useful.
At some point, I’ll be playing with some shelves that hang along the side. There are hooks in the top corners I can anchor them to, and they’ll add yet more out of the way storage space for useful things - those will probably be 6.5-7’ high as well, to leave all the space below them useful.
Comments
Comments are handled on my Discourse forum - you'll need to create an account there to post comments.If you've found this post useful, insightful, or informative, why not support me on Ko-fi? And if you'd like to be notified of new posts (I post every two weeks), you can follow my blog via email! Of course, if you like RSS, I support that too.


