
Winter is here - and that means an excuse for more shed insulation! I’ve added under-floor foam insulation as well as a nice set of window plugs this winter!

If you’re not familiar with my office, I took a Tuff-Shed and insulated it fairly well. I’ve got rock wool in the walls and ceiling, plus a complete (and gap taped) layer of 2” foamboard inside that. Then my walls. It’s well insulated - on top, and in the walls. But the floor is totally un-insulated (because the shed was delivered whole), and my windows aren’t particularly well insulated either - they’re double pane windows, which is awesome, but a vinyl framed double pane window is very, very poorly insulated compared to the ~R23 of my walls and ~R30 of my roof.
So, being me, I set out to solve these problems and document how the solutions work - as well as some potential gotchas.
Under the floor is tricky - I only had some small access holes. I went with a local foam insulation provider to blow foam in. The window gaps are easier - I can just build myself some nicely insulated plugs.
So, read on to see what I did, and how it’s been working!
Under-Floor Insulation
I bought my shed for a rather nice discount - because it was an already assembled demo unit. It showed up on a truck and was dropped off, quite skillfully, on my foundation. Unfortunately, this left me no opportunity to insulate under it. I didn’t have a chance to put anything under there, and I didn’t particularly want to jack one side up and shove rock wool or something under there to get wet and rot out my plywood floors from below. So, I ran last winter with no insulation under the floor.
There are downsides to a shed with no insulation under it - especially one that I work in all winter. The most obvious downside (which I hope to resolve) is that the floor is cold. Even with the inside warmed up, the floor was exposed to the chilled outside air, and the temperature near the ground was often 30F lower than the rest of the shed. This is hard on feet in the winter - I spent much of last winter wearing heavy insulated camping socks out there. I’d rather not do that if I don’t have to. The other problem, which became more obvious while preparing for this insulation work, is that there were an increasing number of critters nesting under my shed. We chased out a few mice or voles, and I’m pretty sure there were some bees or wasps particularly interested in under my shed for the winter.
While there’s no easy way to shove insulation under my shed, I do have some small access ports - the end framing has these holes that correspond with each gap between the studs under there. So, if I can find something to inject in there, I’d be golden.

Obviously, the answer is some sort of foam insulation that can be squirted in - but a lot of the DIY foams don’t have a particularly long reach (so they couldn’t reach the center), and they tend to be closed cell foams that generate a lot of pressure while curing. Lots of pressure is no good for me either - too much pressure and my plywood floors come up. That’s an awful lot of work to fix, so I didn’t want to go that route.
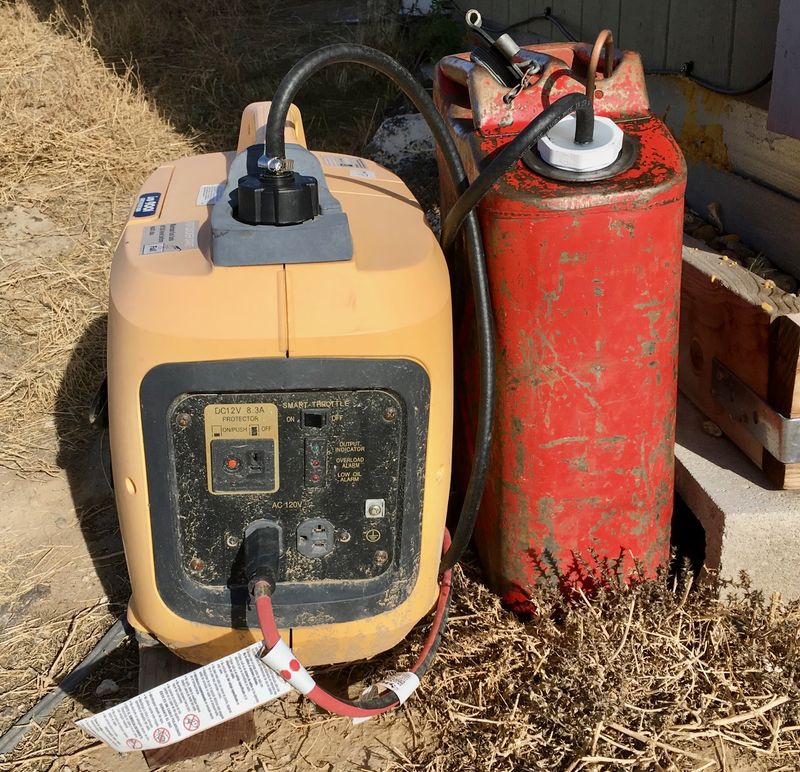
After calling around, I talked with a local foam insulation contractor. They specialize in spray foam insulation, and the owner assured me that some of their products worked wonderfully for sheds like this - it’s an open cell foam that expands quickly but has a very low curing pressure, so it won’t pop my floors out. A bit of scheduling later, and they showed up with their fancy foam insulation truck!
This looks like a box truck with a door in the side, but when they light the (very large) generator up, it’s obvious that there’s more to it. A massive diesel generator in the front part of the box powers a large air compressor and a few pumps that provide an awful lot of heat and pressure to the injection system.

A long distance from the truck is no problem - they have more than enough hose to snake through multi-story houses from the driveway, so there’s plenty of hose coiled up.

I went with a local company, as I try to for many things (as opposed to a national company). I’d just rather keep my money local, and my views on the likely long term future of the nation suggest that developing local and regional businesses is a good bet.
The foam injection gun is a super steampunk looking contraption. A bunch of hoses lead in, it’s got a handle with a massive trigger, and a tiny little jet on the end. And it’s covered in gunk. If it had more brass and were covered in grease, it would totally fit in any sort of steam driven fantasy world!

For this project, the foam used is an open cell foam. The closed cell stuff insulates better, but has a much higher curing pressure, and everyone involved was concerned about ripping the plywood out of the floor of my shed. I might have considered it if I did this when the shed was freshly installed and it would be easy to replace the plywood, but not at this point. So, the foam is an open cell foam that doesn’t offer quite the same R value, but it does offer plenty of keeping the wind from whistling through under my office.

The testing process for setting the mixture is interesting - a garbage can with a bag in it. Watching the foam get sprayed through is fascinating - it’s a thin jet of foam that hits, waits a few seconds, and then suddenly, pfhoomp. It’s fully expanded. It’s not the gradual expansion you get with the cans of foam from Home Depot. This is totally different, and entirely bizarre to watch. But, that’s how it works, and it’s really cool!

Given the small size of my office, foam injection went quickly. For the most part, the installers were able to squirt it from one side all the way across to the other (12’) without too much hassle. It involves a sweeping motion to get the foam injected everywhere, and then there was a bit of touchup from the other side if needed.
My floor joists run longwise (so about 2’ x 12’ openings). The newer versions of this shed seem to have joists run the other way, so 2’ x 8’ openings. That would be even easier to foam, if you’re doing this now! Or, if you can ask your builder, they can probably set the joists up that way for easier foaming.

A bit of mess later, and a few foam covered voles hauling tail out the other end, my shed is now insulated underneath. The foam eventually yellows in the sun, but this doesn’t mean anything for the foam buried deep under my floors.
Which, I’d add, did not pop up. So, success! At least in terms of foaming under the floor. How big a difference does this make? I’ll let you know in spring, but so far, it seems to make a noticeable difference in how easy the office is to heat. The true test will be when it’s -10F with 20kt winds, but I can’t easily induce that to test with. The floor is still cooler, but not as bad as last winter - and it’s a lot easier to move air around to reduce the temperature delta.

Eyebrow Window Plugs & Cutting Foamboard
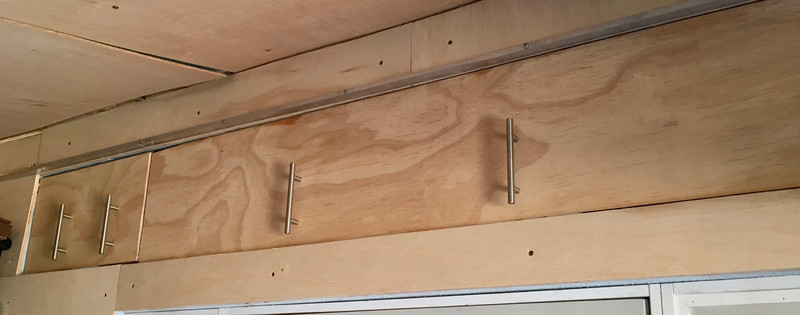
One problem with my office, facing south, is that the upper “eyebrow windows” let an awful lot of sun through when it’s low in the sky. This is great for solar gain, but, unfortunately, this mostly means the sun is shining on my monitors and blinding me. Last winter, I covered these windows with a bunch of cardboard (you can see some in the photo), and that worked. This winter, I set out to insulate them a lot better, because there’s no point in having poorly insulated windows when I’m blocking the light anyway.
Or so I thought. Turns out, you can insulate them too well. We’ll get there in a bit, though. If you’re curious, that’s my 2005 Ural in front of my office. Great fun to ride through the winter, and you get full “You rode a motorcycle in this????” credit, even with a sidecar, 2WD, and somewhat knobby tires.
I thought about permanently closing the windows off, but I really do like them in the summer - the extended overhang shades them nicely, and I get an awesome amount of diffuse natural light in here through them - so my solution needs to be removable.

A bunch of measuring later, and I had a plan. I can shove two sheets of 2” thick foamboard (the blue or purple stuff, depending on where you shop) in, with a layer of plywood and some handles to easily remove them. This will offer an insulation value of about R20 (foamboard is pretty reliably R5 per inch), which is an awful lot better than my uninsulated windows.
When I did the foamboard for my walls, I hacked the foamboard into shape with a reciprocating saw. This worked, but the results are ugly. The edges are all torn up, shed foam balls if you touch them, and I simply wasn’t happy with them. Fine for stuff hidden behind plywood that won’t be ever touched again, but I want these plugs to come in and out, and I need some fairly fine precision to get them to seal well - too large, they won’t go in, too loose, and they don’t block any cold air from sneaking past.
After a bunch of research, I found what looked like a good method - and it’s awesome! The trick is to turn a putty knife into a foamboard cutter, and get a long metal guide for cutting. This is, by far, the best way of cutting foamboard I’ve ever found, it makes almost no mess, and I fully suggest doing this if you have any reason to cut foamboard in the future!
You need a stiff putty knife (not the super flexible end ones), a flat file, and a good set of sharpening stones. What you’re doing is building a super sharp foam knife out of a putty knife. You could probably use another long, sharp knife you have laying around, but my wife wouldn’t be a fan of me using the kitchen knives for this, and they’re really not designed for the type of cut you’ll be making. Plus, if you cut all the way through and hit the ground, dulling the large kitchen knife isn’t a great option. So build your own. It’s really easy.
Get a putty knife from your local hardware store, and sit down with the file to give the edge the rough shape you want. For foamboard, you’ll want a fine edge - so a steeper angle and sharper tip than most knives get. If you have a 45 degree angle, it’s not going to cut foamboard well - you want a 15-20 degree angle, tops. I went with a double bevel, but it’s up to you. Again, fine, fine tip. You won’t dull it on the foamboard, and you want it to slice through easily.
Once you have the angle roughed in with a file, get out your sharpening stones. If you don’t have a sharpening stone, the Smith’s Tri-Hone is less than $30 on eBay and is great for things like this. Start with the course stone, and give your new knife a great edge. Start with the course, work down to the fine, and when you’re done, you should have a putty knife with a brutally sharp edge on it. This is not a toy - if you’ve done it right, it’s a properly good little knife!

Mine doesn’t have quite as fine an edge as I’d prefer. I didn’t realize just how much easier that made things. Live and learn (and offer advice so other people can do better). I also picked up a 4’ aluminum measuring stick while I was getting the putty knife - this is the full width of a sheet of plywood or foamboard, and makes cutting easier. You need a guide of some sort for this setup, and a normal yardstick is both too short, and too flexible. A hunk of iron bar would also work well as a guide.

Cutting takes a bit of practice - you want to draw the knife along the cut line at a steep angle (handle back almost against the board while you’re cutting). If you to cut with the knife too close to vertical, it simply won’t cut, or it will crunch up the foam and not give you a good cut. Play around a bit and you’ll find what works (make a few test cuts before you start cutting for real). It does require a good bit of force to cut, so wear good leather gloves and keep kids out of the way - this is not a toddler-friendly project.
If you cut all the way through or most of the way, great - but you don’t actually have to cut all that deep. Cutting halfway or so will get you a score you can break cleanly on (from the back side, slam it over your knee, and it should pop the rest free). If you’re left with a hinge, like this, snap it the other way and you’ll pop the hinge free cleanly.

This is the result of cutting halfway and breaking it - the right side is the smooth cut by knife, and the left side is where it broke along the grain. You can see that the knife cut is radically smoother than anything you’ll get with a serrated blade. I really wish I’d known about this method when I built my office!

With this knife, you can also cut off very fine slices to fine tune the size. This is less than a quarter inch, cut cleanly off one edge. For slices like this, the knife will sink deeper in and you can usually cut all the way through without any trouble (the cut part can move away so there’s less resistance to cutting). I definitely can’t do any work this fine with a saw on foamboard!

Building the Plugs
With my handy new foamboard cutter, cutting out the plugs was very simple - I just cut them to size and trimmed them to fit. There are some vertical 2x4s between the window segments, and I sized the boards so the outer layer of foam would lay over those and help break thermal bridges. The details will depend heavily on your setup, of course. Cut slightly oversize, trim to fit. With the foamboard in place, it definitely blocked the light, but it would be hard to get in and out - and, really, it looks tacky. Time to built some handles on it!

To hold the plugs together (and to hold the plywood base for handles on), I decided to glue the layers together - but I also didn’t want pieces to shift while I was hauling them back to the shipping container to glue. A couple screws, punched through the foamboard, served to pin all the pieces in position relative to one another. I could still pull them apart to get glue in, then clamp them down and keep the alignment perfect.

Plywood Covers, Handles, and Glue
In order to have something solid to attach handles to, I grabbed some thin plywood (1/8”). Nothing fancy, but it’s not that heavy, and is plenty strong enough (especially when glued down) to let me pull these plugs out and store them somewhere (probably my ceiling with magnets, but I haven’t actually gotten that far yet).

You can find great little packs of cabinet handles at your local home improvement store.

The only real downside to these is that the bolt lengths are designed assuming you’re going through a normal cabinet front - which tend to be thick. Not 1/8” plywood. I had to put a bunch of washers on the back so the bolts could actually clamp down and hold things in place. That, of course, meant I had a bunch of washer and bolt sticking out the back of the plywood. A bit of digging with a pocket knife dug out some little holes for the bolts and washers. This is important so the plywood will sit flat on the foam and make a good seal with glue, because the glue is the only thing holding these together.

Make sure the glue you’re using is compatible with foamboard - some of the glues out there will eat foamboard, but most of the better ones are fine. With the handles mounted, I put a bunch of glue between the foamboard layers, and between the plywood and foamboard. Some handy cinderblocks (seriously, these are always useful to have around) serve as the clamp weights, and then it’s just a matter of waiting!

Do the same thing with the end plugs, and they’re ready to install! Three plugs, keeping the sun out, keeping the heat in, and… making greenhouses between the window panes and the insulation. Whoops.

How to Melt Vinyl Windowframes
This worked great - right up until the first really sunny afternoon, at which point I discovered that something had gone very badly wrong. There was… a thing, laying in my window. A very, very warped thing. This is not exactly what I expected to see.

Further investigation revealed that the vinyl window edge molding had quite warped from heat - vinyl softens around 170F or so, and this obviously got soft enough to reform.

Closer inspection didn’t reveal any better news. The frame in the center was pretty badly warped on the inside. You can see the smaller side windows are still intact - they have less sun coming in, so don’t get quite as hot.
Fortunately, the actual window is still intact and solid. It’s just the inside that’s warped. This tells me two things:
- My insulation works really, really well!
- I need to fix this before I put those plugs back in…

Even the foamboard had started to swell up, soften, and puff slightly. It’s not supposed to get that hot. The limit for this sort of board is also in the 170F range, so I assume I was in the 175F+ range (80C, for those of you who prefer that). Way, way too hot. The problem is the sun streaming in - I made a very good greenhouse.

Shed Shutters: Reducing Sunlight
I considered a number of options, and eventually settled on building a movable shutter for the outside. A nautically inclined friend of mine convinced me to design it so I can open it with ropes in the summer, and while I haven’t actually finished that part, it’s designed for it.
I used some 1/2” plywood to build the single shutter. The edges are sealed with Titebond III (a great waterproof glue, and easily found at your local hardware store), then the whole thing is primed and painted with something that’s pretty close to my shed trim (which also needs repainting around the door - I don’t think the trim got properly primed).

My windows stick out from the trim somewhat - so I need spacers to hold the hinges out. Plus, I’m hinging on the outside (so I can swing the shutter up in the summer and get that wonderful ambient light), which means I need yet more gap for the plywood thickness. Fortunately, I now have a lot of plywood laying around in my (soon to be legal) shipping container, so I just built some spacers out of plywood. TiteBond, clamps, some spraypaint, and they’re good!

You can’t buy grey hinges, but you can buy grey spray paint! While it doesn’t perfectly match, I just hosed down the hinges with some spray paint so they look close.
The screws I’m using to hold everything together (at least on the plywood side) are some lath screws. They’ve got super wide heads that mean they’re basically a washer and screw combined. I have no idea if they’re intended to be used for things like this, but they work, and I’m in a very dry climate (look at all that dry dirt below the hinge), so I expect they’ll be fine.

Hanging the shutter solo is a bit tricky, but I worked it out. Threading screws into the spacer blocks first helps a lot. Once two screws are in, it’s easy to line the rest up and get everything secured. The hinges are held in, through the spacers, with 4” long screws. They’re deep into the frame of the shed, and the weak point is definitely not the hinge to shed connection!

Unusually, I’ve got my gate latches facing down. Because the shutter is slightly shorter than the total length of the windows (my goal was to block enough light to avoid melting things, which didn’t require the extra two inches on each side), it’s a long reach on the ends, and it was going to be really difficult to line everything up.
This alignment works fine, and makes it easier to pop the latches open (I can reach them from my step). I don’t know if I’ll leave them like this forever, or eventually change them. One thing I might do is replace the screws with some short bolts - I’m not sure that the screws are quite as tightly secured as I prefer. If I do that, I’ll probably replace one of the screws at the hinge side with a bolt as well.

With the shutter finished, you can see that it blocks most of the sun - and, also, how the low sun would otherwise be streaming straight in my windows. I’m pretty happy with how it looks - not quite stock, but the color matches closely enough that it looks like a factory option - mostly.

I still get a bit of light leakage through the ends (and a bit through the bottom). The shutter isn’t designed to totally block light - just to reduce the light enough that I’m no longer at risk of melting my windows. For that, it works wonderfully!

So, finally, I have my insulation plugs. They block light, keep heat in, and shouldn’t melt my windows as long as I keep the shutter down.
For the summer, I plan to stick a few old hard drive magnets on them and hang them on the ceiling against some iron bars screwed into the plywood. Out of the way, and I don’t have much else hanging from the ceiling yet (just a shop lamp over my lab bench).
How’s the New Insulation Working?
Quite well! It’s been cold this winter (fun with inversions as well), and my office is working fine. I haven’t had any of the brutally cold days from last winter yet, but my office seems a bit easier to heat in the mornings, it runs a bit warmer in the mornings (last winter it was typically 20F above the overnight low, this year it’s running 23-25F warmer unless it’s really windy), and with airflow in the office, my feet are warmer than they were last winter. The floor is still cooler than the rest of the office, but it’s not as bad (so far) as last year. The real test will be if we get the below zero temperatures for a week again - that was rough last winter. Bundle up going to the office, for sure, because it took an awful lot of time to heat up. Hopefully this all helps.
Is it “worth it” in terms of financial savings? Almost certainly not. The under floor foam was $600, and I’ve got around $100 in the plugs and shutter. I burned about $30 of propane last winter, and I’ve definitely not removed all heating requirements, so the payoff period is so long as to be meaningless. But, I didn’t do this for the money savings. I did it to be more comfortable in my office. And that, so far, seems to be working!
Like last winter, heating depends on the quantity of sun available. If it’s forecast to be a sunny day, I’ll heat on electric (actually, I’ll go so far as to turn my Folding@Home box on long before I head out there - sometimes it’s burning power at 5AM). If it’s forecast to be cloudy, or I’m in an inversion, I heat with propane. No point in wasting precious electrons turning them into heat without doing something useful. Occasionally I’m wrong (today I ran the generator for an hour around lunchtime, just before the sun came out for the afternoon), but this mostly works. I’ve got better battery monitoring so I’m more comfortable cycling the batteries hard, but I still try to keep them above 50% charged.
Otherwise, so far, winter is going fine! I’ll see how it is next month, when the really nasty weather usually hits.
Comments
Comments are handled on my Discourse forum - you'll need to create an account there to post comments.If you've found this post useful, insightful, or informative, why not support me on Ko-fi? And if you'd like to be notified of new posts (I post every two weeks), you can follow my blog via email! Of course, if you like RSS, I support that too.


