
One of the most interesting things about my solar powered office is that the entire office is a machine, it’s a very obvious machine, and I don’t have an instruction manual for operation. It’s something I’m learning as I go - and last winter involved an awful lot of learning.
Last winter, I ran my generator a lot, which means I had to refill it a lot. I learned, early, that I lack a gas can suited to filling my generator. All the new EPA legal stuff is awful to actually use (seriously, EPA, consistent gas spills on the ground aren’t better than some gas vapors in the air), and I tended to make a mess with any can I used, because my generator doesn’t let you see the gas level through the strainer, and by the time you can see it, you’ll overfill it by the time the nozzle drains. Annoying, wasteful, and I wanted a better solution for this winter.
An extended run tank solves this problem for the most part, but those kits are seriously expensive - a good chunk of what I paid for my generator. Forget that. They’re simple enough. I built mine for about $35 (I had the tank laying around).

Curious? Keep reading!
Extended Run Fuel Tanks
Filling generators is annoying. Filling generators daily is really annoying. And, conveniently, the new inverter generators make it really easy to attach an extended run tank that will prevent you from having to do this every day. My office requires 3-4 gallons of gas (about 15kWh electrical) to run for a week with nearly no solar input (~300Wh/day grade awful) if I’m in here working. Heat is propane on those dark weeks, but I need the generator to charge the batteries, since my pack is not sized to run a week without sun (no, it wouldn’t make sense to do that, because it would be very expensive and the extra capacity would only be utilized a week or two a year).
Newer inverter generators have a sealing fuel cap - toggle the lever to “on” to vent the cap for running, turn it “off” to seal the whole fuel system up for storage. This is probably to meet EPA/CARB requirements, but it’s also good for keeping the gas fresher (the volatiles can’t just wander off as easily). However, this also means that the fuel system is completely sealed except for the cap - and that’s exactly what the extended run tanks rely on!
Almost all the closed frame inverter generators (Honda, Kipor, etc) have a fuel pump because the bottom of the fuel tank is below the carburetor. I’m quite familiar with mine, having replaced a leaking one last year. This means that they’ll happily pull a vacuum in the tank if the vent is closed (and will stop running quickly) - but it also means you can use that vacuum to suck fuel from an external tank into the generator fuel tank!
An extended run fuel tank is really very simple. It’s a sealed generator fuel cap and a vented external fuel tank with a pickup hose. As the generator pumps fuel from the built in tank, it causes a slight vacuum, which pulls fuel from the external tank. Easy! And seriously cheap to build. All you need is a sealed generator cap, an external fuel tank, and some hose to connect them (and, maybe, a filter or some weights for the pickup end of the hose).
Building the Generator Cap
The biggest cost, for me, was the new generator cap (about $20). If you don’t care, you can just modify your existing generator cap, but I wanted to keep the existing one intact for portable use (camping, house power, etc). While my generator mostly lives around my office, it doesn’t always stay there in the summer.
You’ll have to adapt these instructions to your own style of generator cap, but most newer caps are pretty similar.
Mine is simple enough - there’s a toggle on the top that switches between “on” and “off.” That just refers to what position the slider needs to be in for generator operation vs storage. This is an air vent for the fuel tank, and if you run the generator with the cap in the “off” position, it’ll stop after not particularly long from fuel starvation, and you’ll hear suction when you open the cap.

Flipping it over, there’s a metal dish, a spring, a washer, a cotter pin, and the actual plastic shaft. Remove the cotter pin, and the whole thing pulls apart.

Pull everything out, and you get this collection of parts. My daughter, for some reason, thinks this collection is great fun to play with. She is at the “threading” stage of development, and loves putting the washer and spring on the center shaft, or putting them under the bowl and sliding them around the table. I have no idea why it’s so fun, but I’m not one to complain about her playing with spare generator parts!

The top, with everything off, is pretty simple. An O-ring to seal the cap, and some ramps for the cap - the ramps simply push the cap up slightly when in the “on” position, and it lets air flow through. We’ll soon fix that!

After some measuring and fiddling around at the parts store, I ended up with this handy little adapter. The hose barb fits 1/4” fuel line, and the pipe threads look like they’ll fit my generator cap without much work! This is from AutoZone, but you can find a similar adapter pretty much anywhere. It should run you around $5.

It fits - only barely. And only in the top. Time to cut threads! Which, for a brass adapter and a plastic cap, consists of “Press down, hard, while turning it in.” That works absolutely perfectly for this type of setup - the brass cuts threads into the plastic and digs in, creating a good seal against the threads.

Just in case, though, I coated the second half of the threads with Permatex #2. This is a non-hardening gas resistant sealant that I love as a thread sealant. It maintains a putty-like thickness, so it’s never brittle and prone to cracking. This stuff is great for fuel systems, and I used a good bit of it sealing up my Ford 9N fuel system.

You can see a bit of the sealant around the edge, but it really did just screw all the way in with a bit of force. This is kind of an ideal situation - I didn’t even have to drill the hole out!

On the bottom, there’s a rubber gasket that helps seal everything up. I coated the back of the gasket with #2 as well to help ensure that it holds a good vacuum - I don’t want air leaking past the threads and across the back of the gasket, though that’s pretty unlikely. Just being overkill, as usual…

My Fuel Tank
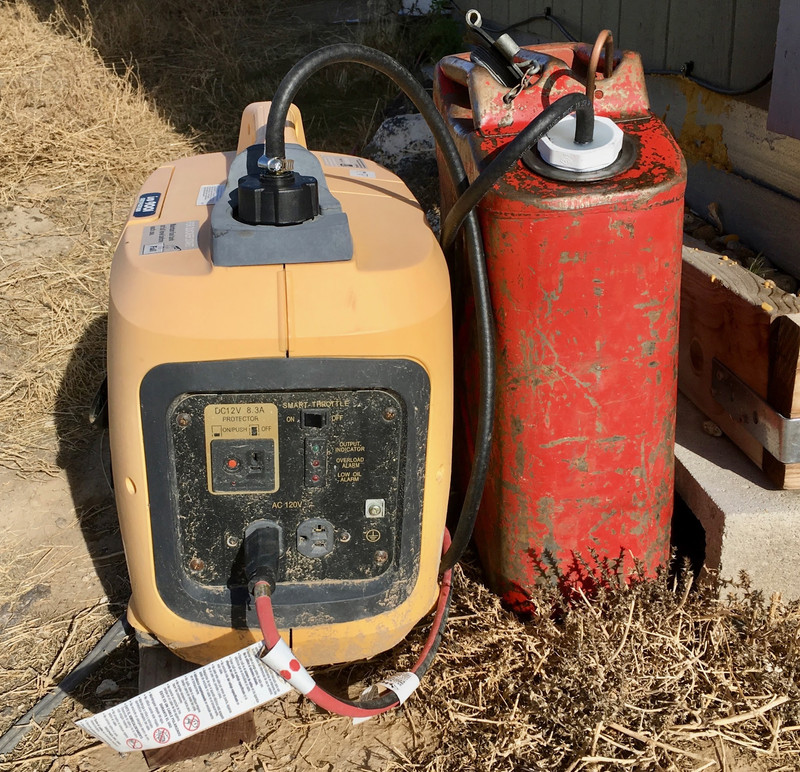
With the generator side cap done, I started on the tank pickup. My extended run tank is an old metal 5 gallon Jerry can I found laying around a relative’s property (I find a lot of useful things there). Old. Metal. Heavy. Solid. Holds gasoline. Good enough for me! The outside is dirty, but the inside is clean enough. I’m still going to put a filter in, just to help in case there is crud floating around. I’m not sure when this was last used, but it has something resembling old gasoline in the bottom. I rinsed it out and filled it - it’s probably fine.

The opening on these is a 2” threaded fitting. It matches the normal PVC pipe threads pretty well, so you can build your own fill spout or extended run adapter out of PVC from your local hardware store, if you care. One thing to be aware of is the vent hole at the top. If you cover this, the tank won’t vent. That’s bad for sucking gasoline out. However, if you leave that open, there’s a good chance that rain will eventually make it in. There’s an easy solution, which I will demonstrate shortly!

Building the Pickup Filter
Whatever you use as your pickup, it has to fit through a 2” opening. So no giant filters.
Given the rather unknown history of my tank, I decided to toss a filter on the pickup end to help keep any debris from making it into the (not-quite-as-good) filter in the generator. A bit of digging around my local auto parts store found this helpful looking filter - which I then proceeded to hack up. Notice that the paper element is secured to the outlet side (the right) - I can remove the entire left side of the case and not have the filter fall out or come unsealed or anything.

So remove I did. A bit of time with a hacksaw, some deliberately uneven cutting to make sure it wouldn’t seal to the bottom of the fuel jug, and I’ve got a pickup! I also cut a few V slits in the bottom to help it feed shortly before I dunked it in the tank.

How do I intend to keep this from floating around in the tank?
Washers! I grabbed a stack of washers from my shed and they help weigh it down so it sinks to the bottom of the gas can.

Building the Tank Cap
I mentioned earlier that the opening in my fuel tank shares threads with normal PVC pipe - so my tank cap is a PVC pipe plug. PVC is generally gasoline resistant, and this cap won’t be immersed in gasoline (normally) - it will only see vapors.
Starting with a 2” PVC pipe cap, I need two holes in it - one for the fuel line, and one for the vent line. I’m closing up the existing vent hole to avoid water infiltration, so I need a vent hole as well - one that won’t collect water or leafcutter bees.

My vent is a chunk of old copper fuel line - this is a left over segment from when I replaced the fuel line on my 1939 Ford 9N tractor. It’s been nice having storage space again - I can keep useful material like this around instead of throwing it out and buying replacements when I need something.

A bit of bending, a bit of drilling, and I have a vent line for my tank! It faces down to avoid water ingress, and the opening is small enough that it should keep the leaf cutters out. I’ll see about that in the summer, though. This tank won’t be sitting outside all summer long - I’ll use the left over gas in other equipment come spring, since I don’t need my generator at all in the summer and I drain the tank.

Another hole through the cap for my 1/4” fuel line (closer to 1/2” outside diameter), and I’m ready to secure stuff in position.

I’ve got multiple of these cans laying around, so I used an empty one to measure the fuel line length - you can see my stack of washers working nicely here to keep things pointing straight down. I sized the line to hold the bottom of the filter just off the bottom of the tank - I accept that I won’t be able to draw 100% of the gas out of the extended tank and I’m perfectly fine with that.

Once I had the lengths set properly, I gooped in some black RTV to help secure the lines - but this still leaves a giant cavity that can fill with water, freeze, and generally be annoying. I don’t want water in there in case the RTV seal isn’t perfect, and I definitely don’t want it freezing and crushing off my fuel lines. That sounds like the kind of problem I just don’t want to deal with on a sub-freezing day.

So, I filled the whole volume of the cap with hot glue! I’ve used hot glue as a filler before - when I built my ebike DC-DC converter to run my headlights form the pack voltage, I used hot glue, and it held up perfectly. So, a bunch of stick of hot glue later, I’ve got a nicely filled cap that should keep water out!

It dries to an opaque white, seals up nicely, and should hold everything in place just about forever!

Final Assembly
I sealed off the stock vent hole with a bit of metal insulation tape I had laying around - this is leftover from taping my office foamboard insulation. I’ve got the replacement vent hole, so this one is just a way for water to get in - no good for winter power generation.
The tank is full of my normal “property blend” of gas - ethanol free premium, with some Stabil and Seafoam thrown in for storage purposes. Not everything I have around requires premium, but enough stuff I run does, and everything will run just fine on ethanol free premium. With the Stabil and Seafoam, it lasts quite a while if sealed up - I don’t worry about the gas until it’s been around for close to a year, and it’s never been a problem.

The new fuel cap screws right in - I got it finger tight and then about half a turn, since it doesn’t need to seal entirely airtight (just keep water out). PVC has slightly tapered threads, so don’t expect it to seat all the way down.

Finally, screw the generator cap on, grab a hose clamp, and secure the fuel line in place!
One downside of this setup is that I don’t have a swivel in the fuel line - it twists up the line pretty badly if I unscrew one end or the other. It’s not a problem for my use, since I’m not constantly unscrewing the fuel lines, but if you do go through a lot of gas, your life will be easier if you just undo the hose clamp to pull one end or the other off for refueling.

The Final Product & Operating Notes
With the whole setup connected, I can go through 5-6 gallons of generator fuel between refills! Less mess, less fuss, and I can just let the generator run without worrying about the fuel level in the generator tank. This simplifies my life, and should mean a lot less spilled fuel (I cannot say enough bad things about EPA legal cans).
Setup is pretty simple. Fill the generator all the way, put some fuel in the extended tank (I typically fill it all the way, though it doesn’t really matter), tighten the hose clamp on the generator cap, and start your generator. The fuel pump will suck fuel out of the generator tank, which will (eventually) suck fuel out of the other tank and into the generator tank, at least until the external tank is empty (or below the pickup level).
Does it work? It certainly seems to! I’ve sucked about 5 gallons through it so far without any problems, and the fuel ends up in my generator (the generator tank level is an inch or two down after the process, but I didn’t prime the fuel line, so that’s reasonable enough). My only caution would be that if you’ve disconnected your oil level sensor (mine is generally disconnected because it doesn’t work properly in the cold), you really need to be up on checking the dipstick on startup. Otherwise, this would make it really easy to run the generator out of oil before it ran out of fuel if it’s burning some oil.
Don’t expect much in the way of efficiency - getting 4.5-5kWh per gallon out of these little generators is about the best you can expect. I need to profile mine properly at some point, but they are not very efficient, sadly. They’re better than a screamer at low loads, but are somewhat worse at higher loads. However, the power is quite clean, and I can’t load up a big generator enough to make it more efficient.

That’s it! Simple, cheap, and works. Don’t waste your money on prebuilt extended run tanks when you can build your own! Plus, I think mine looks cooler.
Comments
Comments are handled on my Discourse forum - you'll need to create an account there to post comments.If you've found this post useful, insightful, or informative, why not support me on Ko-fi? And if you'd like to be notified of new posts (I post every two weeks), you can follow my blog via email! Of course, if you like RSS, I support that too.


